Posts filed under ‘For the sweet tooth’
Forbidden treat-Kavuni Arisi Payasam (Black Rice pudding)
Kavuni Arisi Payasam or Black Rice Pudding is a specialty of the Chettinad region of Tamil Nadu. This gorgeous deep violet hued sweet, is a prominent preparation of most festive fares of the Chettiars.
Kickstarting the festivities with Scandinavian Rosettes and Timbales!
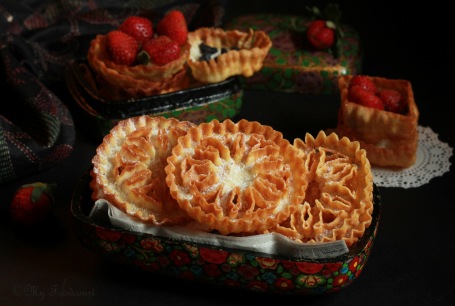
Airy, delicate, melt in your mouth- these deep fried Scandinavian Rosettes and Timbales are a delight to make and eat! Christmas is just around the corner and what better way to kickstart the festivities than these gorgeous, intricately designed cookies & pastry shells which are traditionally made during Christmas!
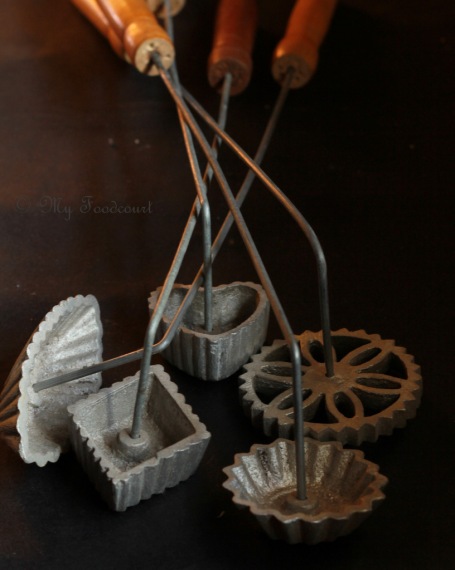
I have been hoarding these special Rosette and Timbale irons/moulds for many many years now. I found them in a hole-in-the –wall shop in Tulshibaugh, Pune (of all the places). I just bought them on a whim, not knowing what they were used for. They made it to my ‘To be used immediately’ list when I found them during one of my recent cleaning sprees.
For the basic pastry,most of the recipes online use the same proportion of Flour,egg and Milk more or less and the batter can be whisked together quickly. I added an extra tablespoon of sugar for the sweet lovers in my house (except me) and a pinch of baking powder (I may skip this next time).

Moulding and deep frying the cookies is a bit tricky and needs some practice as well as patience, if you are a novice. The iron is heated at a high temperature in hot oil, then dipped in the batter so that the batter sticks to it and then re-immersed in the hot oil to create a crisp pastry layer around the iron which can then be taken off with the help of a fork. Just reading this might seem intimidating, but it was easier once I got a hang of it. The Timbales were trickier to take off the iron and to ensure they were fried evenly..
The fried cookies and pastry shells are dusted with Icing sugar to make them sweeter as well as to give them a festive look.
Achapam, the traditional cookies from Kerala are on my list next. They are very similar to the Rosettes but are made using Rice flour.
The Timbales were served filled with fresh fruits. You may also fill them with custard.
Indulge in this pretty deep fried goodness this festive season, here’s how I made them:
Scandinavian Rosettes and Timbales
Servings: I made around 15 Rosettes and 10 assorted Timbales
Ingredients
1 Cup Flour
1 Cup Milk
2 eggs
2 tbsp sugar
¼ tsp baking powder (optional)
½ tsp Vanilla or Almond Extract
Large pinch salt
Any Flavorless oil for deep frying (I used Sunflower)
Icing sugar for dusting
Method
Heat oil in a pan deep enough to fry the cookies.
In a mixing bowl sift the flour. Add the milk, eggs, sugar, extract, salt and Baking powder. Whisk together till all the lumps disappear. (Do not over mix)
Carefully dip the iron in the hot oil for 2-3 minutes. Drain the oil and immediately immerse the iron in the batter just upto the top egde for a few seconds. (You will hear a sizzling sound if the iron is hot enough, once you dip it in the batter) If the batter is over the top, it will be difficult to remove the cookies.
Immerse the iron back in the oil and fry on medium heat, till the cookies are light brown (evenly) in colour. Use a fork to gently push them out of the mould.
Use a slotted spoon to fishout, if the cookies fall off in the hot oil.
Drain them on a paper towel and dust with Icing sugar.
Note: Rosettes as well as the Timbales are best eaten within 1-2 days or being made. To store, keep them layered between sheets of waxed paper in an airtight container preferably in a cooler part of the house.
Share this:

Happy Diwali! and a recipe for Fresh Figs with Lychee Honey – Nut Shrikhand
If you are looking to prepare some non-traditional, quick dessert this Diwali, here’s a refreshing guilt free dessert; Figs with Lychee Honey -Nut Shrikhand.
Dulche de leche & Apple Satori
A can of Homemade Dulche de leche lurking in the fridge got me thinking about this Satori.
Satori is a Maharashtrian sweet flat bread, usually stuffed with Rava and Khoya/Mawa .The stuffed bread is then cooked on a griddle ,drizzled with homemade ghee.
I decided to swap the Dulche de leche for khoya. It’s the season of Apples and Apple pies, so some grated apples and spices were added to the filling. I love the McCormick Apple pie spice mix I bought a few years ago. The warm spices mingled well with the Apple and Dulche De leche stuffing. I made a small test batch of about 7-8 Satoris and they were gone in minutes. I think grated pumpkin should also work in place of Apples.
The Dulche de leche I used was very firm since it was sitting in my refrigerator for quite some time. A filling made with a runny or a sauce like consistency of Dulche de Leche may not be a good idea, since it will be difficult to stuff and roll out the Satori.Take care that it is firm enough.

If you would like to try something different this Diwali, here’s my fusion recipe for
Dulche de Leche & Apple Satori
Ingredients
For the cover
¾ cup Maida
¾ cup fine Rava (Semolina)
Small pinch salt
½ tbsp oil
~1/2 cup water (or more if required)
For the filling
2-3 tbsp Ghee
4 tbsp fine Rava/Semolina
2 Apples,peeled cored and grated (I used 1 Granny Smith and 1 Red Shimla apple)
3-4 tbsp Homemade Dulche de leche
½ tsp Apple pie spice mix (or you can use Cinnamon, Nutmeg, All Spice powder)
Ghee to cook the Satori
Method
For the dough
Boil water with the oil. Cool .
Mix the Maida, Rava and salt in a bowl.
Gradually add the water till it all just comes together.
Knead into a soft pliable dough.
Cover with a kitchen towel and keep aside for half an hour.
To make the filling
Heat the ghee in a pan.
Add the Rava and roast for 2-3 minutes .
Add the grated apples and mix nicely. Add 1-2 tbsp water and cook covered for 3-4 minutes or till the apples are cooked and water evaporates.
Cool slightly. Add in the Dulche de Leche, mix well.
Refrigerate for half an hour.
Pinch off 7-8 balls from the dough. Flatten the ball into a disc.
Roll out the ball a little. Add a tablespoon and half of the stuffing in the centre.
Bring together the edge and Seal it, like you would for a stuffed paratha.
Dust the work surface with a little flour.
Gently Roll out into a ~4 ½ inch disc, taking care that the filling does not come out. Don’t make them very thin.
Cook on medium heat on a hot griddle on both sides, till light brown spots appear.
Repeat this process to make the rest of the Satoris.
These can be cooled and kept in an airtight container at this stage.
When ready to serve, heat them on the griddle, drizzle homemade ghee liberally on both sides and serve.
Share this:

Modur Pulav for Regional Indian Home cooking series#1- a guest post by Anshie of Spice Roots
We are celebrating Nine years of Homestyle cooking at My Foodcourt! I have always been fascinated by the variety of the regional delicacies cooked in Indian homes. When I started blogging, we had a few events like the RCI that showcased regional cooking and which also introduced me to the different delicacies cooked in Indian homes. Instead of hosting an event, I thought of inviting my blogger friends from all over India and the world to share their classic, homestyle recipes.

I haven’t been fortunate enough to experience much of Kashmiri homestyle cooking, so I thought of kick-starting this series on Regional Indian Home cooking, with the heavenly Kashmiri cuisine. When I thought of picturesque Kashmir and its rich cuisine, I thought of my gorgeous friend, Anshie who blogs at Spice roots -where she writes about made from scratch recipes, immersed in spices and stories in order to help making eating home cooked food a lifestyle. I have been eyeing some of her recipes like Monji Hakh or the Monji Achar and plan to make them soon! Anshie was kind enough to accept my invitation instantly and brings to you a celebratory dish Modur Pulav from her homeland.Thank you Anshie for your lovely post, the fabulous recipe and the gorgeous photos.
Dear Readers, Please welcome Anshie and I hope you all enjoy discovering India’s culinary diversity through this series on Regional Indian Home cooking.
_________________________________________________________________________
Hi I am Ansh and I blog at Spiceroots. I write about made from scratch recipes, immersed in spices and stories in order to help making eating home cooked food a lifestyle. I hope to inspire a love for spices & home cooking and through my blog I try to stay connected to my roots.
Madhuli invited me over to be a guest at her cozy, beautiful blog space to celebrate Regional Indian Home cooking. She requested that I make a home style Kashmiri dish to introduce to you all. Since she is celebrating completing NINE years of food blogging, I decided to make a special dish from my home – Modur Pulav or the Sweet Pulav.

In Kashmir, Modur Pulav is how a feast begins. It is served as the first dish in any celebratory meal. Infused with cinnamon, cardamom, cloves and bayleaves, flavored with aromatic saffron; cooked in ghee and sugar and bejeweled with dried fruits and nuts and a heavy dash of peppercorns. The dish looks, feels and tastes celebratory! A little goes a long way, since it is really sweet and since it’s not a main dish.
I wanted this dish to hit all the right notes and though I have cooked the Modur Pulav a few times, I always thought it didn’t taste like my mom’s. So I looked up Anita’s Blog, A Mad Tea Party and found the missing ingredient from my dish. I was cooking it all along without the dried coconut. Once I found the missing link, I made it again and voila! So don’t skimp on the dried fruits and nuts. They are essential to the dish.

What better way to celebrate a friend and her accomplishments than share a treasured recipe from the place I celebrate everyday. I am glad to have connected with Madhuli through social media and her blog. Her love for food is showcased through her pictures and recipes. Thank you for having me over to share your space, Madhuli.
Modur Pulav Recipe:
Equipment – A Medium size pot with a tight fitting lid
Ingredients
2 c basmati rice
6 c water
1/3c Ghee
4 green cardamoms
½ Stick of cinnamon
4 cloves
½ C almonds
1/4 C sliced dried coconut
½ C raisins
4- 6 sliced dates
2 tej patta ( Indian bay leaf)
1 tsp peppercorns
2 C sugar
a big pinch of saffron
a pinch of sugar
3/4 C warm milk
Instructions
Wash the rice until the water runs clear. Drain and keep aside for a few minutes.
While the rice is resting, bring 6 cups of water to a rolling boil in a 5- 6 Qt pot.
Meanwhile, grind the saffron with the pinch of sugar and then add it to the warm milk.
Add in the rice into the boiling water and cook it to al dente (about 5 – 7 minutes) like you would for a biryani.
Drain and keep the rice aside.
Heat the ghee and add in the cloves, peppercorns, cardamom, bay leaves and cinnamon. Saute for a bit and then add in the nuts , dates and raisins. Add in the sugar and then add in the milk with the saffron. Cook until the sugar dissolves and you have a milky sugar syrup.
Using the same 6 qt pot as before, add the rice back into it. Now add the sugar syrup and nut mix into the rice. Stir to combine.
Cover and cook on low heat for 45 min to an hour. Alternately you can bake it in the oven at 350*F for 20 – 25 minutes.

Share this:

9 years and counting!
9 Years! That’s how old My Foodcourt is 🙂
What started as a journal to document heirloom recipes, soon became a passion and now an integral part of my life. Exploring different cuisines,Learning food photography,Cook-alongs,Bake-alongs, food events, Giveaways,some media mentions,blogging Off and On (at my own pace 🙂 ), moving to another space and then moving back – all this happened during these 9 long years.

I have said this before and will say it again- I have been very lucky to meet talented, generous and ever encouraging virtual friends during these years, who now are my friends for life. Some of them I have met in person too. Thank You my food blogger friends as well as readers of My Foodcourt. I am so glad we crossed paths!

Many of my food blogger friends have stopped blogging now. I miss the camaraderie we enjoyed back then, since we were such a close knit group. Not that it doesn’t exist anymore, but the small food blogging group has now become an ocean and it is a pretty difficult to keep up with the happenings.
I also miss posts from my friend Indira of Mahanandi very much. Mahanandi, as I have said earlier was the inspiration to start this blog in the first place. I am so glad that I met Indira few years back when I visited Sugarland. I wish and hope she gets back to blogging soon!

On that Nostalgic note, I would like to share a recipe for a Banana and Date loaf to celebrate these glorious 9 years of my virtual life .
The original recipe is from Lisa’s Lemoy Kitchen . I made a few changes to it. I used part whole wheat and part APF/Maida instead of the spelt flour. Also I reduced the sugar to less that half cup, since I thought 1 cup sugar was too sweet. Also I skipped the pecans,since the little Diva in our house does not like nuts 🙂

I baked 6 mini Banana and Date loaves instead of 1 large loaf and they were gone in no time. This is a great way to use up overripe Bananas.
Here’s the recipe for the Banana and Date loaf
Adapted from Lisa’s Lemoy Kitchen
Makes 6 mini loaves
Ingredients
1 cup All purpose flour(Maida) + ½ cup whole wheat flour
1 teaspoon Baking soda
1 teaspoon salt
200g pitted dates (roughly chopped)
½ cup caster sugar or a little less
2 eggs
½ cup vegetable oil
3 very large ripe bananas (mashed)
1 1/2 teaspoons of vanilla extract
Method
Preheat oven to 180 degC.
Grease and dust the loaf pan or mini pans.
Sift flour and baking soda into a mixing bowl.
Add salt and dates.
Mix to thoroughly coat the nuts and dates.
Use electric mixer, whisk the eggs, sugar and oil until light and creamy.
Add mashed banana and vanilla extract.
Add dry ingredients into the banana batter.
Pour into the loaf/mini pans.
Bake for 50-60 minutes (large pan) or ~15-18 minutes for the mini loaf pans or until skewers comes out clean.

Share this:

Our ‘Mango Summer’ and Mango Curd topped Meringue nests
While you get over your shock of seeing 2 posts on consecutive days here, let me crib a bit more about the heat. It is so..so hot here- No respite whatsoever 😦

The better part though, of the hot Indian summer is the gorgeous bounty of fruits that it offers. The little Diva in our house goes on an ‘all Mango’ Diet and hence we call it our ‘Mango Summer’. Unlike the other fruits, Mangoes don’t need any disguise for her. Wash-peel-eat Mangoes is her ritual for the summer. The peels and pit are not spared either-every last bit of goodness is sucked & licked before getting discarded.

Aamras shows up regularly on the menu and everything from Sheera to Cakes is flavoured with mangoes!We even made Mango Agua Fresca!

Few summers ago, I discovered this gorgeousness called Mango Curd, the tropical cousin of Lemon curd. It is an integral part of our Mango Summer now. ‘We’ use it to Spread, fill, top breads, Rotis, Cakes, Tarts or just lick it from a spoon!
I like to use Alphonso mangoes for the Mango Curd, but I have made it with other varieties too. Some people might think they are overrated , but I looooovvvve Alphonso mangoes the most and so our Mango Curd is made with Alfonso mangoes. You can use any variety you like.
I use this recipe from Smitten Kitchen to make the Mango curd.

If you are in Nasik, there is an organic Farmers market on Kute Marg, behind Sopan hospital. You can buy your box of plump, juicy, organic, naturally ripened mangoes from there.

The egg whites left over from making the mango curd were baked into these airy, crisp meringue nests. A few specs of egg yolk managed to escape into the whites, but the Kitchen Aid whipped them to stiff peaks 🙂
Meringue nests topped with Mango curd and ruby red pomegranate seeds-we have a sweet, spectacular looking dessert!

The mango curd, if you can save it,stays well refrigerated for about a week and the meringues can be baked in advance too.
Mango Curd recipe:
Adapted from Smitten Kitchen
Makes 1 to 1.5 cups
Ingredients
~ 400 gms ripe mangoes, peeled, pitted, cut into 1/2-inch pieces
1/3 cup sugar
3 tablespoons fresh lime juice
4 egg yolks
1/4 cup unsalted butter, cut into small pieces ( I used Amul)
Method
Puree mango, sugar, lime juice and salt in processor, scraping down sides of work bowl occasionally. Add yolks; puree 15 seconds longer.
I did not sieve the curd. You can do that if you have too many strands in the mangoes.
Set metal bowl over saucepan of simmering water (do not allow bottom of bowl to touch water); whisk puree until thickened and thermometer registers 75 deg C, about 10 minutes. Remove from over water. Whisk in butter 1 piece at a time. Cover and refrigerate overnight.
Meringues nests recipe
Makes about 10- 12 nests
4 egg whites
¾ cup caster sugar
Pinch of Cream of tartar (or use few drops of lemon juice and few salt crystals)
Method:
Line two baking sheets with parchment paper.
Preheat the oven to 200 deg C.(if using an OTG heat only the lower element )
Place the egg whites in the bowl of the stand mixer with the whisk attachment.
Add cream of tartar and whisk on medium until frothy.
Whisk on high till soft peaks form.
With the mixer on medium speed, add caster sugar, 1 tbsp at a time and whisk till stiff peaks form
In a piping bag with a star nozzle, fill the stiff egg whites.
Pipe ~ 3” circles, 1-2 “apart from each other on the lined baking sheet.
Pipe two circles atop one another around the edge, to form a nest.
Bake the meringue nests till crisp on the outside but not browned (took about 40-45 minutes for me)
Switch off the oven and keep the meringues in the oven until completely cool
Fill each meringue nest with Mango curd and top with fruits of choice.I have topped them with Pomegranate seeds , kiwi and mango cubes.

Share this:

A Plum post!
The thing that I like most about summers is the bounty of colorful fruits that it offers. Not just mangoes but Jamuns, Litchis,peaches apricots, cherries, plums we have been savoring them all! The lad is a fresh fruit lover and loves snacking on them. The little lady of our house on the other hand is a mango addict but refuses to eat any other fruit. The only way to feed her fruits other than mangoes and bananas is to sneak them in shakes or smoothies.

The gorgeous weather (yes finally it’s raining here!) has increased the frequency of the kids’ hunger pangs. That also means my mind is constantly thinking of recipes to satiate the ever hungry kids with ‘different’ yet wholesome food. (I wonder how my mother managed when we were growing up?)
Litchis went into salads and Granitas when it was warmer. Peaches/apricots in crisps and parfaits.
Plums were a bit tricky to sneak in -since the boy loves tart fruits but no sweets for him. The daughter wont eat tart fruits but loved her sweets.

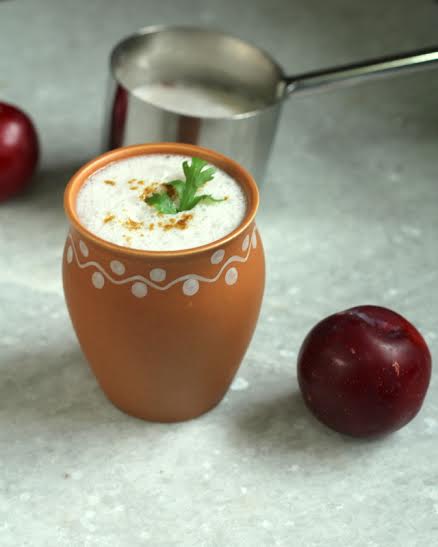
I had some leftover coconut milk from a Thai curry made earlier. On a whim I decided to make Sol Kadhi sans the Sol-The kokum. So you can call this ‘Plum Kadhi’ instead. The end result was as appetizing as the quintessential Maharashtrian favourite Sol Kadhi (have blogged about it here earlier).
Plum Kadhi recipe
Makes ~ 4 cups
Ingredients
1 1/2 cups Coconut milk
~ 2 1/2 cups water
2 Plums pitted and chopped
¼ tsp green chilli paste
¼ tsp garlic paste
Black Salt to taste
Cumin powder and coriander or mint leaves for garnishing
Method
Blend all the ingredients except cumin and coriander/mint leaves together.
Chill and Garnish with cumin powder/coriander/mint leaves.
To satisfy the little on I made Plum Karanji-handpies. I chose to bake instead of deep fry the local favourite sweet Karanji with a Plum twist. A layered cover (also called as Satha/Sathyachya karanjya in Marathi) wherein I substituted half the quantity of all purpose flour with whole wheat flour and filled it with a sweet and sour plum filling. The end result was a stunning (specially when cut), crisp karanji with an unsual sweet -sour taste- almost a cross between a karanji and a hand pie and hence they are Plum Karanji-handpies !

Plum Karanji recipe
Makes ~ 6 Karanjis
Ingredients
For the cover
¾ cup All purpose flour
¾ cup Whole wheat flour
3 tsp fine semolina
4 tbsp ghee melted
2 tsp icing sugar
Pinch of salt
~ ½ cup milk or enough to knead a tight dough
For the filling
7-8 Crisp plums, pitted and chopped
3 tbsp scrapped fresh coconut
2 tbsp crushed/powdered cashewnuts
¼ tsp clove powder
¼ tsp cinnamon powder
~ 6 tbsp powdered jaggery (or to taste)
For layering
4 tsp ghee
2 tsp Cornflour
Cinnamon sugar for dusting (optional)
Method:
For the filling:
In a pan add the plum, coconut and jaggery. Cook on a low flame till the liquid evaporates (~ 4-5 minutes)
Add the cashewnut powder and the spices.
Mix well and cool completely.
For the layering mixture:
Whisk the ghee a few times till it becomes fluffy.
Add cornflour and whisk again.
For the Cover
In the bowl of the food processor add all the cover ingredients except the milk. Pulse 1-2 times
Add the milk slowly till a firm dough is formed. Knead into a ball.
Cover and keep aside for half an hour.
Halfway through the waiting time heat the oven to 180 deg C.
After half hour, cut the dough into 4 equal parts.
Form a ball of 1 dough piece and roll out into a thin circular disc ~ 6 inch diameter
Keep aside, covered.
Roll out the 2nd dough ball to a thin circular disc like a chapati.
Spread about a tsp of the ghee cornflour mixture evenly on the rolled out dough.
Cover this with the rolled out chapatti no 1.
Repeat the with the 3rd and 4th dough ball. Total you have 4 rolled out chapatti like discs layered with the ghee-cornflour mixture.
Put a tsp of the cornflour-ghee mixture on top of the 4th layer.
Make a tight roll of the layered chapattis, like a Swiss roll.

Trim both the edges and cut the rest of the roll into 6 pieces approximately 1 inch each.
Cover the other cut pieces till you roll out and fill the first one
With the cut side down roll out each piece into a circle like a poori
Place 1 tsp of the plum filling in the centre of the poori
Cover one side of the poori with the other into a semicircle-karanji shape.
Seal the ends using a fork or a fluted cutter
Place on a greased baking tray and bake till golden in color (~ 15 mins)
Dust with Cinnamon sugar mixture (optional)
Serve hot
With just 10 days to go for the first Indian Food Bloggers Meet ,the IFBM FB page is abuzz with all the upcoming excitement.There are several contests for participating bloggers being held as a run-up to the actual meet.
I am sending the ‘Plum Kadhi‘ and the ‘Plum Karanji Handpies‘ to the KitchenAid Plum contest
Share this:

{Food Photography} Coconut Barfi revisited
This summer we have been enjoying an unending supply of Coconuts from our garden. The children have been snacking on the tender coconut flesh and the sweet coconut water as a refreshing thirst quencher.

We use coconut in very few preparations and Coconut barfi/Kopri Mithai/Nariyal barfi/Narlachya Vadya happens to be one of them. Both the kids love it and this time it was particularly made as part of the lad’s birthday feast.
I have blogged about the Coconut barfi recipe way back in 2007. It’s the same recipe (my Mother-in-law’s), the only thing that is different in 2012 are the photos. 🙂
My friend Aparna of My Diverse Kitchen is starting a series of photography exercises so that amateur food photographers like me can work on our photography skills. What better way to start the series than Coconut Barfi? Here’s my photo to kick start this fabulous series.
Thank you Aparna for your time, effort and patience. If you would like to join us you have 4 more days to submit your photo- details here .

Equipment & photo details:
Camera : Canon EOS 60D
Lens: Canon 50mm f/1.8 lens
Aperture and Shutter speed :f 2.0 (shutter speed: 1/80s) and 5.6 (shutter speed :1/10s) for the top and bottom photos respectively.
ISO: 100
Share this:

Kesar Phirni
I am not a great fan of sweets, specially the Indian sweets, most of which are way too sweet for my taste. My Husband on the other hand loves sweets .He recently had Kesar Phirni and was raving about it. The little girl shares daddy’s sweet love.

Phirni has been on my to-do list for ages. I found a recipe for ‘Strawberry Phirni’ in Sanjeev Kapoor’s cute booklet ‘Sunday Specials’ . I did not have strawberries at home and so I chose the royal ‘Kesar/Saffrom’ for flavor.

The recipe is very easy and quick (except for the refrigeration time). The only change I would like to make next time is either use a little more rice or use some evaporated milk (milkmaid) while cooking the Phirni. After 5-6 hours of refrigeration the Phirni was still on the ‘runny’ side. I was expecting a pudding like thicker consistency. The taste was fabulous all the same.
I would recommend making it previous night chill and have it next day. Tastes much better.

Here’s the recipe for Kesar Phirni (original recipe: Strawberry Phirni by Sanjeev Kapoor in Sunday Specials )
Ingredients
4 Tablespoons Rice (I used Basmati)
1 Litre milk
¾ cup Sugar
6-8 Almonds (I used readymade Almond flakes)
8-10 Pistachios
Few strands of Kesar/ Saffron
Method
Clean wash and soak the rice in sufficient water for ½ hour.
Drain and grind the rice to a coarse paste. Add ½ cup water to the paste.
Soak Pistachios (and almonds too if using whole) in hot water for 5 mins ; drain, peel and slice finely.
Warm the Kesar/Saffron strands and lightly crush in a small mortar-pestle.
Heat the milk and bring it to a boil.
Stir in the rice paste, lower the heat and cook for 5-6 minutes until the milk thickens, stirring continuously.
Add the sugar and saffron and continue to cook till the sugar dissolves.
Remove from heat, cool to room temperature.
Pour the mixture into earthenware/ ceramic bowls.
Garnish with Pistachios, Almonds, few strands of Kesar.
Chill in the refrigerator for a few hours and serve.


