Posts filed under ‘egg’
Bread boats filled with spinach, eggs & Del Monte Sandwich spread
Bread boats filled with spinach, eggs & Del Monte Sandwich spread is a fun way to serve breakfast. This stuffed bread makes for a perfect Sunday morning breakfast to share with friends and family or a handy on- the- go snack.
Continue Reading October 26, 2016 at 2:08 am Leave a comment
Bake your own Bolillos to make Mexican Tortas!
Tortas make a great meal/snack for a small get-together with family or friends or a kiddie party. Make the different components and let everyone assemble their own sandwiches. This ,a pitcher full of Margarita or Mojito or Sangria (or any other drink) is my version of a homemade Happy Meal!
Back to School with Egg Bhurji Stuffed Pita Pockets
Egg Bhurji stuffed Pita pockets is a great for the kids lunch box or for a lazy weekend brunch or very handy as a meal/snack ‘on-the-go’. You can even involve the kids to make their own lunch/snack.
Kickstarting the festivities with Scandinavian Rosettes and Timbales!
Airy, delicate, melt in your mouth- these deep fried Scandinavian Rosettes and Timbales are a delight to make and eat! Christmas is just around the corner and what better way to kickstart the festivities than these gorgeous, intricately designed cookies & pastry shells which are traditionally made during Christmas!

I have been hoarding these special Rosette and Timbale irons/moulds for many many years now. I found them in a hole-in-the –wall shop in Tulshibaugh, Pune (of all the places). I just bought them on a whim, not knowing what they were used for. They made it to my ‘To be used immediately’ list when I found them during one of my recent cleaning sprees.
For the basic pastry,most of the recipes online use the same proportion of Flour,egg and Milk more or less and the batter can be whisked together quickly. I added an extra tablespoon of sugar for the sweet lovers in my house (except me) and a pinch of baking powder (I may skip this next time).

Moulding and deep frying the cookies is a bit tricky and needs some practice as well as patience, if you are a novice. The iron is heated at a high temperature in hot oil, then dipped in the batter so that the batter sticks to it and then re-immersed in the hot oil to create a crisp pastry layer around the iron which can then be taken off with the help of a fork. Just reading this might seem intimidating, but it was easier once I got a hang of it. The Timbales were trickier to take off the iron and to ensure they were fried evenly..
The fried cookies and pastry shells are dusted with Icing sugar to make them sweeter as well as to give them a festive look.

Achapam, the traditional cookies from Kerala are on my list next. They are very similar to the Rosettes but are made using Rice flour.
The Timbales were served filled with fresh fruits. You may also fill them with custard.
Indulge in this pretty deep fried goodness this festive season, here’s how I made them:
Scandinavian Rosettes and Timbales
Servings: I made around 15 Rosettes and 10 assorted Timbales
Ingredients
1 Cup Flour
1 Cup Milk
2 eggs
2 tbsp sugar
¼ tsp baking powder (optional)
½ tsp Vanilla or Almond Extract
Large pinch salt
Any Flavorless oil for deep frying (I used Sunflower)
Icing sugar for dusting
Method
Heat oil in a pan deep enough to fry the cookies.
In a mixing bowl sift the flour. Add the milk, eggs, sugar, extract, salt and Baking powder. Whisk together till all the lumps disappear. (Do not over mix)
Carefully dip the iron in the hot oil for 2-3 minutes. Drain the oil and immediately immerse the iron in the batter just upto the top egde for a few seconds. (You will hear a sizzling sound if the iron is hot enough, once you dip it in the batter) If the batter is over the top, it will be difficult to remove the cookies.
Immerse the iron back in the oil and fry on medium heat, till the cookies are light brown (evenly) in colour. Use a fork to gently push them out of the mould.
Use a slotted spoon to fishout, if the cookies fall off in the hot oil.
Drain them on a paper towel and dust with Icing sugar.
Note: Rosettes as well as the Timbales are best eaten within 1-2 days or being made. To store, keep them layered between sheets of waxed paper in an airtight container preferably in a cooler part of the house.
Share this:

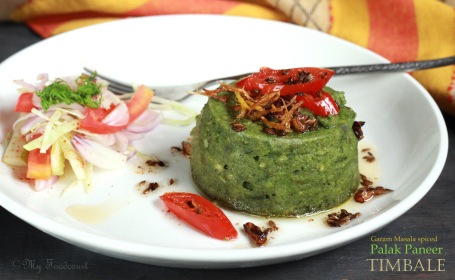
Garam Masala spiced Palak Paneer Timbale
A Timbale is a baked savory custard like dish usually made with meat, cheese, vegetables and eggs. Pasta or rice is sometimes added to the creamy mixture too. This elegant dish can be made almost with any vegetable.
There is a Light up your Diwali contest going on at The Urban spice. We have to create recipes with Spinach ,Egg , Brown Rice, Khoya or Oats as the core ingredient.
I thought of a Spinach Timable which has been on my mind for a while. Currently I am in a ‘fusion food’ creative mode and so the Spinach Timbale turned into a Garam Masala spiced Palak Paneer Timbale :).Two core ingredients Spinach and Eggs are incorporated in this recipe! So,this recipe has been created for The Urban Spice and KitchenAid India Diwali Contest.
Instead of using any Pasta or Rice I preferred using Ragi/Nagli Rava. You can swap this with Semolina or any Millet if you like.
To add a little crunch and flavour, add some finely julienned Ginger as a garnish along with a garlic-Red Chilly flavoured (Tadka) . A simple Kachumber kind of salad served on the side along with the soft creamy Timbale makes for a hearty meal, using day to day ingredients-The humble Palak Paneer Sabji in gourmet avatar! It was super tasty as it is, but you can also serve this with a Tomato gravy if you like. These can be made ahead and baked just when you want to serve them.
Here’s the recipe for my Garam Masala Spiced Palak Paneer Timbale
Serves 2
Ingredients
For the Timbale
1 Tbsp Butter
1 onion, finely chopped
½ tsp garlic paste
½ tsp ginger paste
1 green chilly finely chopped
½-1 tsp Garam Masala
¼ Cup Ragi Rava, soaked in water for 5 minutes
½ Cup Spinach Puree
½ Cup grated or crumbled Paneer
1 egg
2 Tbsp fresh cream (I used Amul)
1 small pinch sugar
Handful of coriander leaves, chopped
Salt to taste
For the Garnish
2-3 Tbsp oil
1 inch Ginger piece,finely julienned
1 tsp Cumin seeds
¼ tsp Asafoetida
2-3 Garlic cloves,sliced
½ fresh Red Chilly sliced
For the Salad/Kachumbar
1 onion, sliced
1 Tomato, sliced lengthwise
A few cabbage shreds
1 Cucumber, sliced lengthwise
Salt and Red chilli powder to taste
1/2 tsp lime juice
Few sprigs of fresh coriander
Method
To make the Timbale
Preheat the oven to 190 degree celcius.
Grease two 175ml/ ¾ Cup Ramekins.
Line the base with a parchment paper and grease the paper.
In a pan heat the butter. Add the onion and the ginger garlic paste.
Saute for 1-2 minutes and then add the green chilly, Garam masala.
Saute for a few seconds and then add the Ragi Rava
Mix properly. Take off the heat.
Add the Spinach puree, Paneer,fresh coriander, Cream,salt and sugar.
Mix well and let the mixture cool a bit.
Whisk the egg and add this to the Spinach mixture.
Spoon the spinach mixture into the ramekins and place in a deep baking tray with tall sides.
Add hot water to the baking tray to come halfway up the sides of the ramekins.
Bake for about 40-45 minutes till just set. (Insert a tester and check if it comes out clean)
Invert onto a plate and peel off the paper.
Serve Hot garnished with the fried Ginger and the Garlic-Chilly oil and the salad on the side.
For the garnish
Heat the oil in a very small pan.
Add the Ginger and fry till crisp.Take it out of the oil and drain on a paper towel.
In the same oil, add the cumin seeds and the Asafoetida.
Add the garlic and fry till golden.
Take off the heat and add the sliced Red chilly
For the Salad/Kachumbar
Mix all the ingredients and serve.
Share this:

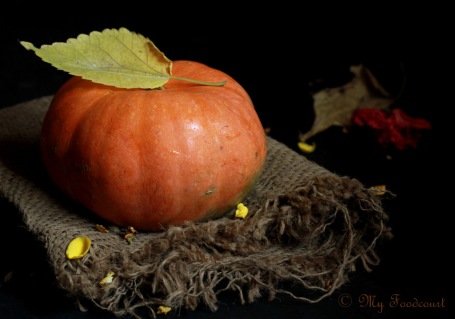
Spiced Pumpkin Bread Rolls – We knead to bake
This is one of the most adorable breads I have baked! These supersoft , flavourful,festive Spiced Pumpkin Bread rolls are just in time for Thanksgiving- whether you celebrate or not 🙂

Aparna aptly chose these for the our monthly bread baking group-We knead to Bake. Thank you Aparna, I had so much fun making them. As gorgeous as they look, they are quiet easy to make.
Apart from looking like mini pumpkins, these rolls use Pumpkin puree too. I followed Aparna’s recipe without making any changes.I made my own pumpkin puree, since canned is not available here. Also I used pumpkin pie spice mix to flavour the rolls, instead of the individual spices. The kitchen smelled heavenly, while the rolls were being baked 🙂
This recipe for the Spiced Pumpkin Bread Rolls is adapted from Beyond Kimchee.I used only the 2 tbsp honey, recommended by Aparna so they were not sweet.

Spiced Pumpkin Bread Rolls
(Adapted from Beyond Kimchee)
Ingredients:
1/3 cup warm milk
2 tbsp honey
2 tsp instant yeast
1/2 cup puréed pumpkin (unsweetened)
40gm butter, melted
1 egg
1 teaspoon salt
2 1/2 to 2 3/4 cups all-purpose flour
1/2 tsp cinnamon
1 tsp powdered dry ginger
1/2 tsp allspice
5 to 6 pecans, sliced into 3 vertical sections
Method:
Pour the warm milk into a bowl. Add the honey and yeast and mix well and leave aside for about 5 minutes until the mixture is starting to look “frothy”.
Put the flour, the salt and the spice powders into a food processor or stand mixer bowl and run a couple of times to mix them well. Then add the yeast mixture, the pumpkin purée, the melted butter and the egg to the processor bowl.
Knead until you have a smooth and elastic dough that will be somewhat sticky. It should pull from the side of the bowl. Add a little more flour (or milk) if required, to obtain this consistency of dough.
Turn the dough out to a wooden board dusted with a little flour and knead by hand for a minute or if using a stand mixer continue to knead on medium speed.
Shape it into a ball and place it in a well-oiled bowl, turning it around to coat it well. Loosely cover and let the dough rise for about an hour or so, until double in volume.
Deflate the risen dough gently to remove large pockets of air and divide it into about 8 or 10 equal sized portions. Shape each portion into a ball. Flatten each ball slightly and using a sharp knife or a pair of scissors make 7-8 cuts at equal distance from each other, from the edge of the ball towards the centre but leaving the centre uncut – like a flower.
Place the dough “flowers” 2” apart on a lightly oiled or parchment lined baking sheet. Loosely cover and let them rise for about 45 minutes. Use your fore finger or the round end of a wooden spoon (dip it in a little oil or flour so the dough doesn’t stick to it) and poke a deep hole in the centre of each “flower” for the pecan “stem”. Brush them with milk (or egg wash if you use it).
Bake the rolls at 180C (350F) for 15 to 20 minutes, or until golden brown. Take them out of the oven and brush the rolls with melted butter or a little honey diluted with water for a shine, if you like that.
Let them cool and then place a sliced pecan piece for the “stem”into the indentation of each roll.
I served them with a hot soup.
Share this:

Spicy Crepe Packets
These Crepe Packets have been on my mind for quite some time. I had seen crepe packets with a fish filling (I think) on a food show on TV some time back. I forgot to note down the recipe and also forgot where I saw it, but the idea kept hovering in my head.

There is an ever hungry lad in my house who, sometimes, needs to be fed every hour! The little lady on the other hand is very very choosy. Finding a balance between their diverse tastes and wants is quite a challenge. One rainy afternoon (yesterday actually 🙂 ) when the kids had a holiday, they pestered me to make something ‘nice & tasty’ and so the crepe packets were made! I am happy to report that these Spicy Crepe Packets got a thumbs up from both of them and both of them thought they were ‘nice & tasty’.

Since I did not remember the recipe I saw, I used a basic crepe recipe. Mushrooms & Corn are loved by the kids in any form. So they went into the filling. The veggies were flavoured with a Cajun spice mix and fresh Oregano from our garden. But as you will see from the recipe, pretty much any seasoning or masala mix or for that matter any filling of your choice should be ok. The lad had the Crepe packets with Sriracha Sauce while the little lady preferred it with Tomato sauce. I thought they were good on their own too.
The crepe packets were accompanied by a glass of Hot Chocolate (made with a Homemade Hot chocolate mix) and the awesome weather !
Participating in food events provides the much needed motivation for me to blog regularly or I just keep posting photographs on My Foodcourt’s FB page or Twitter or Instagram ( If you are not already following me, please do so now 🙂 Thank you)

These Spicy Crepe Packets is my second entry to the Monsoon Snack Recipe Challenge @ The Hub hosted by Archana’s Kitchen
Thanks Archana, the Hub is providing the much needed blogging motivation for me 🙂
Here’s the recipe for Spicy Crepe Packets
Makes ~ 8-9 Crepe packets
Ingredients
For the crepes
½ cup Plain Flour/Maida
¼ Cup Whole wheat Flour
¼ Cup Oat Flour (Ground Instant Oats)
1 Tbsp melted butter or Ghee
2 eggs
½ tsp salt
½ cup milk
~ ¾ cup water (more or less to get a thin consistency batter)
Pinch of baking powder (optional)
For the filling
1 packet button Mushrooms cleaned, stems removed and finely chopped (~ 1 cup chopped mushrooms)
¼ cup Sweet Corn Kernels
1 Onion finely chopped
1 small Bell pepper finely chopped (Red/Yellow or both)
2 Cloves Garlic
2 tsp Cajun Spice mix (I used Spice Supreme)
½ tsp Chilli Flakes
Salt to taste
Grated Cheese as required
Few Fresh or dried Oregano leaves
2 tsp Oil
½ egg for brushing and sealing the crepe packets
3-4 tbsp Ghee or butter for frying the packets
Method
For the filling
Heat Oil in a pan.
Add the Garlic and onion and sauté for few minutes.
Add the corn and cook covered for 4-5 minutes
Add the mushrooms and cook on high flame till the water evaporates (2-3 minutes).
Add the bell peppers and cook 1-2 minutes more.
Add the spice mix, salt, chilli flakes and oregano leaves.
Mix well and keep aside.
For the crepes
Sift the flours, salt and baking powder together.
Blend all the ingredients together in a blender or by hand .The consistency of the batter should be thin. Add more water if required. Sieve to remove any lumps.
Keep the batter aside for ½ hr to 45 mins.
Heat a nonstick pan.
Pour a ladleful of batter and swirl the pan immediately to spread the batter evenly. (I used a 6” non stick pan)
Cook for 30-40 seconds or brown spots just appear on the bottom
Take it out the crepe and place it on a flat surface.
Repeat the procedure for more crepes
To make the crepe packets
Place a crepe, cooked side up on a flat surface.
Place about 1 tbsp filling in the centre. Grate some cheese over it.
Fold 1 side of the crepe over the filling and brush with egg.
Fold the other side and brush again with egg.
Fold the ends to make a packet and press slightly to seal.
Brush with egg on the folded side as well as the other side.
Heat 1 tbsp butter or ghee in the same non stick pan and place the crepe packets, folded side down .
Fry on both sides till brown.
Repeat for other packets.
Serve Hot immediately with Sauce or Chutney of choice.
Share this:

9 years and counting!
9 Years! That’s how old My Foodcourt is 🙂
What started as a journal to document heirloom recipes, soon became a passion and now an integral part of my life. Exploring different cuisines,Learning food photography,Cook-alongs,Bake-alongs, food events, Giveaways,some media mentions,blogging Off and On (at my own pace 🙂 ), moving to another space and then moving back – all this happened during these 9 long years.

I have said this before and will say it again- I have been very lucky to meet talented, generous and ever encouraging virtual friends during these years, who now are my friends for life. Some of them I have met in person too. Thank You my food blogger friends as well as readers of My Foodcourt. I am so glad we crossed paths!

Many of my food blogger friends have stopped blogging now. I miss the camaraderie we enjoyed back then, since we were such a close knit group. Not that it doesn’t exist anymore, but the small food blogging group has now become an ocean and it is a pretty difficult to keep up with the happenings.
I also miss posts from my friend Indira of Mahanandi very much. Mahanandi, as I have said earlier was the inspiration to start this blog in the first place. I am so glad that I met Indira few years back when I visited Sugarland. I wish and hope she gets back to blogging soon!

On that Nostalgic note, I would like to share a recipe for a Banana and Date loaf to celebrate these glorious 9 years of my virtual life .
The original recipe is from Lisa’s Lemoy Kitchen . I made a few changes to it. I used part whole wheat and part APF/Maida instead of the spelt flour. Also I reduced the sugar to less that half cup, since I thought 1 cup sugar was too sweet. Also I skipped the pecans,since the little Diva in our house does not like nuts 🙂

I baked 6 mini Banana and Date loaves instead of 1 large loaf and they were gone in no time. This is a great way to use up overripe Bananas.
Here’s the recipe for the Banana and Date loaf
Adapted from Lisa’s Lemoy Kitchen
Makes 6 mini loaves
Ingredients
1 cup All purpose flour(Maida) + ½ cup whole wheat flour
1 teaspoon Baking soda
1 teaspoon salt
200g pitted dates (roughly chopped)
½ cup caster sugar or a little less
2 eggs
½ cup vegetable oil
3 very large ripe bananas (mashed)
1 1/2 teaspoons of vanilla extract
Method
Preheat oven to 180 degC.
Grease and dust the loaf pan or mini pans.
Sift flour and baking soda into a mixing bowl.
Add salt and dates.
Mix to thoroughly coat the nuts and dates.
Use electric mixer, whisk the eggs, sugar and oil until light and creamy.
Add mashed banana and vanilla extract.
Add dry ingredients into the banana batter.
Pour into the loaf/mini pans.
Bake for 50-60 minutes (large pan) or ~15-18 minutes for the mini loaf pans or until skewers comes out clean.

Share this:

Our ‘Mango Summer’ and Mango Curd topped Meringue nests
While you get over your shock of seeing 2 posts on consecutive days here, let me crib a bit more about the heat. It is so..so hot here- No respite whatsoever 😦

The better part though, of the hot Indian summer is the gorgeous bounty of fruits that it offers. The little Diva in our house goes on an ‘all Mango’ Diet and hence we call it our ‘Mango Summer’. Unlike the other fruits, Mangoes don’t need any disguise for her. Wash-peel-eat Mangoes is her ritual for the summer. The peels and pit are not spared either-every last bit of goodness is sucked & licked before getting discarded.

Aamras shows up regularly on the menu and everything from Sheera to Cakes is flavoured with mangoes!We even made Mango Agua Fresca!

Few summers ago, I discovered this gorgeousness called Mango Curd, the tropical cousin of Lemon curd. It is an integral part of our Mango Summer now. ‘We’ use it to Spread, fill, top breads, Rotis, Cakes, Tarts or just lick it from a spoon!
I like to use Alphonso mangoes for the Mango Curd, but I have made it with other varieties too. Some people might think they are overrated , but I looooovvvve Alphonso mangoes the most and so our Mango Curd is made with Alfonso mangoes. You can use any variety you like.
I use this recipe from Smitten Kitchen to make the Mango curd.

If you are in Nasik, there is an organic Farmers market on Kute Marg, behind Sopan hospital. You can buy your box of plump, juicy, organic, naturally ripened mangoes from there.

The egg whites left over from making the mango curd were baked into these airy, crisp meringue nests. A few specs of egg yolk managed to escape into the whites, but the Kitchen Aid whipped them to stiff peaks 🙂
Meringue nests topped with Mango curd and ruby red pomegranate seeds-we have a sweet, spectacular looking dessert!

The mango curd, if you can save it,stays well refrigerated for about a week and the meringues can be baked in advance too.
Mango Curd recipe:
Adapted from Smitten Kitchen
Makes 1 to 1.5 cups
Ingredients
~ 400 gms ripe mangoes, peeled, pitted, cut into 1/2-inch pieces
1/3 cup sugar
3 tablespoons fresh lime juice
4 egg yolks
1/4 cup unsalted butter, cut into small pieces ( I used Amul)
Method
Puree mango, sugar, lime juice and salt in processor, scraping down sides of work bowl occasionally. Add yolks; puree 15 seconds longer.
I did not sieve the curd. You can do that if you have too many strands in the mangoes.
Set metal bowl over saucepan of simmering water (do not allow bottom of bowl to touch water); whisk puree until thickened and thermometer registers 75 deg C, about 10 minutes. Remove from over water. Whisk in butter 1 piece at a time. Cover and refrigerate overnight.
Meringues nests recipe
Makes about 10- 12 nests
4 egg whites
¾ cup caster sugar
Pinch of Cream of tartar (or use few drops of lemon juice and few salt crystals)
Method:
Line two baking sheets with parchment paper.
Preheat the oven to 200 deg C.(if using an OTG heat only the lower element )
Place the egg whites in the bowl of the stand mixer with the whisk attachment.
Add cream of tartar and whisk on medium until frothy.
Whisk on high till soft peaks form.
With the mixer on medium speed, add caster sugar, 1 tbsp at a time and whisk till stiff peaks form
In a piping bag with a star nozzle, fill the stiff egg whites.
Pipe ~ 3” circles, 1-2 “apart from each other on the lined baking sheet.
Pipe two circles atop one another around the edge, to form a nest.
Bake the meringue nests till crisp on the outside but not browned (took about 40-45 minutes for me)
Switch off the oven and keep the meringues in the oven until completely cool
Fill each meringue nest with Mango curd and top with fruits of choice.I have topped them with Pomegranate seeds , kiwi and mango cubes.

Share this:

We Knead to Bake #26 -Kummelweck Rolls
It’s been 2 months since the ‘Dream machine’ arrived…and I haven’t baked bread for many months now. Ever since the Kitchen Aid arrived, I wanted to use it for Kneading bread dough. We Knead to Bake is in its 26th month and I have missed baking many of the breads. For a while now, I have had an idea brewing in my head to make- to fuse the classic Misal-Pav flavours into a burger. I was being too lazy to try this though. On a whim yesterday, I decided to take care of all the above issues and baked these gorgeous Kummelweck Rolls.

“A Kummelweck (Kimmelweck) Roll is a crusty Roll sprinkled with caraway and coarse salt instead of sesame or poppy seed topping. They are German in origin ,“Kummel” means caraway seeds while “Weck” means roll. In Buffalo in New York, these rolls are used to make a speciality sandwich called the “Beef on Weck”, with thinly sliced rare roast beef and horseradish and it is typically served with fries and a dill pickle. These rolls are great for sandwiches and burgers’.

I made 8 large sized Rolls using the recipe below. The hot weather aided the proofing and I got supersized rolls. I am not sure whether it was the added Vital Gluten, or the Kitchen aid or the recipe itself, but these are one of the best rolls I have baked- Crusty tops and super fluffy inside. Thank you Aparna for this fabulous recipe.
Next time maybe, I will keep the size smaller. Also, I used Shahjeera, instead of Caraway seeds.
I made a Misal Flavoured patty to sandwich between these fluffy buns, along with some sweet and sour mango chutney. To enhance the Misal flavor, I also added a layer of the Onion-Tomato Masala that is served with the Masala Pav . All these elements gelled together in this fabulous Misal Pav burger – as per the family this was one of the best burgers they have had.Recipe for my Misal Pav burger coming up tomorrow.

Here’s the recipe for the Kummelweck/Kimmelweck Rolls
(Adapted from http://www.jewishfood-list.com/recipes/bread/rollskimelweck01.html )
Ingredients:
2 1/2 tsp active dry yeast, I used Instant yeast
1/2 cup warm water
1/2 cup warm milk
2 Tbsp oil
1 tbsp honey
1 egg white (optional)
1 1/2 tsp salt
3 to 3 1/4 cups bread flour*
Egg wash (optional)
Coarse sea salt and caraway seeds (Iused Shahjeera)
Method:
*To substitute for bread flour add 1 tbsp of vital wheat gluten to 2 to 3 cups of all-purpose flour.
Mix together the warm water and the warm milk and stir in the yeast. Let it sit aside for about 5 minutes. Knead by hand or with the machine.
In the bowl of your machine, combine the yeast mixture, oil, honey,the egg white and stir.
Now add the salt and about 2 1/2 cups of flour and knead, adding as much more flour as required till you have a smooth and elastic dough that is tacky but not sticky. Shape the dough into a ball, and place it in an oiled bowl. Cover loosely with cling film and let rise for about an hour, until it is almost double in volume.
Deflate the dough well (not kneading), shape into a round and and allow it to rise, covered, for 30 minutes more.
Divide the dough into 8 equal pieces and shape each into a smooth ball, then slightly flatten it. Place them on lightly greased or parchment lined baking sheets. Spray or lightly brush with oil, loosely cover and let the dough rise for 30 more minutes. Brush with eggwash (or something else that will make sure the topping sticks when baking), then cut slits (like a +) on the top using a sharp blade or scissors.
Sprinkle the top of the rolls with sea salt and caraway seeds, and then mist with water. Bake the rolls at 220C (425F) for 5 minutes and then quickly mist with water again making sure you don’t keep the oven door open for too long.
Bake for another 20 minutes or so until they’re brown and done. Cool on a wire rack. This recipe makes 8 large burger bun sized rolls.


