Posts filed under ‘baking powder’
Kickstarting the festivities with Scandinavian Rosettes and Timbales!
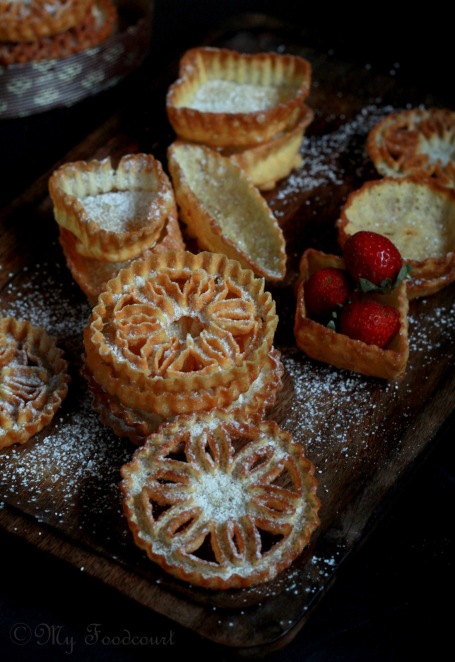
Airy, delicate, melt in your mouth- these deep fried Scandinavian Rosettes and Timbales are a delight to make and eat! Christmas is just around the corner and what better way to kickstart the festivities than these gorgeous, intricately designed cookies & pastry shells which are traditionally made during Christmas!
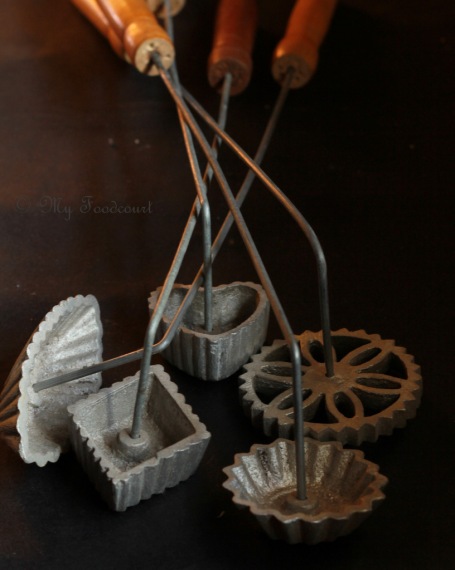
I have been hoarding these special Rosette and Timbale irons/moulds for many many years now. I found them in a hole-in-the –wall shop in Tulshibaugh, Pune (of all the places). I just bought them on a whim, not knowing what they were used for. They made it to my ‘To be used immediately’ list when I found them during one of my recent cleaning sprees.
For the basic pastry,most of the recipes online use the same proportion of Flour,egg and Milk more or less and the batter can be whisked together quickly. I added an extra tablespoon of sugar for the sweet lovers in my house (except me) and a pinch of baking powder (I may skip this next time).
Moulding and deep frying the cookies is a bit tricky and needs some practice as well as patience, if you are a novice. The iron is heated at a high temperature in hot oil, then dipped in the batter so that the batter sticks to it and then re-immersed in the hot oil to create a crisp pastry layer around the iron which can then be taken off with the help of a fork. Just reading this might seem intimidating, but it was easier once I got a hang of it. The Timbales were trickier to take off the iron and to ensure they were fried evenly..
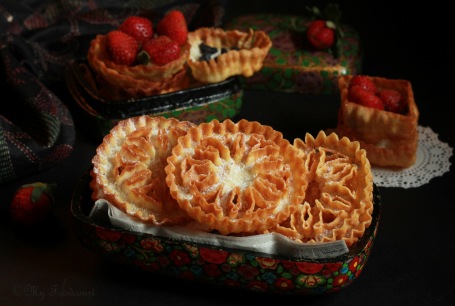
The fried cookies and pastry shells are dusted with Icing sugar to make them sweeter as well as to give them a festive look.
Achapam, the traditional cookies from Kerala are on my list next. They are very similar to the Rosettes but are made using Rice flour.
The Timbales were served filled with fresh fruits. You may also fill them with custard.
Indulge in this pretty deep fried goodness this festive season, here’s how I made them:
Scandinavian Rosettes and Timbales
Servings: I made around 15 Rosettes and 10 assorted Timbales
Ingredients
1 Cup Flour
1 Cup Milk
2 eggs
2 tbsp sugar
¼ tsp baking powder (optional)
½ tsp Vanilla or Almond Extract
Large pinch salt
Any Flavorless oil for deep frying (I used Sunflower)
Icing sugar for dusting
Method
Heat oil in a pan deep enough to fry the cookies.
In a mixing bowl sift the flour. Add the milk, eggs, sugar, extract, salt and Baking powder. Whisk together till all the lumps disappear. (Do not over mix)
Carefully dip the iron in the hot oil for 2-3 minutes. Drain the oil and immediately immerse the iron in the batter just upto the top egde for a few seconds. (You will hear a sizzling sound if the iron is hot enough, once you dip it in the batter) If the batter is over the top, it will be difficult to remove the cookies.
Immerse the iron back in the oil and fry on medium heat, till the cookies are light brown (evenly) in colour. Use a fork to gently push them out of the mould.
Use a slotted spoon to fishout, if the cookies fall off in the hot oil.
Drain them on a paper towel and dust with Icing sugar.
Note: Rosettes as well as the Timbales are best eaten within 1-2 days or being made. To store, keep them layered between sheets of waxed paper in an airtight container preferably in a cooler part of the house.
Share this:

Spicy Crepe Packets
These Crepe Packets have been on my mind for quite some time. I had seen crepe packets with a fish filling (I think) on a food show on TV some time back. I forgot to note down the recipe and also forgot where I saw it, but the idea kept hovering in my head.

There is an ever hungry lad in my house who, sometimes, needs to be fed every hour! The little lady on the other hand is very very choosy. Finding a balance between their diverse tastes and wants is quite a challenge. One rainy afternoon (yesterday actually 🙂 ) when the kids had a holiday, they pestered me to make something ‘nice & tasty’ and so the crepe packets were made! I am happy to report that these Spicy Crepe Packets got a thumbs up from both of them and both of them thought they were ‘nice & tasty’.

Since I did not remember the recipe I saw, I used a basic crepe recipe. Mushrooms & Corn are loved by the kids in any form. So they went into the filling. The veggies were flavoured with a Cajun spice mix and fresh Oregano from our garden. But as you will see from the recipe, pretty much any seasoning or masala mix or for that matter any filling of your choice should be ok. The lad had the Crepe packets with Sriracha Sauce while the little lady preferred it with Tomato sauce. I thought they were good on their own too.
The crepe packets were accompanied by a glass of Hot Chocolate (made with a Homemade Hot chocolate mix) and the awesome weather !
Participating in food events provides the much needed motivation for me to blog regularly or I just keep posting photographs on My Foodcourt’s FB page or Twitter or Instagram ( If you are not already following me, please do so now 🙂 Thank you)

These Spicy Crepe Packets is my second entry to the Monsoon Snack Recipe Challenge @ The Hub hosted by Archana’s Kitchen
Thanks Archana, the Hub is providing the much needed blogging motivation for me 🙂
Here’s the recipe for Spicy Crepe Packets
Makes ~ 8-9 Crepe packets
Ingredients
For the crepes
½ cup Plain Flour/Maida
¼ Cup Whole wheat Flour
¼ Cup Oat Flour (Ground Instant Oats)
1 Tbsp melted butter or Ghee
2 eggs
½ tsp salt
½ cup milk
~ ¾ cup water (more or less to get a thin consistency batter)
Pinch of baking powder (optional)
For the filling
1 packet button Mushrooms cleaned, stems removed and finely chopped (~ 1 cup chopped mushrooms)
¼ cup Sweet Corn Kernels
1 Onion finely chopped
1 small Bell pepper finely chopped (Red/Yellow or both)
2 Cloves Garlic
2 tsp Cajun Spice mix (I used Spice Supreme)
½ tsp Chilli Flakes
Salt to taste
Grated Cheese as required
Few Fresh or dried Oregano leaves
2 tsp Oil
½ egg for brushing and sealing the crepe packets
3-4 tbsp Ghee or butter for frying the packets
Method
For the filling
Heat Oil in a pan.
Add the Garlic and onion and sauté for few minutes.
Add the corn and cook covered for 4-5 minutes
Add the mushrooms and cook on high flame till the water evaporates (2-3 minutes).
Add the bell peppers and cook 1-2 minutes more.
Add the spice mix, salt, chilli flakes and oregano leaves.
Mix well and keep aside.
For the crepes
Sift the flours, salt and baking powder together.
Blend all the ingredients together in a blender or by hand .The consistency of the batter should be thin. Add more water if required. Sieve to remove any lumps.
Keep the batter aside for ½ hr to 45 mins.
Heat a nonstick pan.
Pour a ladleful of batter and swirl the pan immediately to spread the batter evenly. (I used a 6” non stick pan)
Cook for 30-40 seconds or brown spots just appear on the bottom
Take it out the crepe and place it on a flat surface.
Repeat the procedure for more crepes
To make the crepe packets
Place a crepe, cooked side up on a flat surface.
Place about 1 tbsp filling in the centre. Grate some cheese over it.
Fold 1 side of the crepe over the filling and brush with egg.
Fold the other side and brush again with egg.
Fold the ends to make a packet and press slightly to seal.
Brush with egg on the folded side as well as the other side.
Heat 1 tbsp butter or ghee in the same non stick pan and place the crepe packets, folded side down .
Fry on both sides till brown.
Repeat for other packets.
Serve Hot immediately with Sauce or Chutney of choice.
Share this:

A Savory Sweet Punch- Golden Onion Corn Quiche
Managed to get this month’s Sweet Punch challenge made just in the nick of time. Having missed the last month’s challenge, I did not want to miss this one, that too, a savory bake. This month Ria challenged us to a Savory Sweet Punch- Golden onion Quiche.

This month’s challenge seemed quite simple and I had all the ingredients. The moment I saw it I had decided to do it right away instead of the usual last minute rush! I made the Quiche –photographed it- wrote a post about it… all in my mind! 🙂
Everyday I kept thinking there’s still time for the posting date. Shravan festivities made the Quiche schedule take a back seat until finally yesterday I realized that its already the 6th and I had to bake the Quiche ; procrastination still rules here as far as Food events are concerned. Reminds me of my exam days in the college. 🙂 Now I have decided to do the next month’s challenge way ahead of the posting date; and the cycle continues….
Ria wanted us to bake a simple Golden Onion Quiche. Her recipe used Chicken along with the caramelized onions; I substituted that with Sweet corn (I had 2 kgs of Sweetcorn given by a friend waiting to be used up!) and spiced it up with sliced green peppers on top.
I also added some Buckwheat flour which Deeba sent to the Quiche pastry shell. I almost halved the recipe for the filling and this gave me four mini Quiches + a small muffin sized Quiche.
I served The Golden Onion Corn Quiche for dinner along with a red bell pepper soup and some Zucchini crispies! My Quiche crust was a little crumbly, maybe due to the addition of the Buckwheat flour. The caramelized onions paired very well with the sweetcorn in the rich cheesy filling. It is a perfect recipe for a simple weeknight dinner.

Thanks Ria for the lovely recipe, I had great fun (though last minute) doing it!
Here’s the recipe:
Golden Onion Corn Quiche
Ingredients:
For the pastry:
150 gms All Purpose flour/Maida
50 gms Buckwheat Flour
100gms Butter (frozen) (I used salted butter and skipped the addition of salt)
1/4 tsp Baking powder
1 egg beaten
For the filling:
3 medium sized onions chopped
½ cup sweet Corn kernels
½ cup milk
½ cup Cheddar Cheese grated
2 eggs beaten
2 tsp oil
Chopped green chillies/peppers for topping (optional)
Salt and black pepper powder as required
Method:
I first made the filling and then the pastry
For the filling:
Heat oil in a pan.
Add the onions fry till they caramelize.
Add the Sweet corn and fry for another 5-6 minutes.
Take off from the flame.
Slightly cool and mix in the remaining ingredients for the filling except the green chillies if using.
Keep aside and make the pastry shell.
For the pastry:
Preheat the oven to 180oC
Sieve Maida and baking powder together.
Add the Buckwheat Flour.
Grate in the butter and mix it with the flour with your fingertips till it resembles coarse sand.
Add in the beaten egg and gather it into a soft dough. (Use a few drops of ice cold water if does not gather together, I did not need the water)
Roll it out on a lightly floured surface and lift it up carefully and line the tin/tins that you will be baking it in. For mini Quiches roll I made 4 balls of the dough and rolled out each ball separately and then lined the tins.
Press the dough evenly to line the tin for the pastry shell and make sure make sure the dough comes a little way up the sides, so that it can hold the filling.
Pour in the filling in all the pastry cases and top with the green chillies.
Bake in the preheated oven till golden brown. (it took about 35 minutes for me)
Cool in the tin completely and then serve it in wedges.
Drop in here to see some more versions of the lovely Golden Onion Quiche.
Share this:

Tiramisu Cake- A sweet punch
One of my resolutions (?) for the New Year was to explore baking beyond the simple basic cakes and cookies. This also meant an opportunity to try out different recipes from the several cookbooks I own; cookbooks which were just gathering dust on the shelves.Given my hectic schedule and the 6-7 hr daily power out(r)age I was getting nowhere near implementing my resolution.So when Ria, Maria and Divya announced –A Sweet Punch I could not resist the opportunity.
‘A Sweet Punch is a monthly baking event started by Ria, Maria and Divya, to make baking as simple as possible, bringing you a tried and tested recipe every month. It could be either from cookbooks or from other food-blogs.All we need to do is, follow the recipe and create magic!’
The recipe chosen for this month was Tiramisu Cake from Dorie Greenspan’s Baking From My Home To Yours

There were quite a few ‘firsts’ for me:
- This is my first Sweet Punch
- This is my first recipe from Dorie Greenspan’s Baking From My Home To Yours , which I bought months ago from Flipkart
- I made my first batch of Mascarpone at home! I have been eyeing this on blogs and always planned to make it.
The Sweet Punch rule was simple: ‘try to stick to the recipe as far as you can but you can make changes to suit your religious/ dietary requirements’ and I did just that!
I followed the recipe to the tee. The only change I did was to bake a single cake and then cut it into two, instead of the recommended two 9”cakes.
My first try at making Mascarpone was very encouraging and I was quite pleased with the results, moreover it was so simple to make…making me wonder why I did not try this before?
I made the Mascarpone 2 days in advance and the cake a day earlier.
The only problem I faced was, when I mixed the Mascarpone with the other ingredients for frosting it changed its texture (I guessed the heat here was too much to keep the cheese firm, any suggestions to firm up the frosting are pls. welcome). I did not have the time to keep it back in the refrigerator to firm it up so I just poured it on the cake and inbetween the layers and let the frosting drizzle from the sides.

I used mini chocolate chips for the filling and dusted the top with dark Cocoa. I had a small bottle of Amaretto liqueur, which a close relative had gifted us many many years ago (another first) and I am glad I added it to the frosting. The rich burst of flavors from the coffee and the liqueur made the cake almost divine! I am glad I used the entire syrup to soak the cake even if I had some initial doubts.
Thank you Ria, Maria and Divya for the intiative, lovely recipe and most of all for the detailed explanation to make it look so easy and simple!
Here’s the recipe for Tiramisu Cake:
Tiramisu Cake
Baking: From My Home to Yours by Dorie Greenspan
For the cake layers:
2 cups cake flour (I used All purpose flour +Cornstarch)
2 teaspoons baking powder
1/8 teaspoon baking soda
1/4 teaspoon salt
1 1/4 sticks (10 tablespoons) unsalted butter, room temperature
1 cup sugar
3 large eggs
1 large egg yolk
1 1/2 teaspoons pure vanilla extract
3/4 cup buttermilk (I used homemade buttermilk)
For the espresso extract:
2 tablespoons instant espresso powder
2 tablespoons boiling water
For the espresso syrup:
1/2 cup water
1/3 cup sugar
1 tablespoon amaretto, Kahlua, or brandy
For the filling and frosting:
1 8-ounce container mascarpone (store-bought or homemade) (I used 250 gms homemade from the recipe on Deeba’s blog here)
1/2 cup confectioners’ sugar, sifted
1 1/2 teaspoons pure vanilla extract
1 tablespoon amaretto, Kahlua, or brandy
1 cup cold heavy cream
2 1/2 ounces bittersweet or semisweet chocolate, finely chopped, or about 1/2 cup store-bought mini chocolate chips
Chocolate-covered espresso beans, for decoration (optional) (I did not have these so I skipped it)
Cocoa powder, for dusting
Getting ready:
Center a rack in the oven and preheat the oven to 350 degrees F ( I baked at 180 degrees C). Butter two 9×2 inch round cake pans,(I used only 1) dust the insides with flour, tap out the excess, and line the bottoms of the pans with parchment or wax paper. Put the pans on a baking sheet.
To make the cake:
Sift together the cake flour, baking powder, baking soda, and salt.
Working with a stand mixer, preferably fitted with a paddle attachment, or with a hand mixer in a large bowl, beat the butter on medium speed until soft and creamy.
Add the sugar and beat for another 3 minutes. Add the eggs one by one, and then the yolk, beating for 1 minute after each addition. Beat in the vanilla; don’t be concerned if the mixture looks curdled. Reduce the mixer speed to low and add the dry ingredients alternately with the buttermilk, adding the dry ingredients in 3 additions and the milk in 2 (begin and end with the dry ingredients); scrape down the sides of the bowl as needed and mix only until the ingredients disappear into the batter. Divide the batter evenly between the two pans and smooth the tops with a rubber spatula.
Bake for 28 to 30 minutes,( took ~ 45 minutes for me) rotating the pans at the midway point. When fully baked, the cakes will be golden and springy to the touch and a thin knife inserted into the centers will come out clean. Transfer the cakes to a rack and cool for about 5 minutes, then run a knife around the sides of the cakes, unmold them, and peel off the paper liners. Invert and cool to room temperature right-side up.
To make the extract:
Stir the espresso powder and boiling water together in a small cup until blended. Set aside.
To make the syrup:
Stir the water and sugar together in a small saucepan and bring just to a boil. Pour the syrup into a small heatproof bowl and stir in 1 tablespoon of the espresso extract and the liqueur or brandy; set aside.
To make the filling and frosting:
Put the mascarpone, sugar, vanilla, and liqueur in a large bowl and whisk just until blended and smooth.
Working with the stand mixer with the whisk attachment or with a hand mixer, whip the heavy cream until it holds firm peaks. Switch to a rubber spatula and stir about one quarter of the whipped cream into the mascarpone. Fold in the rest of the whipped cream with a light touch.
To assemble the cake:
If the tops of the cake layers have crowned, use a long serrated knife and a gentle sawing motion to even them. Place one layer right-side up on a cardboard round or a cake plate protected with strips of wax or parchment paper. Using a pastry brush or a small spoon, soak the layer with about one third of the espresso syrup. Smooth some of the mascarpone cream over the layer – user about 1 1/4 cups – and gently press the chopped chocolate into the filling. Put the second cake layer on the counter and soak the top of it with half the remaining espresso syrup, then turn the layer over and position it, soaked side down, over the filling. Soak the top of the cake with the remaining syrup.
For the frosting, whisk 1 to 1 1/2 tablespoons of the remaining espresso extract into the remaining mascarpone filling. Taste the frosting as you go to decide how much extract you want to add. If the frosting looks as if it might be a little too soft to spread over the cake, press a piece of plastic wrap against its surface and refrigerate it for 15 minutes or so. Refrigerate the cake too.
With a long metal icing spatula, smooth the frosting around the sides of the cake and over the top. If you want to decorate the cake with chocolate-covered espresso beans, press them into the filling, making concentric circles of beans or just putting some beans in the center of the cake.
Refrigerate the cake for at least 3 hours (or for up to 1 day) before serving – the elements need time to meld.
Just before serving, dust the top of the cake with cocoa.
(Though the cake recipe looks exhaustive it turned out to be quite simple when I actually made it)
Check out the roundup for more scrumptious versions of this cake at A sweet Punch
Share this:

Apricot Prune Tea Cake
Apricot and Prunes make a delicious combination for this light and simple Tea cake .The slight tangy taste of the dried fruits compliments the sweetness of the cake. Prunes and Apricots add a chewy texture to the cake and help to keep the cake moist. We loved the nutty walnut flavour which also added crunch to the cake.
I found the recipe here. I have followed the recipe except that I did not use the ½ tsp salt as suggested. Also I used almost ½ cup of milk instead of ¾ as recommended in the recipe and my baking time was 5-6 minutes over the specified baking time of 55 minutes.
I call it a tea cake instead of the Coffee cake as the original recipe suggests since I am sending it all the way to Goa for the High Tea Treats hosted by Aparna of My Diverse Kitchen.
Thank you Aparna and Meeta for hosting this event; Loved your choice of theme for the Monthly Mingle.

Apricot Prune Tea Cake Recipe
Ingredients:
3/4 cup dried prunes, pitted
3/4 cup dried apricots (or mangos, pears, apples, raisins or other dried fruits)
Boiling water
2 cups plus 1 tablespoon sifted flour, divided
2 teaspoons baking powder
2/3 cup brown sugar (I used Demerara Sugar)
1 teaspoon cinnamon powder
1/4 pound (~1/2 Cup) butter, softened
3/4 cup sugar
2 eggs
½ cup milk
1 teaspoon vanilla
6 tablespoons melted butter
1/3 cup chopped walnuts
1. Cover prunes and apricots (or other dried fruit) with boiling water. Let stand 5 minutes. Drain and chop finely.
2. In small bowl, sift 2 cups flour with baking powder.
3. In another small bowl, combine brown sugar with remaining tablespoon flour and cinnamon. Set aside.
4. Cream butter until fluffy. Add 3/4 cup sugar, mixing well. Add eggs, one at a time, beating until light.
5. At low speed, add flour mixture to butter mixture alternating with milk and vanilla until just blended.
6. Fold in chopped fruit.
7. Pour a third of batter into greased 9-inch tube pan. Spread evenly and sprinkle with a third of brown sugar mixture. Drizzle with a third of melted butter.
8.Repeat for 2 additional layers.
9.Top with chopped Walnuts.
10.Bake in a preheated 180 degree celcius oven for 55 minutes (I took ~60 minutes) or until inserted tester comes out clean.
11.Cool on rack for 10 minutes.
12.Remove cake from pan and return to rack to cool thoroughly.
I already have request from the family to repeat the Apricot Prune Tea cake and that means it was really good! 🙂 My little one loved it and the DH, with an eternal sweet tooth was asking for more! Maybe I can glaze it the next time or maybe even top it with a Chocolate sauce! Will let you know.
Cheers!
Share this:

Jammy Buns
I have been intending to try out this particular recipe for a long time. Lack of time is a major factor that has constrained me from doing so. When Nandita announced ‘Baking for Breakfast’ as the theme for WBB#7 I decided to finally make it.Thanks Nandita for that .Baking is one culinary activity I plan to take up regularly. I am still at the trial stage. That is I still try my baked recipes on others! Thanks to food blogging and events like this I can hone my baking skill! I found this recipe in a lovely book ‘Baking- Simple cookery’, a collection of recipes by a team of experts. (No names on the book) 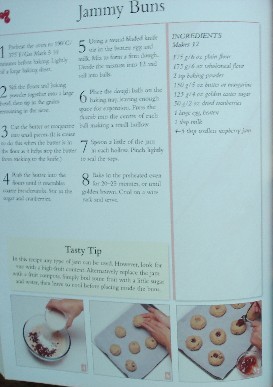
I had most of the ingredients – Wheat flour and Cranberries were the ingredients that tempted me to try out this recipe! And I found it to be very simple for a novice baker like me.
Delicious and crispy Jammy Buns for WBB #7 hosted by the versatile Nandita. 
For 12 Jammy buns
175 g Plain flour (2 cups)
175 g Wheat flour(2 cups)
2 tsp baking powder
150 g butter
125 g caster sugar
50 g dried cranberries(I used orange flavoured)
1 egg beaten
1 tbsp milk
4-5 tbsp mixed fruit jam
The original recipe used golden caster sugar and raspberry jam. I have used white sugar and mixed fruit jam instead. Preheat oven to 190 oC/ 375oF 10 minutes before baking. Lightly oil a baking sheet.Sift the flours along with the baking powder into a bowl.Cut the butter into small pieces. Rub the butter into the flours untill it resembles coarse breadcrumbs.Stir in the sugar and cranberries.Stir in the beaten egg and milk.Mix to form a firm dough. Divide the mixture into 12 and roll into balls.Place the dough balls on the baking tray, leaving enough space for expansion. Press the thumb into the centre of each ball making a small hollow. Spoon a little jam in each hollow. Pinch lightly to seal the tops. Bake in the preheated oven for 20-25 minutes or until golden brown. Cool on wire rack.
Jammy Buns were delicious and turned out to be good for a first attempt. You have to excuse a little rocky shape for my crisp buns since my little one helped me do it. He was down with a severe bout of Dysentry and I had to entertain him!!

Share this:

Marble cake with Cranberries

Some very good reasons prompted me to make this cake:
#- I found dried Orange flavoured Cranberries in the supermarket here. I had never tasted Cranberries before. Many people here don’t even know what are Cranberries. I was one of them! But I am very experimentive with my cooking and hence grabbed the packets of Dried Cranberries as soon as I saw them. ( that too at an offer I couldn’t resist1 pk. Free with the other! J)
#- My niece turns three this week and came down from Mumbai to visit us this weekend. I wanted to bake a cake for her b’day – celebrating in advance. Kids generally like Chocolate flavoured cakes.
#-I had baked a plain Marble cake 2 years ago with one of my very good friend, Deepa’s recipe. My hubby kept on asking me to bake it again (that’s his way of appreciating my food!) But I never got around making it till now!
Dried Cranberries, Chocolate Flavour and hubby’s request all put into one I baked – Marble cake with Cranberries.
(I have lost Deepa’s Marble Cake recipe which I scribbled on a piece of paper. So I just added the ingredients in proportions I faintly recalled J)
250 gm Maida (All purpose flour)
250 gm powdered sugar
250 gm butter (I used Amul)
4 eggs
½ tsp baking powder
3-4 drops Vanilla essence
2 tsp Cocoa powder
1tbsp Milk
¾ cup dried Orange flavoured Cranberries
Sieve Maida and baking powder together. Keep it aside. In a bowl cream the sugar and butter. Beat it in one direction using a cake spatula till light and fluffy. Beat eggs (just 1 spin in the mixer).Add some beaten eggs to the sugar-butter mixture and mix properly. Repeat till all the beaten eggs are mixed properly with the sugar butter mixture. Fold in some sieved Maida and baking powder mix. Repeat for the rest of the Maida. Add milk. The mixture should be of dropping consistency. Adjust the amount of milk accordingly.Add Vanilla essence and mix properly.Add the dried Cranberries and mix. Divide the mixture into two. Keep one portion as it is. To the other half add Cocoa powder and mix well. Grease a round (any shape will do) baking pan, dust it with Maida.Alternatively put 1 spoon of the Vanilla and Cocoa mixture in the pan.Bake it in a preheated oven at 180oC for about 35-40 minutes or till a knife inserted in the cake comes out clean.Cool on a wire rack.

I had three little helpers with me aged :3 yrs, 16 months and 10 months!They could hardly wait to cut the cake. So there was no chance of a photograph before the cake was cut!My little niece has cut this cake and mami’s(aunty’s) Marble Cake with Cranberries was a hit with her.
Have to bake it again next weekend for my dear hubby since he could get only a piece of it-indication that the cake came out really well!
Share this:

Spiced Walnut Ring
Spices are a way of life in India as far as food is considered! A variety of spices are skillfully blended in Indian cuisine not only for the flavor they impart to any dish but also for their health benefits.

This spicy cake is rich in energy, protein and calcium. The spices add that special Indian touch to it.Ginger, Nutmeg as well as Cinnamon all help ease digestion. Walnuts, which are a rich source of omega-3-fatty acids ( help in lowering cholesterol) add extra nutrition and crunch apart from its distinctive flavour.
I found this recipe in ‘Baby and Toddler Food’ by Tarla Dalal. I liked it because it uses Whole wheat flour (a very healthy alternative) to the all purpose flour (Maida), which is usually used to make cakes.
For 1 Mini Ring (8 pieces)
Ingredients:
1 cup whole wheat flour(Atta)
1/2 teaspoon baking powder
1/4 teaspoon ginger powder
1/4 teaspoon nutmeg powder
1/2 teaspoon cinnamon powder (dalchini)
1/2 cup butter, softened
1/4 cup brown sugar
1/4 cup condensed milk
1/3 cup milk
1/4 cup walnuts, chopped
Method: Sieve the flour with the baking powder, ginger powder, nutmeg powder and cinnamon powder. Cream the butter and brown sugar in a bowl till light and fluffy Add the condensed milk, flour mixture, milk and walnuts and mix well. Pour this mixture into a greased 125 mm. (5″) diameter ring mould  Bake in a pre-heated oven at 180°C (360°F) for 30 minutes or until a knife inserted into the cake comes out clean.


My husband loved this cake and I could get only one piece for taste!
Spiced Walnut Ring – my entry for this month’s From My Rasoi hosted by Katherine of Toast Point .
Share this:


