Posts filed under ‘asafoetida’
India’s Best blogger, Khadya Jatra and Khandeshi Cuisine
India’s Best blogger, Khadya Jatra and Khandeshi Cuisine….confused? …read on 🙂
2016 seems to have started on a very positive note! Betterbutter had organized ‘ India’s top blogger contest ‘.To participate we had to Curate a meal for two in a foodbook to make a complete meal. I participated and my foodbook menu included- Meetha Pan spritzer, Mini Thalipeeth Tostadas, Garam Masala spiced Palak Paneer Timbale and Meringue nests topped with Mango curd and fruits. 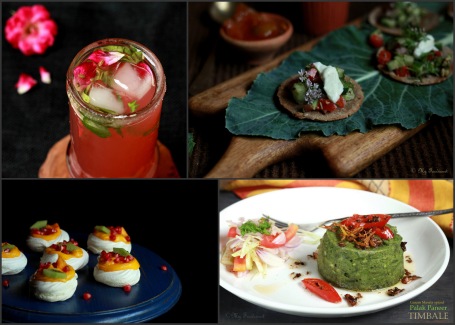
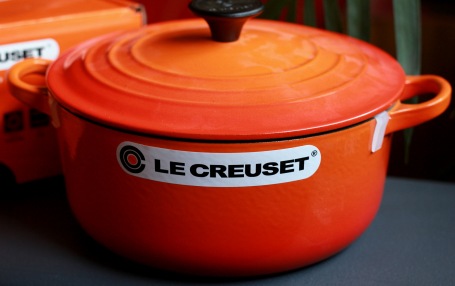
As you must have guessed by now, I won the India’s top blogger contest! The prize is as awesome as the concept & contest- a gorgeous orange coloured Le Creuset Casserole! Thank you again Betterbutter for this!
The recipes are already on the blog or you can check out the foodbook and some of my recipes here on betterbutter.
Khadya Jatra: I wrote this article for a Facebook group initiated by Saee of My Jhola– Angat Pangat, which re-discovers traditional Maharashtrian cuisine. We are starting with a new series on the group called ‘Khadya Jatra’ #APKhafyaJatra ,where a specialist of a particular sub-cuisine of Maharashtra will curate some background information about it and give an authentic recipe with step by step images.Members can then try out the recipe and thus get a chance to learn about the sub-cuisine and recipes.
I am fortunate to be the first ‘specialist’ and Saee invited me to curate some information and a recipe about Khandeshi Cuisine.Thank you Saee for this,I am honoured.
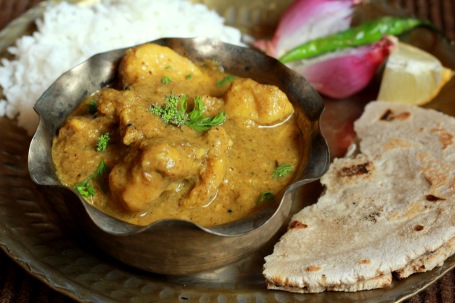
Spicy, fiery gravies with a thick sinful layer of oil floating on top (tarri) -that’s a trademark Khandeshi dish for you!
Nashik (where I stay) borders the Khandesh region (some parts of present Nashik district are part of Khandesh),has a strong influence of the Khandesi cuisine and you can see specialties like Misal and Shev Bhaji dished out at every nook and corner.
The quintessential Kala Masala forms the base of most gravies (rassa) along with dry coconut (khobra), onion and garlic. These are traditionally served with Bhakri or Rice.

Peanuts and peanut oil is also extensively used for cooking. Peanuts, small green lavangi mirchi or fiery Red mirchi, garlic are roasted on an iron griddle or directly on charcoal, pounded in a wooden mortar and pestle (Badgi-musal) to make the famed Thecha. Apart from the staple Jowar Bhakri, Kalnyachi Bhakri- Chutney is very popular with most Khandeshi’s. Kalna is a blend of Jowar + Urad and is served with a spicy peanut chutney.
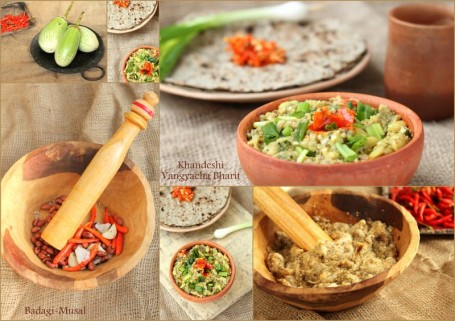
The Khandeshi love for eggplants need not be stressed. Be it Bharit made using large green eggplants (Jalgaoni Vangi) or small eggplants stuffed with kala masala or mashed eggplants (Ghotleli Bhaji), every Khandeshi loves this vegetable! The Ghotleli Bhaji and Dal batti are part of many festivities in most Khandeshi households.
Mande (Khandeshi version of Puran Poli) and Wheat Kheer are the popular sweets from the region.
The hot summers are utilized to make different types of Papads and Vade (Valvan) like the laborious yet rewarding Bibde.
A very popular Khandeshi preparation is Patodyachi (or Patvadya) Bhaji. Rolled out Besan flour dough is cut into strips and cooked in a spicy kala masala gravy. The other lesser known form of this preparation is called ‘Dubuk Vade’. Instead of making strips, dumplings are made from the besan batter and cooked in a similar gravy. I am guessing the name Dubuk comes from the noise it makes when a dumpling is dropped in the gravy-I am not sure of this though 🙂
It is simple, it is spicy, it is fiery, it uses Kalal masala gravy and it is absolutely lip smacking- ticking all the right boxes for typical Khandeshi, homestyle food. I have toned down the heat and oil to suit our taste; you can adjust it to yours.
Here’s the recipe for Dubuk Vade
Recipe serves ~ 3-4 persons
Ingredients
For the Rassa
2 onions, sliced
¼ cup dry coconut, grated (Khobra)
4-5 garlic cloves
Handful of fresh coriander leaves, cleaned and washed
2 teaspoons Kala Masala (or to taste)
1 teaspoon Red chilli powder
½ teaspoon turmeric powder
2+2 tablespoon oil, divided (or more if you like)
2 teaspoon Cumene seeds (jeera)
Salt to taste
Water as required
For the vade (dumplings)
¾ cup Besan, sieved (gram flour)
2-3 garlic cloves, finely minced or grated
½- 1 teaspoon red chilli powder
½ teaspoon turmeric powder
¼ teaspoon asafoetida (hing)
Salt to taste
Method
To make the Rassa
Heat 2 tablespoon oil on an iron griddle or in an iron wok.
Add the onions and garlic and sauté till the onions start browning. Stir so that the onions and garlic are sautéed evenly.
Add the grated coconut and sauté till it just starts browning and starts emitting the aroma.
Add the coriander. Stir around to mix.
Take it off the heat and add the red chilli powder and kala masala.
Mix and cool completely.
Grind the masala, in a blender, using very little water to a smooth paste.
Heat the remaining oil in a saucepan/wok.
Add the cumin seeds.
Once they sizzle, add the ground masala and sauté.
Cook till the water evaporates and the oil starts oozing out, taking care not to burn the masala.
Add sufficient water (about 2 ½ -3 cups) to make a medium consistency gravy.
Season with salt and let the Rassa boil for a few minutes.
Meanwhile make the dumplings
Mix all the ingredients under dumplings. Add water to make a batter of dropping consistency (~ ½ cup)
Drop spoonfuls of the batter in the boiling Rassa, working quickly so that all the dumplings cook evenly. Add little water to the bowl/vessel in which you made the dumpling batter, whisk and add that to the gravy so that it will thicken a bit.
Cook for a few minutes till the dumplings are cooked through (about 8-10 minutes) and the gravy thickens a bit. (add water if it is too thick)
Serve hot with Jowar Bhakri or Rice, with a raw onion and lemon wedge on the side
Note: If you want that layer of oil floating on top, use more oil and chilli powder.
Share this:

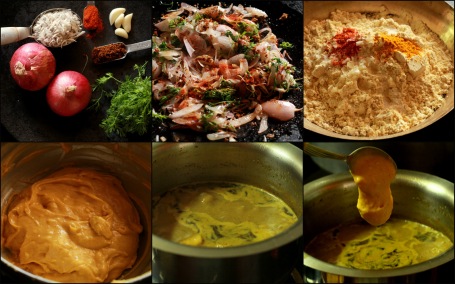
Garam Masala spiced Palak Paneer Timbale
A Timbale is a baked savory custard like dish usually made with meat, cheese, vegetables and eggs. Pasta or rice is sometimes added to the creamy mixture too. This elegant dish can be made almost with any vegetable.
There is a Light up your Diwali contest going on at The Urban spice. We have to create recipes with Spinach ,Egg , Brown Rice, Khoya or Oats as the core ingredient.
I thought of a Spinach Timable which has been on my mind for a while. Currently I am in a ‘fusion food’ creative mode and so the Spinach Timbale turned into a Garam Masala spiced Palak Paneer Timbale :).Two core ingredients Spinach and Eggs are incorporated in this recipe! So,this recipe has been created for The Urban Spice and KitchenAid India Diwali Contest.
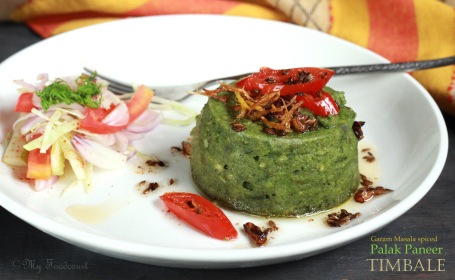
Instead of using any Pasta or Rice I preferred using Ragi/Nagli Rava. You can swap this with Semolina or any Millet if you like.
To add a little crunch and flavour, add some finely julienned Ginger as a garnish along with a garlic-Red Chilly flavoured (Tadka) . A simple Kachumber kind of salad served on the side along with the soft creamy Timbale makes for a hearty meal, using day to day ingredients-The humble Palak Paneer Sabji in gourmet avatar! It was super tasty as it is, but you can also serve this with a Tomato gravy if you like. These can be made ahead and baked just when you want to serve them.
Here’s the recipe for my Garam Masala Spiced Palak Paneer Timbale
Serves 2
Ingredients
For the Timbale
1 Tbsp Butter
1 onion, finely chopped
½ tsp garlic paste
½ tsp ginger paste
1 green chilly finely chopped
½-1 tsp Garam Masala
¼ Cup Ragi Rava, soaked in water for 5 minutes
½ Cup Spinach Puree
½ Cup grated or crumbled Paneer
1 egg
2 Tbsp fresh cream (I used Amul)
1 small pinch sugar
Handful of coriander leaves, chopped
Salt to taste
For the Garnish
2-3 Tbsp oil
1 inch Ginger piece,finely julienned
1 tsp Cumin seeds
¼ tsp Asafoetida
2-3 Garlic cloves,sliced
½ fresh Red Chilly sliced
For the Salad/Kachumbar
1 onion, sliced
1 Tomato, sliced lengthwise
A few cabbage shreds
1 Cucumber, sliced lengthwise
Salt and Red chilli powder to taste
1/2 tsp lime juice
Few sprigs of fresh coriander
Method
To make the Timbale
Preheat the oven to 190 degree celcius.
Grease two 175ml/ ¾ Cup Ramekins.
Line the base with a parchment paper and grease the paper.
In a pan heat the butter. Add the onion and the ginger garlic paste.
Saute for 1-2 minutes and then add the green chilly, Garam masala.
Saute for a few seconds and then add the Ragi Rava
Mix properly. Take off the heat.
Add the Spinach puree, Paneer,fresh coriander, Cream,salt and sugar.
Mix well and let the mixture cool a bit.
Whisk the egg and add this to the Spinach mixture.
Spoon the spinach mixture into the ramekins and place in a deep baking tray with tall sides.
Add hot water to the baking tray to come halfway up the sides of the ramekins.
Bake for about 40-45 minutes till just set. (Insert a tester and check if it comes out clean)
Invert onto a plate and peel off the paper.
Serve Hot garnished with the fried Ginger and the Garlic-Chilly oil and the salad on the side.
For the garnish
Heat the oil in a very small pan.
Add the Ginger and fry till crisp.Take it out of the oil and drain on a paper towel.
In the same oil, add the cumin seeds and the Asafoetida.
Add the garlic and fry till golden.
Take off the heat and add the sliced Red chilly
For the Salad/Kachumbar
Mix all the ingredients and serve.
Share this:

Desi Health Bites- Multigrain Daliya Hot Pot
I am back with another recipe showcasing my love for multi-grains again for the #Fortunehealthbites – Multigrain Daliya Hot Pot . It’s a Hot Pot alright – but a quick, no meat and no bake kind of Hot Pot- unlike the ‘Lancashire Hot Pot’ which inspired me for the basic idea and presentation for this recipe.
Daliya or the broken grains/Lapsi of wheat is the most commonly used in Indian cuisine for making savoury as well as sweet preparations. Jowar and Bajra groats are traditionally used to make ‘Khichada’, a spicy version of the Khichdi.
With the appearance of organic stores in town/online there is a now a variety of Daliyas easily available. My pantry now hosts an array of these nutritious, relatively quick to cook Daliyas .

I have flavoured this Hot Pot with Allspice, just because I have these flavourful leaves growing abundantly in my kitchen garden. The grilled sweet potato garnish adds some crunch to the Multigrain Hot Potmaking it look like a ‘gourmet’ makeover of the humble Khichdi, while still maintaining its ‘Comfort Food’ status.

I had recently switched over from Sunflower to Ricebran oil as per suggestion from my all knowing elder brother 🙂 and then as if on cue, Fortune Foods sent over their Rice Bran Health oil.
Fortune rice bran health oil has a key micronutrient called “oryzanol”, an antioxidant found only in the bran of rice. It helps reduce bad cholesterol,increase good cholesterol and keeps your heart healthy, making it a healthier choice.
Squalene is an organic compound naturally produced by human skin cells and is a natural moisturizer. Fortune Rice Bran Health Oil contains good amounts of it which prevent the ageing of skin.
Antioxidants improve health by fighting free radicals that harm the immune system. Fortune Rice Bran Health oil has natural antioxidants that help build strong immunity.”

“Also I learned that it is a myth that colourless or transparent oils are healthier than dark oils. FRBH is refined optimally to keep all the essential micronutrients intact. It has a darker appearance primarily due to Oryzanol.
It is a myth that colourless or transparent oils are healthier than dark oils. FRBH is refined optimally to keep all the essential micronutrients intact. It has a darker appearance primarily due to Oryzanol.
It is enriched with a gamut of nutrients and is good for heart, immunity, skin and hormones. It is appropriate for people of all ages”
Here’s the recipe for my recipe for the Multigrain Daliya Hot Pot
Multigrain Daliya Hot Pot
Serves 4-5
Ingredients
1 ¾ Cups mixed Daliya (Broken :wheat,jowar,barley,Buckwheat,corn,rice- any or all of these)
¼ cup green moong dal
¾ cup chopped veggies ( Beans,carrots,peas,beetroot,beetgreens,red pumpkin etc..)
1 small onion finely chopped
1 small Tomato chopped
½ tsp grated ginger
2-3 garlic pods crushed (optional)
1-2 Allspice leaves of Bay leaves
Handful of mint leaves torn into pieces or you can use coriander leaves
5-6 cups of vegetable stock/water (for porridge like consistency)
Salt to taste
For the tempering
3 tsp Fortune Rice bran Health oil
2 tsp cumene seeds
2 tsp mustard seeds
½ tsp turmeric powder
½ sp Asafoetida
3-4 dried red chillies torn into pieces
2-3 tbsp peanuts (optional)
For the Hot Pot Topping
2 large Sweet Potatoes sliced
½ tsp crushed black pepper
1 tsp Rock Salt or to taste
7-8 mint leaves torn into pieces
2 tsp Fortune Rice bran Health oil
Juice of ½ a lime
Method
In a bowl Mix the crushed black pepper,rock salt,lime juice,mint leaves & oil.
Pour over the sliced sweet potatoes and rub all over.Keep aside.
Wash the Multigrain Daliya and the green moong dal with water.
In a pressure pan, heat the oil.
Add the mustard seeds and once they crackle add the cumene seeds.
Add the turmeric powder,asafoetida,dry red chillies and peanuts .Stir for minute.
Now add the Allspice/bayleaf and the chopped onion, crushed garlic and grated ginger. Sauté for a minute.
Add the chopped tomato and cook for a few seconds.
Add the veggies next and mix well.
Now add the multigrain Daliya along with the green moong dal. Mix again.
Add ~ 5-6 cups of Vegetable stock or water (for porridge like consistency).
Add salt.Cover and cook for 1 whistle+10-12 mins on SIM or till the Daliya is cooked.
Meanwhile, grill the Sweet potatoes on a griddle pan on the stove top or in the oven ~ 10 minutes on each side- till they are just cooked.
Take out the Hot Multigrain Daliya in a flat bottom serving bowl.
Garnish with the mint leaves.
Top all over with the grilled sweet potatoes and serve hot immediately.
Pomegranate + green onion Raita and roasted Nagli/Ragi papad make great accompaniments for the Multigrain Daliya Hot Pot.

Notes:
If you have the time, soak the mix Daliya and the green moong dal in water for about half an hour. This can reduce the cooking time.
The veggies can be chopped in advance and refrigerated in airtight containers.
Fresh Basil is also a good option as a garnish for the Hot pot instead of Mint or coriander.
This blogpost is in association with Fortune Foods as a part of their Desi Health Bites activity– The Hunt for the Best Rice Bran Oil Recipes. For more updates and healthy recipes using Fortune Rice Bran Health Oil, follow Fortune Foods on Facebook and on Twitter at @fortunefoods
Check out more Desi Health Bites by all the awesome Food Bloggers here at Fortune Food
Share this:

Desi Health Bites – Mini Thalipeeth Tostadas
I love experimenting with different grains and flours. Jowar, Nagli/Ragi,Amaranth, Corn etc.. are pantry staples in my house. Most of the times,I use a blend of these grains for our day-to-day food in the form of khichdis, upmas,dosas.
One such multipurpose, wholesome flour mix is the ‘Thalipeeth Bhajani. This is a pantry staple in every Maharashtrian household.

Bhajani Thalipeeth basically is a quick flat bread made using this multigrain Bhajani mix along with chopped onions,sometimes some chopped fresh or leftover vegetables, fresh coriander, sesame seeds and spices.It is usually served for breakfast with fresh homemade Curd/Yogurt, homemade white butter and/or sweet lime pickle.

My Mom makes her own Thalipeeth Bhajani by roasting – Jowar, Bajra, wheat, Nagli,Rice,Gram dal,Urad dal and cumene , coriander seeds and then milling them together. Needless to say I get my Thalipeeth Bhajani mix readymade from her as and when I am out of stock :). Most supermarkets, grocery stores, health food shops now stock Thalipeeth flour, so it is easily available or see the Quick Mix version given below.
Another favourite item from the Maharashtrian cuisine is ‘Khamang Kakdi’ – cucumber salad tempered with spices and topped with crushed peanuts. I love to add Tomatoes and onion to my Khamang Kakdi.

Both these Classic Maharashtrian favourites, I have combined in a quick modern Appetizer Avatar- Mini Thalipeeth Tostadas, akin to the Mexican Tostadas.

It seems to be a long winded recipe but it uses simple day-to-day ingredients found in most Indian kitchens.With some advance preparation it can be easily put together in under 30 minutes.
I have used Fortune Rice Bran Health Oil for making my Mini Thalipeeth Tostadas.
“Fortune rice bran health oil has a key micronutrient called “oryzanol”, an antioxidant found only in the bran of rice. It helps reduce bad cholesterol,increase good cholesterol and keeps your heart healthy, making it a healthier choice.
Squalene is an organic compound naturally produced by human skin cells and is a natural moisturizer. Fortune Rice Bran Health Oil contains good amounts of it which prevent the ageing of skin.
Antioxidants improve health by fighting free radicals that harm the immune system. Fortune Rice Bran Health oil has natural antioxidants that help build strong immunity”.
“It is a myth that colourless or transparent oils are healthier than dark oils. FRBH is refined optimally to keep all the essential micronutrients intact. It has a darker appearance primarily due to Oryzanol.
It is enriched with a gamut of nutrients and is good for heart, immunity, skin and hormones. It is appropriate for people of all ages”
 Here’s the recipe for my Mini Thalipeeth Tostadas
Mini Thalipeeth Tostadas
Makes about 18-19, 3” round Tostadas
Prep time: 20 mins
Cooking time: ~30 mins including baking time
Ingredients
For the Tostados
2 Cups Thalipeeth flour/Multigrain flour *
1 tsp Ajwain/Carom seeds
2 tsp Sesame seeds
½ tsp Dry red chilli powder (or to taste)
2 tsp Fortune Rice Bran Health Oil
2 Tbsp chopped fresh coriander leaves
¼ tsp garlic paste
½ tsp Asafoetida/hing
Warm water as required (~ ¾-1 cup)
For the topping
1 large cucumber peeled finely chopped
1 large Tomato ,seeds removed & finely chopped
½ onion finely chopped
3 tsp roasted peanuts crushed
2 tsp chopped fresh coriander leaves
½ tsp brown sugar
Salt to taste
For tempering
2 tsp Fortune Rice Bran Health Oil
½ tsp mustard seeds
½ tsp Cumene seeds
5-6 Curry leaves
½ tsp powdered Asafoetida
1-2 green chillies chopped
For the herbed Yogurt/Curd
¾ cup thick Yogurt/curd
2 tsp chopped mint leaves
2 tsp chopped coriander leaves
Rock salt to taste
Method
For the Tostados
Preheat the oven to 170 deg C.
Line a baking sheet with Parchment paper.
Add the flour or flours to a mixing bowl.
Add all the other ingredients except the water.Mix well.
Slowly add the warm water and knead the flours into a stiff but pliable dough.
Transfer the dough to a lightly floured work surface.
Roll out into a thin layer. The layer should be as thin as possible while still workable.
Cut rounds using a 3” cookie cutter/ sharp edge of a small steel Dabba.
Transfer to the prepared baking sheet and bake till they turn golden around the edges – ~15-20 minutes. (Keep an eye on them after about 12 minutes as they burn easily.)
Cool completely on a wire rack.
Note: These can be made well in advance. Can be stored in an air tight container for about 2 weeks.
For the topping-Koshimbir
Mix the cucumber, tomatoes, onions in a bowl.
Add the crushed peanuts, salt,sugar and mix
In a small Kadhai/pan add the oil.
Once hot, add the mustard seeds.
Once the mustard seeds crackle, add the cumene seeds, Asafoetida, curry leaves and green chillies.
Pour this over the Cucumber-tomato-onion mixture in the bowl.
Add the chopped coriander and mix again.
Note: The veggies can be chopped in advance but mix everything just before serving and use immediately
For the Herbed Yogurt/Curd
In a small bowl mix together the Yogurt and the herbs.
Season with Rock salt and mix well.
To Assemble the Mini Thalipeeth Tostadas
Keep the crispy Thalipeeth Tostadas on a large serving plate.
Add 1½- 2 spoonfuls of the Koshimbir Topping.
Top with a dollop of the herbed Yogurt
Serve immediately
Other serving suggestions:
You can use Sweet Lime pickle along with the juice, or a coriander-mint chutney or the Marathi Red/Green Chilly Thecha instead of the herbed Yogurt

*Make your own multigrain Quick Thalipeeth flour mix: ½ cup Wheat flour+ ¼ cup Rice flour+ ¼ cup Ragi/Nagli flour+ ¼ cup Jowar flour+1/4 cup Bajra flour+ ¼ Besan/chickpea/Gram flour+ ¼ cup Urad Dal/Black lentil flour + ½ tsp roasted cumene powder+ ½ tsp coriander seed powder
This blogpost is in association with Fortune Foods as a part of their Desi Health Bites activity– The Hunt for the Best Rice Bran Oil Recipes. For more updates and healthy recipes using Fortune Rice Bran Health Oil, follow Fortune Foods on Facebook and on Twitter at @fortunefoods
Share this:

Hadga/Agasti Flower Bhajias
A very Happy New Year to all of you.

I am back after a looooooong silence on MyFoodcourt. As you can guess the resolution for 2015 is to blog as much I can!
I have been thinking of posting recipes for a long time. The ‘comeback recipe’ for the blog has spanned from Christmas cake to Yule log to Pavlova to a humble porridge-but only in my mind!
A trip to the older part of the city a couple of days back lead me to a treasured discovery- the edible Hadga flowers. I had a faint memory of my childhood ,of my Mom using these flowers for cooking. The lady selling these flowers was kind enough to inform me that I need to remove the bitter tasting stamens from the flowers before cooking them.

A chat with Mom about these flowers and she was nostalgic about how these flowers reminded her of her childhood. (Now you know where my love for these offbeat, treasured foods comes from). Mom said she makes a ‘Pith Perun’ bhaji (stir fry with Besan/chana dal flour).Our house help informed me that you can make sinful Bhajias with these flowers. The dipping mercury made the Bhajias more tempting than the stir fry …and so Bhajias were made. The stir fry has to wait its turn, but I had to blog about these treasured flowers rightaway!
 FB comments on the photo of the flowers and Google research have enlightened me that they are also known as Agasti,Bokful in other Indian languages and also that they are eaten as a vegetable in Southeast Asian countries.

I have used carbonated water just to make the Bhajias crispier- just plain water will be fine too.We enjoyed the crispy Hadga Bhajias sans accompaniment.
Here’s my recipe for
Hadga Flowers Bhajia
Ingredients
8-10 Hadga flowers (the younger flowers are better for Bhajias, but I had to make do with whatever I had)
½ cup Besan/Chana dal Flour
½ cup Rice flour
½ tsp Asafoetida(hing)
½ tsp turmeric powder
½ tsp Red chilli powder
½ tsp Ajawain/carom seeds (optional)
Carbonated (or plain) water to make a the batter
Salt to taste
Oil for deep frying
Method
Heat the oil in a wok.
Remove the stamens from the flowers and keep aside.
Mix the flours, spices, Ajwain and salt in a bowl.
Add 2 tsp of the hot oil to this dry mix.
Add the carbonated water to the dry mix to make the batter (not too thick, not too thin) ~ 1/4 cup
Coat each Hadga flower with the batter and deep fry on medium heat till crisp and lightly browned.
Serve immediately.
Share this:

Ambe Dal
The Mango Mania refuses to leave us. First the tangy green raw mangoes and now the luscious ripe ones. I am still hooked on to the raw mangoes and have been using them in every way I can.

Ambe Dal is a traditional Maharashtrian preparation, specially made during these hot summer days when green Mangoes are abundant. It’s super quick and easy to make (with the exception that you need to soak the dal in advance) and requires just a few easily available ingredients.
The tart raw mangoes are grated and added to coarsely ground soaked chana dal (split Bengal gram). This mixture is then flavoured with a spicy tadka (tempering) of Red chillies, curry leaves and asafoetida . I personally love the flavor of asafoetida .

This cool,tangy-spicy Ambe Dal is served on a banana leaf along with Aam Panha (recipe here)
Here’s the recipe for Ambe Dal
Ingredients
1 cup Chana dal (split Bengal gram) soaked in water for 5-6 hours
½ raw mango, peeled and grated (depending on the tartness the amount can be adjusted)
½ tsp sugar
Salt to taste
For the tadka (tempering)
3tsp oil
½ tsp mustard seeds
½ tsp cumene seeds
5-6 curry leaves
Pinch of asafoetida
1-2 dry Red chillies broken into pieces
Method
Rinse and Drain the soaked Chana dal.
Grind the dal coarsely .
Add the grated mango, salt and sugar .
In a small wok/pan heat the oil.
Add the mustard seeds and once they splutter add the cumene seeds.
Add the curry leaves, asafoetida and the red chillies.
Add this tadka over the Mango Dal mixture and mix nicely .
Cool and serve on a banana leaf along with Aam Panha. I love to ‘cool this dal in the refrigerator for half an hour and then serve.

Share this:

Tomato Saar
Tomato Saar is a quintessential Maharashtrian preparation, also a ‘must have’ dish for most of our festive fares.
Tomato is paired with coconut and then tempered with a few spices to make a sweet-spicy-tangy ‘soup’ usually as an accompaniment to steamed rice, although it can also be served like a soup on its own.

Every Maharashtrian household has a ‘unique’ recipe for Tomato Saar. This recipe is my mom’s and I have followed exactly as she makes it. (I am surprised that after all these years I have missed blogging about it here on My Foodcourt!)
In other news, after my earlier rant about the camera, the DSLR is finally home and being played with. I am still discovering the unlimited features, so you will soon see a lot of my ‘discoveries’ with the same either here on the blog or on the FB page here.

Back to my mom’s recipe for Tomato Saar:
(This makes about 13-14 cups of saar)
Ingredients
9-10 medium sized ripe red tomatoes
3/4th cup fresh grated coconut
2 ½ tsp grated jaggery (or more according to sweetness desired)
½ tsp red chilli powder (optional)
Salt to taste
For the tempering:
2 tsp Ghee/oil (homemade ghee tastes the best)
1 tsp mustard seeds
1 tsp cumene seeds
1/4 tsp asafetida (a pinch)
1-2 dry red chillies broken into pieces
10-12 curry leaves torn into pieces with hand
Chopped coriander leaves for garnishing
Method:
Cook the tomatoes in a pressure pan until soft and they lose their ‘rawness’ (one whistle and then 5 mins on sim)
Meanwhile grind the coconut to a fine paste using little water.
Once the tomatoes are cooked, cool and remove skin and chop off the head.
Grind the tomatoes along with the coconut to a smooth paste. The coconut and tomatoes should blend together.
You can sieve the paste through a mesh at this stage. I like to skip this step and directly use the paste as it is.
Add sufficient water to the paste to bring it to a soupy consistency.
Add the jaggery,salt and chilli powder and bring it to a boil.
In a small pan/kadai, heat the ghee/oil.
Add the mustard seeds.
Add the cumene seeds once the mustard seeds splutter.
Switch off the gas and add the asafetida, curry leaves and the red chillies.
Add this tempering to the saar.
Garnish with fresh chopped coriander leaves and serve with hot rice or just as it is like a soup.

Share this:

Raw Banana cutlets and Mix Friut Chutney for The 4 Velveteers!
I received a bag full of home-grown green/raw bananas from my mother’s backyard last week. I have never actually cooked anything with raw banana. My recipe search led me to this wonderful Raw banana and peas cutlet recipe from Sanjeev Kapoor.

These sinful cutlets made with cooked Raw banana, Green peas and a handful of spices make a very good party starter or a tea tine snack. It does not require any binding and are very easy to shape and fry. I tried a shallow fried version but the original deep fried version tastes better. The cutlets were crisp and crunchy and the raw banana-peas was a super hit ‘made-for each other’ combo. It is a keeper recipe and I am going to make it whenever I can lay my hands on raw bananas, even if it means some sinful-deep fried indulgence!

I made a few changes to the original recipe in the proportions of the ingredients to suit our taste.

I serve the Raw banana and peas cutlet along with a Mix fruit chutney (recipe follows) here for the 4- Velveteers challenge for August.

The 4 Velveteers (started by Pamela, Aparna, Asha, and Alessio) is ‘A food bloggers monthly event spanning the 7 seas. Different cultures,different palates, different backgrounds are the best spices to excite our palates’
I joined the group this month and the lovely Asha of Forkspoonknife challenged us to create a savory dish where fruit(s) play the lead role!
Here’s the recipe for the Raw banana and peas cutlet:
Ingredients:
7-8 green/raw bananas peeled, cubed and pressure cooked till soft
~3/4th cup green peas boiled and mashed
4-5 green chillies finely chopped
½ tsp Red chilli powder
½ tsp Amchur (Raw Mango) powder
1 tsp Garam Masala powder
1/2 tsp grated fresh ginger
Few sprigs coriander leaves, cleaned washed and finely chopped
A pinch of Asafoetida
Salt to taste
Oil for deep frying
Method:
Mash the cooked green bananas.
Take the mashed banana and mashed peas in a mixing bowl.
Add all other ingredients except the oil.
Mix well.
Shape the mixture into round or heart shape cutlets.
Heat oil in a wok.
Deep fry the cutlets till golden brown.
Drain on an absorbent paper.
Serve hot with mix fruit chutney or any sauce of your choice.
Mix fruit Chutney:
This mix fruit chutney was made in an attempt to save the fruits lurking in the fridge which were threatening to rot.

I have used up whatever fruits were available balancing the sweet and sour taste. I knew this would not have passed up as a jam, So to make it more flavourful I added some red chilli powder ,other spices and some refreshing mint leaves. The result was a fabulous Sweet-sour and spicy chutney which can be used as a dip for almost anything. I also had it as a substitute to tamarind chutney in pani puri!
Recipe for Mix fruit chutney:
Ingredients:
2 Golden delicious apples peeled and chopped
4-5 red plums chopped
3-4 canned pineapple rings chopped
5-6 dried figs chopped
5-6 dried apricots chopped
~ 2 candied Indian Gooseberries (Amla)
4-5 dried pitted prunes chopped
1/4th cup raisins
3/4 cup dates (Khajur) chopped
2-3 tsp Red chilli powder
2 tsp Garam Masala
1 tsp Black pepper powder
1 tsp Chaat masala
2tbsp apple cider vinegar
½ cup mint leaves chopped
Salt to taste
Method:
Mix all the fruits fresh as well as dried in a deep pan along with ~1/2 cup of water.
Cook on low heat for 15-20 minutes, stirring in between and adjusting the water as required.
Add the spices, salt and vinegar and cook for another 15- 20 minutes or till all the fruits are mushy and cooked.
Set aside to cool.
Run in a blender along with the mint leaves to a smooth chutney consistency.
Serve with cutlets or chips, puris, crackers or crudities or use as a breadspread!
This chutney refrigerates well for about 1 week.

Please also checkout what the other Velveteers have created:
Aparna : Eggless Vegetable- Nut Loaf with a sweet and spicy Mango Jalapeno sauce
Pamela: Green Papaya Curry
Ken : Skillet Roasted Sweet n Sour Pork
Share this:

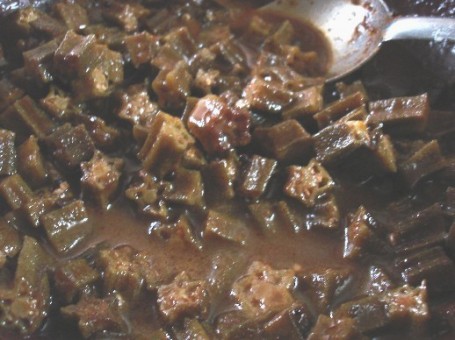
Bendekay (Bhindi/Okra) Gojju
Thank you all of you for your wishes, I am feeling much better now.
South Indian food was restricted to Idli-Sambar-Dosa- chutney- Rasam that was till I got married.
After marriage I learnt so many wonderful recipes from my mother-in-law, not just idli-dosa etc.. but some really nice curries, rice and Rotis.
Ajay’s family hails from Bangalore ;Iyengars settled in Karnataka for generations together (and now he is settled in Maharashtra). It’s a fine blend of Tamilian + Kannadiga cuisine, and now my addition- +Maharashtrian cuisine. So we have some very hybrid recipes cooked in our kitchen!
This is a nice recipe for Bendekay(Bhindi/Okra) Gojju; of course my mother-in-law’s recipe.
Bhindi/ okra is cooked in tamarind pulp along with jaggery and some rasam powder (Malkapudi). It thus has all three tastes; sweet, sour and spicy. This recipe is especially good when you have less amount of Bhindi and more amount of people eating it or when the Bhindi is not very fresh and you need to dress it up! J
Bendekay(Bhindi/Okra) Gojju my second entry to Asha’s RCI Karnataka.
![]()
__________________________________________________________
Bendekay (Bhindi/Okra) Gojju recipe _____________________________________________________ ½ kg Bhindi/okra/ Ladies finger – washed, towel dried, ends removed and chopped into small round discs.~ 1 tbsp tamarind pulp
2 tbsp crushed jaggery
2 tsp Rasam powder (Malkapudi)
¼ tsp asafoetida (hing) crushed
7-8 fresh curry leaves
½ tsp cumene seeds
½ tsp mustard seeds
¼ tsp turmeric powder
2 tsp oil
Salt to taste
Heat oil in a pan.
Do the tadka mustard seeds- cumene seeds- turmeric powder and then the curry leaves and asafoetida.
Add the Bhindi and fry nicely.
Cook for a few minutes and then add the tamarind pulp, jaggery, salt and the Rasam (Malkapudi) powder.
Mix nicely and add little water if the pulp is too thick.
Cook uncovered till the Bhindi is cooked nicely.
Serve hot with Rice of Roti.
Share this:

Kurdai-Gavhacha Cheek-Gavhachya Saalacha Upma for RCI June: Maharashtrian Cuisine!
Translating that title in English is rather difficult so read on…
No Maharshtrian feast is complete without accompaniments such as Papad and Kurdai.
In fact summer is the time the business of making Papads, Kurdais etc..flourishes in many households here.
Kurdai is a delicious snack akin to papads, but made from Wheat. These are usually made during the summer time,sun dried and stored in every household, just like papads and fried whenever required.You need lots of patience and time to make these pearly white, noodle like Kurdais.


Sun-dried Kurdai Deep Fried Kurdai
We usually get these made from someone (usually housewives who run household business making Papads, Masalas and Pickles)- lack of time and laziness being the main reasons. 🙂
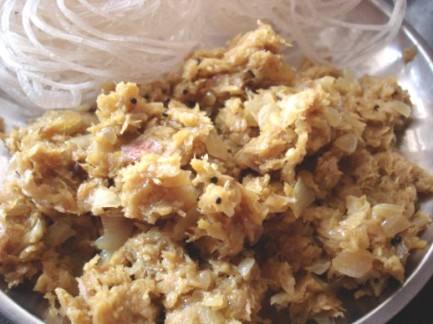
To make Kurdai, Wheat is soaked in water for three days and then finely ground. The milky white extract (it is called as Gavhacha Cheek- Gahu means Wheat and cheek means extract) is separated from the wheat skin.
This milky white extract is then cooked with water to make a soft stiff dough called Ukad, which is inturn passed through a press(Thin Sev press) to get the kurdais. These are then dried and stocked.
The cooked soft dough used to make Kurdai is very tasty by itself- It makes for a delicious, healthy and filling snack. We call it Gavhacha Cheek. I am very fond of this Cheek and even if I don’t make Kurdais at home, I make this Cheek as an evening snack once in a while.The left over Wheat skin (Gavhacha saal; saal means skin) is used for making a scrumptious spicy Upma.
Recipes like these are becoming almost extinct, just like sparrows. Very few households now make these authentic Maharshtrian dishes.
This is my humble attempt to keep the traditional offbeat recipes alive.
Nupur I hope you enjoy these authentic yet offbeat recipes for Gavhacha Cheek and Gavhachya salacha Upma for RCI –Maharshtrian Cuisine

_________________________________________________________ Gavhacha Cheek recipe
Servings :~ 4-5 _____________________________________________________
Ingredients:
5-6 Cups Whole wheat (the older the better)
½ tsp Cumene powder
¼ tsp Asafoetida powder
Salt to taste
1. Soak Wheat in water for 3 days changing the water everyday.
2. After 3 days finely grind the wheat till all the wheat grains are properly crushed and the milky extract separates out.
3. Take some water (about 3-4 cups) in a large vessel and add the crushed wheat to it. Remove the wheat skin with your hands and squeeze tightly so that the milky extract remains in the water and the skin is separated. Repeat this procedure one more time with fresh water –put the skin in another lot of freah water (3-4cups) and squeeze out the extract with your hands.
4. Take a thin fresh clean cotton cloth and filter the extract through it. Use your hand to press the liquid through the cloth.
5. Don’t throw the Wheat skin. Keep it aside.
6. Keep the Milky extract (Cheek) covered overnight.
7. A layer of thin yellowish watery liquid can be seen on the dense White Cheek which is settled at the bottom.Discard the supernatant water and measure the lower dense Cheek using a cup. (You may need a spoon to remove the white cheek since it is quite dense.
8. Boil equal amount of water in a pan and add little salt, cumene powder and Asafoetida.
9. When the water comes to a rolling boil, add the Cheek to it with one hand and stir with a wooden spatula with your other hand, taking care that no lumps are formed.
10. Cook till the milky white cheek becomes translucent. Cover and cook for a few minutes more stirring in between.
11. Serve hot.
12. This can also be served by adding a little sugar and milk on top, but I prefer it as it is.

_________________________________________________________ Gavhachya Salacha Upma recipe
Servings: ~ 3-4 _____________________________________________________
Use the leftover Wheat skin from the Gavhacha Cheek to make this slightly sour and spicy Upma.
Heat oil in a pan. Do the tadka (mustard seeds, cumene seeds, curry leaves, green chillies-in that order). Add some chopped onion and fry till translucent. Add the leftover wheat skin and cook covered for few minutes. Stir this Upma nicely and add little fresh grated coconut. Mix well and let some moisture evaporate.
Garnish with coriander leaves and lime juice (optional). The Upma is already slightly sour so addition of lime juice depends on how sour you like it.
Serve hot.
You can also wrap it in a soft Roti and serve as a Frankie.


