Posts filed under ‘lime juice’
Refried Beans and Mushroom Tostada
These Re-fried beans and Mushroom Tostadas are a perfect representation of the vibrant Mexican food -a riot of flavours, textures and colours.
Bake your own Bolillos to make Mexican Tortas!
Tortas make a great meal/snack for a small get-together with family or friends or a kiddie party. Make the different components and let everyone assemble their own sandwiches. This ,a pitcher full of Margarita or Mojito or Sangria (or any other drink) is my version of a homemade Happy Meal!
Garam Masala spiced Palak Paneer Timbale
A Timbale is a baked savory custard like dish usually made with meat, cheese, vegetables and eggs. Pasta or rice is sometimes added to the creamy mixture too. This elegant dish can be made almost with any vegetable.
There is a Light up your Diwali contest going on at The Urban spice. We have to create recipes with Spinach ,Egg , Brown Rice, Khoya or Oats as the core ingredient.
I thought of a Spinach Timable which has been on my mind for a while. Currently I am in a ‘fusion food’ creative mode and so the Spinach Timbale turned into a Garam Masala spiced Palak Paneer Timbale :).Two core ingredients Spinach and Eggs are incorporated in this recipe! So,this recipe has been created for The Urban Spice and KitchenAid India Diwali Contest.
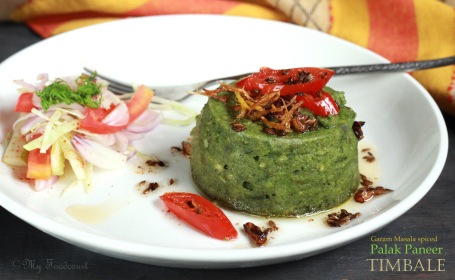
Instead of using any Pasta or Rice I preferred using Ragi/Nagli Rava. You can swap this with Semolina or any Millet if you like.
To add a little crunch and flavour, add some finely julienned Ginger as a garnish along with a garlic-Red Chilly flavoured (Tadka) . A simple Kachumber kind of salad served on the side along with the soft creamy Timbale makes for a hearty meal, using day to day ingredients-The humble Palak Paneer Sabji in gourmet avatar! It was super tasty as it is, but you can also serve this with a Tomato gravy if you like. These can be made ahead and baked just when you want to serve them.
Here’s the recipe for my Garam Masala Spiced Palak Paneer Timbale
Serves 2
Ingredients
For the Timbale
1 Tbsp Butter
1 onion, finely chopped
½ tsp garlic paste
½ tsp ginger paste
1 green chilly finely chopped
½-1 tsp Garam Masala
¼ Cup Ragi Rava, soaked in water for 5 minutes
½ Cup Spinach Puree
½ Cup grated or crumbled Paneer
1 egg
2 Tbsp fresh cream (I used Amul)
1 small pinch sugar
Handful of coriander leaves, chopped
Salt to taste
For the Garnish
2-3 Tbsp oil
1 inch Ginger piece,finely julienned
1 tsp Cumin seeds
¼ tsp Asafoetida
2-3 Garlic cloves,sliced
½ fresh Red Chilly sliced
For the Salad/Kachumbar
1 onion, sliced
1 Tomato, sliced lengthwise
A few cabbage shreds
1 Cucumber, sliced lengthwise
Salt and Red chilli powder to taste
1/2 tsp lime juice
Few sprigs of fresh coriander
Method
To make the Timbale
Preheat the oven to 190 degree celcius.
Grease two 175ml/ ¾ Cup Ramekins.
Line the base with a parchment paper and grease the paper.
In a pan heat the butter. Add the onion and the ginger garlic paste.
Saute for 1-2 minutes and then add the green chilly, Garam masala.
Saute for a few seconds and then add the Ragi Rava
Mix properly. Take off the heat.
Add the Spinach puree, Paneer,fresh coriander, Cream,salt and sugar.
Mix well and let the mixture cool a bit.
Whisk the egg and add this to the Spinach mixture.
Spoon the spinach mixture into the ramekins and place in a deep baking tray with tall sides.
Add hot water to the baking tray to come halfway up the sides of the ramekins.
Bake for about 40-45 minutes till just set. (Insert a tester and check if it comes out clean)
Invert onto a plate and peel off the paper.
Serve Hot garnished with the fried Ginger and the Garlic-Chilly oil and the salad on the side.
For the garnish
Heat the oil in a very small pan.
Add the Ginger and fry till crisp.Take it out of the oil and drain on a paper towel.
In the same oil, add the cumin seeds and the Asafoetida.
Add the garlic and fry till golden.
Take off the heat and add the sliced Red chilly
For the Salad/Kachumbar
Mix all the ingredients and serve.
Share this:

Our ‘Mango Summer’ and Mango Curd topped Meringue nests
While you get over your shock of seeing 2 posts on consecutive days here, let me crib a bit more about the heat. It is so..so hot here- No respite whatsoever 😦

The better part though, of the hot Indian summer is the gorgeous bounty of fruits that it offers. The little Diva in our house goes on an ‘all Mango’ Diet and hence we call it our ‘Mango Summer’. Unlike the other fruits, Mangoes don’t need any disguise for her. Wash-peel-eat Mangoes is her ritual for the summer. The peels and pit are not spared either-every last bit of goodness is sucked & licked before getting discarded.

Aamras shows up regularly on the menu and everything from Sheera to Cakes is flavoured with mangoes!We even made Mango Agua Fresca!

Few summers ago, I discovered this gorgeousness called Mango Curd, the tropical cousin of Lemon curd. It is an integral part of our Mango Summer now. ‘We’ use it to Spread, fill, top breads, Rotis, Cakes, Tarts or just lick it from a spoon!
I like to use Alphonso mangoes for the Mango Curd, but I have made it with other varieties too. Some people might think they are overrated , but I looooovvvve Alphonso mangoes the most and so our Mango Curd is made with Alfonso mangoes. You can use any variety you like.
I use this recipe from Smitten Kitchen to make the Mango curd.

If you are in Nasik, there is an organic Farmers market on Kute Marg, behind Sopan hospital. You can buy your box of plump, juicy, organic, naturally ripened mangoes from there.

The egg whites left over from making the mango curd were baked into these airy, crisp meringue nests. A few specs of egg yolk managed to escape into the whites, but the Kitchen Aid whipped them to stiff peaks 🙂
Meringue nests topped with Mango curd and ruby red pomegranate seeds-we have a sweet, spectacular looking dessert!

The mango curd, if you can save it,stays well refrigerated for about a week and the meringues can be baked in advance too.
Mango Curd recipe:
Adapted from Smitten Kitchen
Makes 1 to 1.5 cups
Ingredients
~ 400 gms ripe mangoes, peeled, pitted, cut into 1/2-inch pieces
1/3 cup sugar
3 tablespoons fresh lime juice
4 egg yolks
1/4 cup unsalted butter, cut into small pieces ( I used Amul)
Method
Puree mango, sugar, lime juice and salt in processor, scraping down sides of work bowl occasionally. Add yolks; puree 15 seconds longer.
I did not sieve the curd. You can do that if you have too many strands in the mangoes.
Set metal bowl over saucepan of simmering water (do not allow bottom of bowl to touch water); whisk puree until thickened and thermometer registers 75 deg C, about 10 minutes. Remove from over water. Whisk in butter 1 piece at a time. Cover and refrigerate overnight.
Meringues nests recipe
Makes about 10- 12 nests
4 egg whites
¾ cup caster sugar
Pinch of Cream of tartar (or use few drops of lemon juice and few salt crystals)
Method:
Line two baking sheets with parchment paper.
Preheat the oven to 200 deg C.(if using an OTG heat only the lower element )
Place the egg whites in the bowl of the stand mixer with the whisk attachment.
Add cream of tartar and whisk on medium until frothy.
Whisk on high till soft peaks form.
With the mixer on medium speed, add caster sugar, 1 tbsp at a time and whisk till stiff peaks form
In a piping bag with a star nozzle, fill the stiff egg whites.
Pipe ~ 3” circles, 1-2 “apart from each other on the lined baking sheet.
Pipe two circles atop one another around the edge, to form a nest.
Bake the meringue nests till crisp on the outside but not browned (took about 40-45 minutes for me)
Switch off the oven and keep the meringues in the oven until completely cool
Fill each meringue nest with Mango curd and top with fruits of choice.I have topped them with Pomegranate seeds , kiwi and mango cubes.

Share this:

Memories of IFBM2014 & The Sparkling Himalayan spritzers
As I watch the rain pouring down outside my window, all I can think of is that the last time it rained this heavily, I was on my way to the first ever Indian Food bloggers meet. Excited and enthusiastic to meet my ‘friends’ the journey from Nasik to Bangalore via Mumbai did not seem as boring . Any apprehensions I had about the IFBM ,were put to rest with the warm ‘Hi’ from Deeba & Sanjeeta, as soon as I stepped into Aranha home, our abode for the next two days. (Thank you Sanjeeta for all your efforts in organising & co-ordinating for our accommodation)That night the residents in & around Aranha home had to bear with some very high decibel , nonstop banter intercepted only by fits of nonsensical laughter, from a bunch of mad Food bloggers. The last time I had such a hilarious time was when I stayed in a hostel during my Masters. We also managed to squeeze in a late night trip to Adigas for the famous filter Kappi.

Even the heavy Bangalore traffic did not dampen our spirits as we maneuvered our way to Adiyar Anand Bhavan for an early morning breakfast –both days I had crisp Dosa accompanied with an array of chutney’s. I specially loved the Curry leaf chutney.
After exchanging pleasantries with the ever helpful and courteous staff of the stunning Aloft Hotel Cessna park (the IFBM venue) all I remember is being engulfed with warm hugs and Hi’s from all my ‘Friends’ I have known through their blogs for years.

The rest of the two days went in a daze, with some candid moments captured by my lens and others etched forever in my memory. Though the highlight for me was meeting all the bloggers, I also returned back motivated by the knowledge exchanged during the inspiring sessions by eminent bloggers, panel discussion and the Masterclasses by the two Masterchefs .
And yes we brought back cartloads of Goodies. I had to buy a bag in Bangalore even after sharing some of the goodies with my friend there.A huge thank you to all the generous sponsors.

When I decided to be a part of the IFBM, I had thought of it as a great opportunity to meet all the bloggers whom I had interacted with over the years. But IFBM 2014 was much bigger and grander than what I could imagine and exceeded every possible imagination. Everything was so meticulously organized, thanks to the awesome organisers{Arundati (Escapades) and Aparna (My Diverse Kitchen), Revati (Hungry & Excited) and Nandita (Saffron Trail)} who worked tirelessly to make it such a grand success. Hats off to you ladies and Thank you once again for all the hard work .You rock!
A special mention for the amazing staff and management of Aloft Hotel Cessna park, Bengaluru. I was overwhelmed by their hospitality. Each meal was carefully planned around a brilliant theme and tastefully created .The stunningly display instantly put all us Shutterbugs to work. Thank you Aloft Hotel, Cessna Park, there couldn’t have been a better place to host the first ever IFBM!

I have been experiencing withdrawal symptoms post the IFBM. This post was long pending, but how do you put such an exhilarating experience into words?This is just a snapshot of my euphoric experience at the IFBM2014. Food blogging for me will not be the same again. I have come back refreshed, inspired and motivated- all things much needed for this blog here. The media coverage post the event was like the icing on the cake. You can read a detailed account of the conference and the media coverage on the IFBM FB page

Many of the contests related to the event are still on. The one from Soulfull won me a gift voucher! The sparkling Himalayan contest is still on. We were gifted a bottle of sparkling Himalayan water at the IFBM and the bottle safely made its way back to Nasik.

With the of Betel/‘Pan’ leaves creeper thriving in the rains, I am trying to use the flavourful leaves wherever possible. I tried recreating the Indian ‘Meetha pan’ flavor for a refreshing ‘Meetha Pan spritzer’ with the Himalayan sparkling water.

Every time I see the star fruit at the fruit vendor’s stall, I have to buy it. The starfruit was then paired with cucumber & some Jal jeera masala for a very Chatpata Starfruit-Cucumber spritzer

‘Meetha Pan Spritzer’
Makes about 1 tall glass
Ingredients
2 young Betel leaves torn into pieces
½ tsp Fennel seeds
1 polo ring crushed
1 tbsp Rose syrup
2-3 tbsp fresh pomegranate juice (I added this just for the colour)
2 tsp fresh Lime juice
A bottle of Himalayan Sparkling water
4-5 Ice cubes
Rose petals for garnishing
Method
Rub a lemon wedge around the rim of a tall glass.
Turn the glass upside down & dip the rim in caster sugar.
Invert and add the torn Betel leaves, crushed polo ring and Fennel seeds.
Use a muddler to lightly crush and mix everything.
Add the Rose syrup,Pomegranate juice & Lime juice (you may adjust quantities to your taste)
Add ice cubes to the glass and pour sparkling Himalayan water over it.
Garnish with fresh rose petals and serve immediately.

Chatpata Starfruit- Cucumber Spritzer
Makes 1 glass
Ingredients
3-4 slices of starfruit
4-5 round cucumber slices
1 slice of a tangerine cut into wedges
½ tsp Sugar
5-6 mint leaves torn
1 tsp Jal jeera powder
1 tsp fresh lime juice
1 pinch crushed black pepper
4-5 Ice cubes
Method
Muddle together the starfruits, cucumber,Tangerine wedges & mint leaves in a serving glass
Add the Jal Jeera, sugar, Lime juice,crushed black pepper and mix.
Add ice cubes & pour sparkling Himalayan water over it
Serve immediately
Share this:

Comfort food-Poha(beaten rice) spiced with Methkut
I was feeling a bit under the weather for the past few days. The wet rainy days did not help to lift up my spirits. Elaborate cooking took a back seat and it was time for some quick easy meals.
Poha (beaten rice) is a must-have ingredient for all Maharashtrian pantries. It is a regular item on the ‘essential items’ in the monthly grocery list. Poha is a handy ingredient when you have unexpected guest, you are pressed for time, need a quick meal or when you want some comfort food!

The modest Poha is dressed up here with a few spices and a classic Methkut powder to make one of the most delightful comfort foods for me.
The recipe is quite forgiving and does not need any pre-planning. Day-to-day ingredients are used and it can be made at the last minute.
The key ingredient used to flavor this Spicy Poha is a Methkut. Methkut is a classic powder made from a few dals and spices and is used in most Maharashtrian households to flavour soft cooked rice; again a comfort food and one with lot of childhood memories.

I used readymade Methkut powder but you can find recipes here and here.
This spiced Poha makes a great tea time snack along with a cup of spiced Chai or a glass of freshly brewed filter coffee.
Here’s the recipe:
2 cups Thin poha (beaten rice)
2-3 tbsp Methkut powder
3-4 tsp coconut water /buttermilk/milk or just plain water
Pinch of sugar
Salt to taste
For the tadka (tempering):
A handful of peanuts
A handful of roasted Chana dal (Dalia)
4-5 dry Red chillies cut into pieces
4-5 curry leaves torn into pieces
1 tsp mustard seeds
1 tsp cumene seeds
½ tsp turmeric powder
~2-3 tbsp oil
For the garnish:
Lime Juice
Fresh coriander leaves
Method:
Sprinkle coconut water/buttermilk/milk or just plain water on the poha and mix to make it a little moist.
Add the methkut, salt and sugar and mix nicely to coat the poha. (Adjust the amount of Methkut to your taste).Keep it aside.
Heat oil in a small pan.
Add the mustard seeds and once they splutter add the cumene seeds followed by the peanuts.
Fry the peanuts well and then add the roasted chana dal.
Add in the turmeric powder, Red chilles and curry leaves.
Add this tadka\tempering to the poha and mix nicely.
Keep covered for a ~ 5 minutes for all the flavours to mingle.
Garnish with lime juice and coriander leaves.

Variation: If you cannot find Methkut you can use the Chutney podi which is normally served with dosa.
Or I have blogged about another version of spicy Poha (Dadpe Pohe) earlier on My Foodcourt here.
Also see Poha spiced with Tamarind
Share this:

Summer salad
 Summer is here and as I have mentioned earlier several times this is not one of my favourite months. The soaring temperatures and longer days are not for me; but I look forward to the grapes and mangoes that this season offers!
Summer is also the season to enjoy some delicious fruity salads!
This salad was accidentally discovered when I wanted to put together some leftover fruits.
The Green color of the apples (Granny Smith Apples) is very soothing in this heat. All similar coloured fruits and veggies are thrown together in this Salad with a dash of Mint, salt and pepper and some lime if you don’t mind the extra tartness.

 Summer Salad recipe
Ingredients:
2 Green apples washed and grated (I did not peel them)
1cucumber peeled and grated
½ Raw mango peeled and grated (adjust the amount depending on the tartness)
8-10 mint leaves
Black salt to taste
Black Peppercorns crushed
Lime juice (optional)
Method:
Mix the grated Apples, Cucumber and raw Mango.
Tear and mix the mint leaves.
Sprinkle the black salt. (I added salt to as soon as the apples were grated)
Add pepper.
Add a dash of lime juice. (Depending on the tartness of the mango)
Mix once again and serve.
Share this:

Dadpe Pohe (Spiced Beaten Rice)
This is a long pending post; so long that my friend S asked me to post it when I started blogging; and that was more than a year ago!
Dadpe Pohe is one of those dishes which ‘no-one can eat just once’ – Very addictive. I can eat bowls of this when it is made; hope all of you like it too.
S Dadpe Pohe specially for you from this Sudama! J
 _________________________________________________________ Dadpe Pohe recipe
Serving: 1 person; if you are like me otherwise it serves 2
_____________________________________________________

2 cups/2 Vati(Katori)/2 Handfuls thin Poha (beaten Rice)
1 onion chopped
½ – 1 cup scrapped fresh coconut
1 small piece ginger grated
Salt to taste
½ tsp sugar
3-4 tsp coconut water
For the tadka (tempering):
A handful of peanuts
4-5 green chillies chopped
4-5 curry leaves torn into pieces
1 tsp mustard seeds
1 tsp cumene seeds
~3-4 tsp oil
For garnishing:
Lime Juice
Fresh coriander leaves
Microwave the Poha for ~ 1 minute or alternatively roast them till crisp or keep them in hot sun till crisp.
Cool the Poha and sprinkle the coconut water to make it a little moist. You can alternatively use buttermilk .
Add the chopped onion, grated ginger, freshly scrapped coconut, salt and sugar , mix nicely and keep aside covered.
In a pan heat the oil.
Add the mustard seeds.
Once they splutter add the cumene seeds.
Add the peanuts and fry nicely till crispy.
Add the green chillies and curry leaves.
Add this tadka/tempering to the Poha.

Mix nicely and keep it covered for 10-15 minutes. This helps for the Poha to ‘Set’ nicely (all the flavours mingle nicely with the poha) If you are in a hurry you can serve immediately.
Garnish with fresh coriander leaves and lime juice.

Share this:

Phodnichi Poli (Resurrected Leftover Roti)
A very popular Maharashtrian breakfast is Phodnichi Poli. Leftover Rotis (Poli as it is called in Marathi) from previous night are recycled the next morning for breakfast, by dressing them up with some spicy tadka (tempering).
I also add some available veggies to make it tastier and healthier. Nothing is as comforting as a hot spicy Phodnichi Poli for breakfast!
You can also substitute Rotis with leftover Rice, Bhakris or Bread to make Phodnicha Bhaat (Rice), Phodnichi Bhakri or Bread chi Bhaji/chivda respectively!
Like many fusion recipes in my kitchen I love to sprinkle some Chutney Podi on my Phodnichi Poli to give it a fusion- Maharashtrian-South Indian taste! J

Phodnichi Poli can be called the ‘Queen of leftovers’ and hence I am sending it to dear Nandita’s WBB#15- Breakfast from leftovers
__________________________________________________________
Phodnichi Poli recipe
_____________________________________________________
7-8 leftover Rotis (Polis)
1-2 carrots grated (you can use beans, cauliflower, peas, tomatoes etc.)
1 onion chopped
4-5 green chillies slit and cut into pieces
5-6 curry leaves
2 tsp Urad Dal (white lentil)
A handful of peanuts
½ tsp mustard seeds
½ tsp cumene seeds
½ tsp turmeric powder
½ tsp sugar
Salt to taste
For the garnishing:
Coriander leaves
Lime juice
Chutney Podi (optional)
Tear and crush the Rotis with your hands. Or if they are dry enough use a food processor to tear them to pieces.
Add salt and sugar to the crushed Rotis and keep aside.
Heat oil in a pan.
Do the tadka (tempering). Mustard seeds- cumene seeds- turmeric powder- curry leaves
Add the peanuts and the Urad dal and fry for a few minutes till the peanuts are fried nicely
Add the green chillies and the chopped onions. Fry till the onions turn translucent.
Add the grated carrot and cook for a few more minutes.
Add the crushed Rotis, mix nicely and cook covered for 4-5 minutes stirring in between.
Garnish with coriander and lime juice. Serve hot.
My favourite combo is to eat Phodnichi Poli with a bowl of curd.
hgfehgfehgfehg
Another recycling idea with leftover Rotis – a must eat for people with a sweet tooth :Crush the Rotis with your hands as above. Add little ghee, crushed jaggery and some sesame seeds. Mix nicely and make small balls like ladoos from this mixture.
These resurrected Rotis will take no time to vanish! J
hgfehgfehgfehg
A few more leftover recipe ideas on My Foodcourt
hgfehgfehgfehg
Share this:

Kurdai-Gavhacha Cheek-Gavhachya Saalacha Upma for RCI June: Maharashtrian Cuisine!
Translating that title in English is rather difficult so read on…
No Maharshtrian feast is complete without accompaniments such as Papad and Kurdai.
In fact summer is the time the business of making Papads, Kurdais etc..flourishes in many households here.
Kurdai is a delicious snack akin to papads, but made from Wheat. These are usually made during the summer time,sun dried and stored in every household, just like papads and fried whenever required.You need lots of patience and time to make these pearly white, noodle like Kurdais.


Sun-dried Kurdai Deep Fried Kurdai
We usually get these made from someone (usually housewives who run household business making Papads, Masalas and Pickles)- lack of time and laziness being the main reasons. 🙂
To make Kurdai, Wheat is soaked in water for three days and then finely ground. The milky white extract (it is called as Gavhacha Cheek- Gahu means Wheat and cheek means extract) is separated from the wheat skin.
This milky white extract is then cooked with water to make a soft stiff dough called Ukad, which is inturn passed through a press(Thin Sev press) to get the kurdais. These are then dried and stocked.
The cooked soft dough used to make Kurdai is very tasty by itself- It makes for a delicious, healthy and filling snack. We call it Gavhacha Cheek. I am very fond of this Cheek and even if I don’t make Kurdais at home, I make this Cheek as an evening snack once in a while.The left over Wheat skin (Gavhacha saal; saal means skin) is used for making a scrumptious spicy Upma.
Recipes like these are becoming almost extinct, just like sparrows. Very few households now make these authentic Maharshtrian dishes.
This is my humble attempt to keep the traditional offbeat recipes alive.
Nupur I hope you enjoy these authentic yet offbeat recipes for Gavhacha Cheek and Gavhachya salacha Upma for RCI –Maharshtrian Cuisine

_________________________________________________________ Gavhacha Cheek recipe
Servings :~ 4-5 _____________________________________________________
Ingredients:
5-6 Cups Whole wheat (the older the better)
½ tsp Cumene powder
¼ tsp Asafoetida powder
Salt to taste
1. Soak Wheat in water for 3 days changing the water everyday.
2. After 3 days finely grind the wheat till all the wheat grains are properly crushed and the milky extract separates out.
3. Take some water (about 3-4 cups) in a large vessel and add the crushed wheat to it. Remove the wheat skin with your hands and squeeze tightly so that the milky extract remains in the water and the skin is separated. Repeat this procedure one more time with fresh water –put the skin in another lot of freah water (3-4cups) and squeeze out the extract with your hands.
4. Take a thin fresh clean cotton cloth and filter the extract through it. Use your hand to press the liquid through the cloth.
5. Don’t throw the Wheat skin. Keep it aside.
6. Keep the Milky extract (Cheek) covered overnight.
7. A layer of thin yellowish watery liquid can be seen on the dense White Cheek which is settled at the bottom.Discard the supernatant water and measure the lower dense Cheek using a cup. (You may need a spoon to remove the white cheek since it is quite dense.
8. Boil equal amount of water in a pan and add little salt, cumene powder and Asafoetida.
9. When the water comes to a rolling boil, add the Cheek to it with one hand and stir with a wooden spatula with your other hand, taking care that no lumps are formed.
10. Cook till the milky white cheek becomes translucent. Cover and cook for a few minutes more stirring in between.
11. Serve hot.
12. This can also be served by adding a little sugar and milk on top, but I prefer it as it is.

_________________________________________________________ Gavhachya Salacha Upma recipe
Servings: ~ 3-4 _____________________________________________________
Use the leftover Wheat skin from the Gavhacha Cheek to make this slightly sour and spicy Upma.
Heat oil in a pan. Do the tadka (mustard seeds, cumene seeds, curry leaves, green chillies-in that order). Add some chopped onion and fry till translucent. Add the leftover wheat skin and cook covered for few minutes. Stir this Upma nicely and add little fresh grated coconut. Mix well and let some moisture evaporate.
Garnish with coriander leaves and lime juice (optional). The Upma is already slightly sour so addition of lime juice depends on how sour you like it.
Serve hot.
You can also wrap it in a soft Roti and serve as a Frankie.


