Posts filed under ‘cornflour’
A Plum post!
The thing that I like most about summers is the bounty of colorful fruits that it offers. Not just mangoes but Jamuns, Litchis,peaches apricots, cherries, plums we have been savoring them all! The lad is a fresh fruit lover and loves snacking on them. The little lady of our house on the other hand is a mango addict but refuses to eat any other fruit. The only way to feed her fruits other than mangoes and bananas is to sneak them in shakes or smoothies.

The gorgeous weather (yes finally it’s raining here!) has increased the frequency of the kids’ hunger pangs. That also means my mind is constantly thinking of recipes to satiate the ever hungry kids with ‘different’ yet wholesome food. (I wonder how my mother managed when we were growing up?)
Litchis went into salads and Granitas when it was warmer. Peaches/apricots in crisps and parfaits.
Plums were a bit tricky to sneak in -since the boy loves tart fruits but no sweets for him. The daughter wont eat tart fruits but loved her sweets.

I had some leftover coconut milk from a Thai curry made earlier. On a whim I decided to make Sol Kadhi sans the Sol-The kokum. So you can call this ‘Plum Kadhi’ instead. The end result was as appetizing as the quintessential Maharashtrian favourite Sol Kadhi (have blogged about it here earlier).
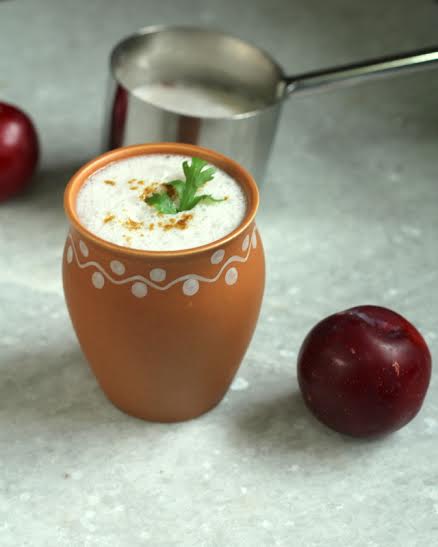
Plum Kadhi recipe
Makes ~ 4 cups
Ingredients
1 1/2 cups Coconut milk
~ 2 1/2 cups water
2 Plums pitted and chopped
¼ tsp green chilli paste
¼ tsp garlic paste
Black Salt to taste
Cumin powder and coriander or mint leaves for garnishing
Method
Blend all the ingredients except cumin and coriander/mint leaves together.
Chill and Garnish with cumin powder/coriander/mint leaves.
To satisfy the little on I made Plum Karanji-handpies. I chose to bake instead of deep fry the local favourite sweet Karanji with a Plum twist. A layered cover (also called as Satha/Sathyachya karanjya in Marathi) wherein I substituted half the quantity of all purpose flour with whole wheat flour and filled it with a sweet and sour plum filling. The end result was a stunning (specially when cut), crisp karanji with an unsual sweet -sour taste- almost a cross between a karanji and a hand pie and hence they are Plum Karanji-handpies !

Plum Karanji recipe
Makes ~ 6 Karanjis
Ingredients
For the cover
¾ cup All purpose flour
¾ cup Whole wheat flour
3 tsp fine semolina
4 tbsp ghee melted
2 tsp icing sugar
Pinch of salt
~ ½ cup milk or enough to knead a tight dough
For the filling
7-8 Crisp plums, pitted and chopped
3 tbsp scrapped fresh coconut
2 tbsp crushed/powdered cashewnuts
¼ tsp clove powder
¼ tsp cinnamon powder
~ 6 tbsp powdered jaggery (or to taste)
For layering
4 tsp ghee
2 tsp Cornflour
Cinnamon sugar for dusting (optional)
Method:
For the filling:
In a pan add the plum, coconut and jaggery. Cook on a low flame till the liquid evaporates (~ 4-5 minutes)
Add the cashewnut powder and the spices.
Mix well and cool completely.
For the layering mixture:
Whisk the ghee a few times till it becomes fluffy.
Add cornflour and whisk again.
For the Cover
In the bowl of the food processor add all the cover ingredients except the milk. Pulse 1-2 times
Add the milk slowly till a firm dough is formed. Knead into a ball.
Cover and keep aside for half an hour.
Halfway through the waiting time heat the oven to 180 deg C.
After half hour, cut the dough into 4 equal parts.
Form a ball of 1 dough piece and roll out into a thin circular disc ~ 6 inch diameter
Keep aside, covered.
Roll out the 2nd dough ball to a thin circular disc like a chapati.
Spread about a tsp of the ghee cornflour mixture evenly on the rolled out dough.
Cover this with the rolled out chapatti no 1.
Repeat the with the 3rd and 4th dough ball. Total you have 4 rolled out chapatti like discs layered with the ghee-cornflour mixture.
Put a tsp of the cornflour-ghee mixture on top of the 4th layer.
Make a tight roll of the layered chapattis, like a Swiss roll.

Trim both the edges and cut the rest of the roll into 6 pieces approximately 1 inch each.
Cover the other cut pieces till you roll out and fill the first one
With the cut side down roll out each piece into a circle like a poori
Place 1 tsp of the plum filling in the centre of the poori
Cover one side of the poori with the other into a semicircle-karanji shape.
Seal the ends using a fork or a fluted cutter
Place on a greased baking tray and bake till golden in color (~ 15 mins)
Dust with Cinnamon sugar mixture (optional)
Serve hot
With just 10 days to go for the first Indian Food Bloggers Meet ,the IFBM FB page is abuzz with all the upcoming excitement.There are several contests for participating bloggers being held as a run-up to the actual meet.
I am sending the ‘Plum Kadhi‘ and the ‘Plum Karanji Handpies‘ to the KitchenAid Plum contest
Share this:

Stone Fruit Tarts
Apricots, Peaches, Cherries, Mangoes, lychees; its the season for all these wonderful fruits. Usually, I enjoy my fruits in their natural form, as it is; with cooking or baking.A batch of peaches I bought some time back was very sour and was just lurking around in the fridge. I was thinking of ways to use-up the fruits when I saw Deeba’s post about these gorgeous tarts. The fate of my sour peaches was sealed; they along with a handful of cherries and apricots were baked to make these delectable tarts.
The other thing which attracted me to the recipe was the use of Buckwheat flour for the crust. Buckwheat Flour had been on my wishlist for quite some time. I happened to mention this in one of my comments on Deeba’s blog and Viola! my wish was granted! A few days later I received 2 packets of Buckwheat flour all the way from Gurgoan from this gorgeous girl! Thanks a lot Deeba for the BW flour and for all the inspiring recipes!

Here’s the recipe for the Stone fruit tarts
Original recipe on PAB here
For the crust
1/2 cup unsalted butter, melted and cooled (I used salted butter and skipped the addition of sea salt)
1/2 cup vanilla sugar
1/4 tsp pure almond extract
1/4 tsp pure vanilla extract
1/2 tsp fine sea salt (skip if using salted butter)
1 cup all-purpose flour
1/4 cup buckwheat flour
2 tbsps finely ground unblanched almonds
For the filling
200ml low fat cream (I used Amul Fresh Cream)
1 large egg lightly beaten
1/2 teaspoon pure almond extract
1/2 teaspoon pure vanilla extract
2 tbsps vanilla sugar
1 1/2 tbsps cornflour
2 tbsps almond meal 500 gms fresh stone fruit, apricots & peaches, pitted and sliced Fresh pitted cherries
Confectioners’ sugar

Method:
For the crust:
Preheat the oven to 180oC.
Grease 4 6” tart pans.
Mix together the melted butter and sugar and blend well.
Add the extracts and the flours. Mix well to form a soft cookie like dough.
Divide it into 4 dough balls.
Evenly press each dough ball along the bottom and sides of the tart pan.
Place the pans in the oven and bake until the dough is slightly puffy and set~ 15 minutes.
Sprinkle the ground almonds over the bottom of the crust.
For the Filling:
Whisk together the Fresh cream, egg, extracts and sugar in a bowl.
Whisk in the Cornflour and almond meal.
Carefully pour the filling on the baked pastry crusts.
Arrange the sliced fruits and cherries on top.
Bake until the filling is firm and the pastry is a deep golden brown ~55 to 60 minutes.
Remove from the oven and immediately sprinkle with confectioners’ sugar.
Cool the tarts
Just before serving, sprinkle again with confectioners’ sugar.
. 
Since I have used fruits lurking in my fridge and have followed a recipe from one of my favourite blogs, these Stone fruit tarts are heading over to Nupur’s blog for Blog Bites 4
Share this:

Mexican Paneer Wraps
A couple of days back we went to the local McDonald’s outlet and had their Paneer Salsa Wrap. Over the weekend I tried making my own Mexican Paneer Wraps at home (I can’t use the name ‘Paneer Salsa Wrap’ it seems to be their trademark!) According to family and friends the rolls were much better than the original J(I dedicate my success to lotso’ hard work and love I put into my cooking J) I have no idea how they make at Mc’s but I made them with the available ingredients and to suit our taste.
I was very impressed and encouraged by Sailu’s recent posts on Mexican recipes. I used her recipe for the Tomato Salsa as well as Sour Cream. Thanks Sailu. You will find very simple and easy recipes on her lovely blog here.
Paneer (cottage cheese) slices and some veggies along with the Tomato Salsa and Sour cream are wrapped in a tortilla to make these delicious wraps.

__________________________________________________
Mexican Paneer wraps recipe :To Make ~6-7 wraps __________________________________________________
For the Flour Tortilla
1 cup Wheat Flour
1 cup Maida (All purpose flour)
2 tsp oil
For the Paneer slices
Paneer block about 250 gms
3 – 4 tbsp cornflour
2-3 tsp Worcestershire sauce (optional)
salt as per taste
oil for deep frying
For the veggie filling
1 1/2 cups chopped mixed vegetables (onions, carrots, beans, cauliflower, sweetcorn kernels)or veggies of your choice
Dried parsley
Red chilli flakes
1tsp olive oil
Salt to taste
For the topping
Shredded cabbage –Red/Purple variety
Grated Cheese
Preparation
Sieve and mix the wheat flour and maida, add oil, salt as required and knead into soft pliable dough. Keep aside for ½ an hour. Meanwhile, mix cornflour, salt, Worcestershire sauce and make a slurry using water.Cut paneer into slices lengthwise and about ½ a cm in thickness.Dip these slices in the cornflour slurry and deep fry in oil till golden brown. Heat Olive oil add the onions and sauté till translucent. Add the other veggies and cook for few minutes. Keep them crunchy do not overcook them. Add salt, dried parsely and chilli flakes and mix nicely.
To make the wraps
Make small lemon sized balls from the dough. Roll out each ball into thin round Chapatis/Rotis ~7” in diameter.Heat a griddle/tava and lightly roast the tortilla on both sides for about a minute or so. The tortillas should not become brown, just roast for a few seconds. Place each warm tortilla on a flat surface. Put the Salsa over it and spread evenly. Add some veggie filling and spread it too. Place the Paneer slice at the centre. Top it with the shredded cabbage, sour cream and grated cheese. Sprinkle red chilli flakes and dried parsley and roll the tortilla firmly. Use some milk if required to seal the edges. Seal the bottom on one side of the tortilla to give it a pocket like shape( Its easier to eat that way) Grill the Paneer Salsa Rolls in the oven for ~ 10 minutes from all sides. Serve hot
Share this:

From China Town
A couple of years back I visited Sydney, Australia. Just after 2-3 days of having sandwiches and fruits for lunch/dinner I craved for Indian food. We discovered a place called China Town during one of our expeditions for food! I was all excited to have Chinese food -something to remind me of food at home! The menu boasted of a range of Chinese dishes. We ordered for some Rice and some Noodles. To my utter disappointment the rice and noodles were nothing like the ones we have at home…here in India.The Chinese food served in India is more of a Indo-Chinese fusion.Basic Chinese recipes altered to suit the Indian palette,with lots of garlic and chillies and sauces!I am not complaining, I prefer it that way.I am a great fan of this Indo-Chinese food.Here’s my favourite Veg Fried Rice and Veg Hot and Sour …Indi style..my style

For the Veg Fried Rice you need:
1 cup rice, cooked
2 cups finely chopped vegetables (Carrots, French Beans, Green Capsicums, fresh button Mushrooms, fresh green spring onions)
3-4 garlic cloves finely chopped
½ tsp ginger grated
2 tsp green chilly sauce
2 tsp Soya Sauce
¼ tsp white/black pepper powder
A pinch of Ajinomoto (Mono Sodium Glutamate) -optional
2 tsp oil for cooking
Salt as per required Heat oil in a wok. Add the garlic and sauté for 1 min.Add the ginger and then add the spring onion whites. Sauté for a few minutes on high flame. Then add the carrots and French beans and cook for a few minutes till the carrots and beans become a little soft.Add the green capsicum, Mushrooms and spring onion greens.Cook for a few minutes.Now add some Chinese green chilly sauce, soy sauce, ajinomoto and some salt .Adjust the salt depending on the soy sauce and ajinomoto added. Add the cooked rice mix and cook for few minutes more on high flame.Serve hot.

For Veg Hot and sour you need:
1 small cabbage diced. 2 Carrots sliced (in thin rounds)
1 medium sized green Capsicum cut into thin strips
2-3 sprigs green onions (bulbs as well as greens)
½ tsp ginger grated
2 tsp green chilly sauce
2 tsp Soya Sauce
1 tbsp hot and sweet tomato sauce (or just add some red chilli powder to tomato ketchup)
2 tsp cornflour
½ cup water
¼ tsp white/black pepper powder
¼ tsp sugar
Salt as per taste.
2 tsp oil

Heat oil in a wok. Add the ginger and chopped onions (white part).Sauté for few minutes.Add the carrots and then add the cabbage.Cook for a few minutes then add the capsicum.When the veggies are just cooked add the sauces, salt and sugar.Add some water to the veggies.In a small bowl mix the cornflour with little water.Add it to the veggies and mix nicely.Cook till the gravy becomes little thick and saucy.Sprinkle pepper powder. Serve hot with Veg Fried Rice.
Share this:


