Posts filed under ‘bean’
Refried Beans and Mushroom Tostada
These Re-fried beans and Mushroom Tostadas are a perfect representation of the vibrant Mexican food -a riot of flavours, textures and colours.
Bake your own Bolillos to make Mexican Tortas!
Tortas make a great meal/snack for a small get-together with family or friends or a kiddie party. Make the different components and let everyone assemble their own sandwiches. This ,a pitcher full of Margarita or Mojito or Sangria (or any other drink) is my version of a homemade Happy Meal!
Three Bean Chilli for a fiery Lunchbox Fiesta
Three bean Chilli – fiery Lunchbox fiesta for The Urban Spice Sweet September Giveaway
Continue Reading September 27, 2015 at 1:00 pm Leave a comment
The Misal Pav burger!
The hot Summer, Exams, work, Summer camps and a rather long recipe delayed this post. Did I mention the heat? It’s still hot but finally I am back with The Misal Pav Burger recipe.
As I said in my earlier post, the idea for this burger kept hovering in my head for a long time. I kept thinking of various combinations to make the patty, the sauce and the toppings. Finally when I baked the Kummelweck rolls, I decided to go ahead with whatever ingredients I had in my pantry. Moth beans or Matki are a staple in our house. Matki sprouts are usually found in my fridge, since everyone loves the Usal (curry) made with it.

The burger patty here, is made using sprouted Matki and potato+breadcrumbs as a binder. I have found a new shop in Nasik -Aarogyam, which sells Nagli/Whole wheat and sprouted wheat bread. So this time the Patty has Nagli breadcrumbs. You can use whole wheat or white breadcrumbs too. Mom made fresh Kanda Lasoon Masala, so the patty was spiced with my Mom’s homemade fiery love 🙂
Raw mangoes are were in season and I made a shortcut Methamba (Mango Chutney). My brother got me a bottle of Roopak’s Aachari masala, along with other spices. I cooked the raw mangoes and spiced them with this Readymade Aachari masala. The masala is awesome by the way 🙂

The other element that I added to the burger was the fiery Masala Chutney. Masala Pav, is a favourite street food here- a bun or the Bombay Pav is served with a spicy Onion-Tomato masala chutney made using Pav Bhaji masala. I substituted the Pav Bhaji masala with the Kanda Lasoon masala. I was apprehensive when I put together all the elements of this Misal Pav burger , but it turned out so good that the son gave it ’the Best Burger ever’ thumbs up!

The Misal Pav burger recipe
Makes about 5-6 burgers
Ingredients:
5-6 burger buns or Laadi pav
~2-3 Tomatoes Sliced
1 large onions sliced
1 cucumber sliced
Few sprigs fresh coriander leaves
For the Patty:
1 cup sprouted moth/matki beans cooked in salted water (just cooked, not mushy)
1 potato cooked,peeled and mashed
¼ cup bread crumbs or as required
2-3 tbsps Chopped coriander
1 small onion chopped
3-4 garlic pods chopped
2 tbsp crushed roasted peanuts
1 tsp green chili paste or red chili powder to taste
1-2 tsp Kanda Lasoon masala
Salt to taste
Oil for shallow frying
For the Mango Chutney
1 raw mango cubed
3 tbsp grated jaggery or more to taste
1-2 tsp Aachari masala
Salt to taste
2-3 tsp oil
For the Onion-Tomato chutney
1 onion chopped
1 tomato chopped
2-3 garlic cloves sliced
2 tsp Kanda lasoon masala
½ -1 tsp red chilli powder
3-4 tsp oil
Salt to taste
Method:
For the Patty
Mix all the ingredients for the patty except the oil.
Make ~ 5-6 balls of the mixture and flatten into a patty
Shallow fry in hot oil in a nonstick pan till browned on both sides
For the Mango chutney:
Heat oil in a pan.
Add the chopped mangoes, jaggery and salt. Cook for 5 minutes or till the mangoes are just cooked.
Add the Achari masala and cook for 1-2 more minutes.
Take off the heat and cool.
For the spicy chutney
Heat oil in a small pan.
Add the garlic and onion and sauté for 1-2 minutes
Add the tomatoes and cook for 2-3 minutes more
Season with salt and spices
To assemble the burger:
Cut the burger buns in half.
Add 1-2 tsps of the spicy chutney.
Place slices of tomato, Cucumber,onion and coriander leaves
Place the patty on the salad.
Top with the tangy Mango chutney and then top with the other half of the bun
Serve immediately

Share this:

Filled Cupcakes for the sweet punch
“Mama I’m hungry, I want something to eat” and a list of specifications follows for ’something’, the most prominent being ‘something different’. I am sure every mother hears this dialogue several times a day. Many times my son has specific hunger pangs;’ I am hungry for chocolate or hungry for oranges or raisins or some favorite snack’ Like every mother I find it challenging to come out with ideas to satiate the ever hungry boy!

This month’s Sweet Punch made my life easier at least for a while; ‘Devils food cupcakes with Vanilla cream filling’ to get me through a few hunger pangs for this week. The boy loves chocolate, even though he does not have a sweet tooth, so he was jumping with joy at the mention of Chocolate cupcakes.

A Sweet Punch is a monthly baking event started by three lovely girls Ria, Maria and Divya, to make baking as simple as possible, bringing you a tried and tested recipe every month.’

This month’s punch was chosen by Divya and the recipe is originally from Baking bites. Thanks Divya I am delighted by your choice of recipe- Filled Cupcakes, a first for me.I don’t think I would had attempted the recipe without your instigation.

The recipe makes about 2 dozen cupcakes. I did not fill and frost all the cupcakes, left few of them as it is. The cupcakes were rich and delicious even without the frosting. The little elf polished off a few even as they were still cooling on the rack.

Here’s the recipe:
Devil’s Food Cupcakes with Vanilla Cream filling
Recipe source – Baking Bites
Makes ~ 2 dozen cupcakes
The recipe looks lengthy and consists of three parts:
a)Making the cupcakes
b)Making the filling
c)Making the frosting
Ingredients:
For the Cupcakes:
1/2 cup butter, room temperature (I used salted butter and skipped the addition of salt)
2 cups sugar (I used Vanilla sugar)
3 large eggs
3/4 cup sour cream (low fat or full) –(I used cream mixed with a tsp of homemade yogurt)
1 tsp vanilla extract
2 cups all purpose flour
2 tsp baking soda
1/2 tsp salt
1/4 cup cocoa powder
2-oz(~55 gms) dark chocolate
1 cup water, boiling
For the Vanilla Cream Filling:
3 tbsp all purpose flour
1/2 cup milk
1/2 cup butter
1/2 cup granulated sugar
1/2 scraped vanilla bean or 1 tsp vanilla extract
For the Chocolate Buttercream Frosting:
1/2 cup butter, room temperature
1/2 cup unsweetened cocoa powder
1 cup powdered sugar
1/4 cup milk
1 tsp vanilla extract
Method:
For the Cupcakes:
Preheat the oven to 350F (180C) and lightly grease two 12-cup muffin tins (I used 4-6 cup muffin pans of different shapes)
In a large bowl, cream together butter and sugar until light.
Beat in eggs one at a time, followed by cream and vanilla extract.
In a small bowl, sieve together flour, baking soda and salt.
Add half of flour mixture to the butter mixture, mix nicely and add the rest of the flour mix.
Stir well between each addition and mix until no streaks of flour remain.
Stir the cocoa powder and the dark chocolate into the boiling water
Pour chocolate water into the rest of the batter and stir until uniform.
Evenly distribute batter into prepared baking cups. Bake each tray for 13-15 minutes (it took ~20-22 minutes for me), until a tester comes out clean and the cakes spring back when lightly pressed.
Cool the cupcakes completely and then turn onto a wire rack to remove from the muffin pans.
For the Vanilla butter filling:
Whisk together the flour and milk and cook in a small saucepan over medium heat until thick. This will only take a few minutes.
Stir continuously to prevent the mixture from clumping and do not bring all the way to a boil.
When thickened (consistency will be that of a thin pudding or custard), strain with a mesh strainer into a small bowl, cover with plastic wrap and let cool completely to room temperature.
When the milk mixture is cool, cream the butter and sugar together in a medium bowl until light. Add in the milk/flour mixture and the scraped vanilla bean seeds (or vanilla extract) and beat at high speed with an electric mixer for 7 minutes, until light and fluffy.
Scrape into a pastry bag fitted with a plain tip, or a large ziplock bag with the corner cut off, and set aside until ready to fill your cupcakes.
For the chocolate butter cream frosting:
Combine all ingredients in a large bowl and beat, with an electric mixer, until frosting is creamy, 3-5 minutes.
Add additional powdered sugar as needed to achieve a thick, but not stiff, frosting that is easy to spread.
Add additional milk, if necessary, to thin the frosting if it gets too thick.
Scrape into a pastry bag fitted with a plain tip or a large ziplock bag with the corner cut off
Assembly:
Take a cooled cupcake and, using a small knife, cut a cone of cake (1-inch across by 1-inch deep) out of the top.
Trim off the pointy end of the cone, leaving a flat circle of cake. Set aside and repeat this process for all the cupcakes.
Take the cream filling and squeeze a tablespoon or so into each cupcake cavity, filling the hole up to the top with filling.
Top off with a flat circle of cake to plug the hole and keep the filling in place.
Pipe out the Chocolate frosting to cover the top of the cupcake.
Top with some vanilla cream if you have any leftover from the filling and some sprinklers.(I topped the boy’s cupcakes with sugar coated marzipan cherries)

Note: I found it difficult to unmold the cupcakes which did not use cupcake liners, while they were still warm. I had to wait for them to completely cool and then remove them from the pan.
I used a piping bag to frost the cupcakes, I found this easier
I used only 1 cup of powdered sugar for the Chocolate frosting, instead of the recommended 2-3cups.
Share this:

Tiramisu Cake- A sweet punch
One of my resolutions (?) for the New Year was to explore baking beyond the simple basic cakes and cookies. This also meant an opportunity to try out different recipes from the several cookbooks I own; cookbooks which were just gathering dust on the shelves.Given my hectic schedule and the 6-7 hr daily power out(r)age I was getting nowhere near implementing my resolution.So when Ria, Maria and Divya announced –A Sweet Punch I could not resist the opportunity.
‘A Sweet Punch is a monthly baking event started by Ria, Maria and Divya, to make baking as simple as possible, bringing you a tried and tested recipe every month. It could be either from cookbooks or from other food-blogs.All we need to do is, follow the recipe and create magic!’
The recipe chosen for this month was Tiramisu Cake from Dorie Greenspan’s Baking From My Home To Yours

There were quite a few ‘firsts’ for me:
- This is my first Sweet Punch
- This is my first recipe from Dorie Greenspan’s Baking From My Home To Yours , which I bought months ago from Flipkart
- I made my first batch of Mascarpone at home! I have been eyeing this on blogs and always planned to make it.
The Sweet Punch rule was simple: ‘try to stick to the recipe as far as you can but you can make changes to suit your religious/ dietary requirements’ and I did just that!
I followed the recipe to the tee. The only change I did was to bake a single cake and then cut it into two, instead of the recommended two 9”cakes.
My first try at making Mascarpone was very encouraging and I was quite pleased with the results, moreover it was so simple to make…making me wonder why I did not try this before?
I made the Mascarpone 2 days in advance and the cake a day earlier.
The only problem I faced was, when I mixed the Mascarpone with the other ingredients for frosting it changed its texture (I guessed the heat here was too much to keep the cheese firm, any suggestions to firm up the frosting are pls. welcome). I did not have the time to keep it back in the refrigerator to firm it up so I just poured it on the cake and inbetween the layers and let the frosting drizzle from the sides.

I used mini chocolate chips for the filling and dusted the top with dark Cocoa. I had a small bottle of Amaretto liqueur, which a close relative had gifted us many many years ago (another first) and I am glad I added it to the frosting. The rich burst of flavors from the coffee and the liqueur made the cake almost divine! I am glad I used the entire syrup to soak the cake even if I had some initial doubts.
Thank you Ria, Maria and Divya for the intiative, lovely recipe and most of all for the detailed explanation to make it look so easy and simple!
Here’s the recipe for Tiramisu Cake:
Tiramisu Cake
Baking: From My Home to Yours by Dorie Greenspan
For the cake layers:
2 cups cake flour (I used All purpose flour +Cornstarch)
2 teaspoons baking powder
1/8 teaspoon baking soda
1/4 teaspoon salt
1 1/4 sticks (10 tablespoons) unsalted butter, room temperature
1 cup sugar
3 large eggs
1 large egg yolk
1 1/2 teaspoons pure vanilla extract
3/4 cup buttermilk (I used homemade buttermilk)
For the espresso extract:
2 tablespoons instant espresso powder
2 tablespoons boiling water
For the espresso syrup:
1/2 cup water
1/3 cup sugar
1 tablespoon amaretto, Kahlua, or brandy
For the filling and frosting:
1 8-ounce container mascarpone (store-bought or homemade) (I used 250 gms homemade from the recipe on Deeba’s blog here)
1/2 cup confectioners’ sugar, sifted
1 1/2 teaspoons pure vanilla extract
1 tablespoon amaretto, Kahlua, or brandy
1 cup cold heavy cream
2 1/2 ounces bittersweet or semisweet chocolate, finely chopped, or about 1/2 cup store-bought mini chocolate chips
Chocolate-covered espresso beans, for decoration (optional) (I did not have these so I skipped it)
Cocoa powder, for dusting
Getting ready:
Center a rack in the oven and preheat the oven to 350 degrees F ( I baked at 180 degrees C). Butter two 9×2 inch round cake pans,(I used only 1) dust the insides with flour, tap out the excess, and line the bottoms of the pans with parchment or wax paper. Put the pans on a baking sheet.
To make the cake:
Sift together the cake flour, baking powder, baking soda, and salt.
Working with a stand mixer, preferably fitted with a paddle attachment, or with a hand mixer in a large bowl, beat the butter on medium speed until soft and creamy.
Add the sugar and beat for another 3 minutes. Add the eggs one by one, and then the yolk, beating for 1 minute after each addition. Beat in the vanilla; don’t be concerned if the mixture looks curdled. Reduce the mixer speed to low and add the dry ingredients alternately with the buttermilk, adding the dry ingredients in 3 additions and the milk in 2 (begin and end with the dry ingredients); scrape down the sides of the bowl as needed and mix only until the ingredients disappear into the batter. Divide the batter evenly between the two pans and smooth the tops with a rubber spatula.
Bake for 28 to 30 minutes,( took ~ 45 minutes for me) rotating the pans at the midway point. When fully baked, the cakes will be golden and springy to the touch and a thin knife inserted into the centers will come out clean. Transfer the cakes to a rack and cool for about 5 minutes, then run a knife around the sides of the cakes, unmold them, and peel off the paper liners. Invert and cool to room temperature right-side up.
To make the extract:
Stir the espresso powder and boiling water together in a small cup until blended. Set aside.
To make the syrup:
Stir the water and sugar together in a small saucepan and bring just to a boil. Pour the syrup into a small heatproof bowl and stir in 1 tablespoon of the espresso extract and the liqueur or brandy; set aside.
To make the filling and frosting:
Put the mascarpone, sugar, vanilla, and liqueur in a large bowl and whisk just until blended and smooth.
Working with the stand mixer with the whisk attachment or with a hand mixer, whip the heavy cream until it holds firm peaks. Switch to a rubber spatula and stir about one quarter of the whipped cream into the mascarpone. Fold in the rest of the whipped cream with a light touch.
To assemble the cake:
If the tops of the cake layers have crowned, use a long serrated knife and a gentle sawing motion to even them. Place one layer right-side up on a cardboard round or a cake plate protected with strips of wax or parchment paper. Using a pastry brush or a small spoon, soak the layer with about one third of the espresso syrup. Smooth some of the mascarpone cream over the layer – user about 1 1/4 cups – and gently press the chopped chocolate into the filling. Put the second cake layer on the counter and soak the top of it with half the remaining espresso syrup, then turn the layer over and position it, soaked side down, over the filling. Soak the top of the cake with the remaining syrup.
For the frosting, whisk 1 to 1 1/2 tablespoons of the remaining espresso extract into the remaining mascarpone filling. Taste the frosting as you go to decide how much extract you want to add. If the frosting looks as if it might be a little too soft to spread over the cake, press a piece of plastic wrap against its surface and refrigerate it for 15 minutes or so. Refrigerate the cake too.
With a long metal icing spatula, smooth the frosting around the sides of the cake and over the top. If you want to decorate the cake with chocolate-covered espresso beans, press them into the filling, making concentric circles of beans or just putting some beans in the center of the cake.
Refrigerate the cake for at least 3 hours (or for up to 1 day) before serving – the elements need time to meld.
Just before serving, dust the top of the cake with cocoa.
(Though the cake recipe looks exhaustive it turned out to be quite simple when I actually made it)
Check out the roundup for more scrumptious versions of this cake at A sweet Punch
Share this:

Vegetable Tagine with Harisa
This is a warm up to the 7-day recipe marathon initiated by Nupur, at One Hot Stove. Just making sure I haven’t forgotten writing posts! Nupur has provided the much needed push for My Foodcourt and hope to reach the finish line, even though I shall be travelling.
Harisa Seasoning was not a very familiar spice to me till recently. My dear brother picked up some free samples for this from a trade fair in Berlin last month. Some Google research and I was tempted to use it immediately; Hit the bulls eye with this recipe for Vegetable Tagine with Harisa. Loved this recipe since I had all the ingredients that were required (a very rare coincidence!).
All the veggies used for this Tagine are in season now. I did not have the traditional ‘Tagine pot’ but slow cooked it on the stove top for the flavours to mingle and the result was a scrumptious spicy-sweet and tangy stew. Traditionally served with couscous, I served this with rice. As usual I tweaked the recipe a little bit to suit our taste.

Here’s the recipe:
Vegetable Tagine with Harisa
2 onions, sliced
½ tsp ginger-garlic paste
1 tsp sugar
3 tsp Harisa seasoning
a pinch of saffron (optional)
1 tsp cumin seeds (roasted and crushed)
1 cinnamon stick
1 bay leaf
250ml vegetable stock or water
3 ripe tomatoes, skinned and chopped
2 large carrots, cut into chunks
2 sweet potatoes, peeled and cubed
1 red pepper, seeded and cubed
1 yellow pepper, seeded and cubed
2 brinjals, cubed
400g chickpeas soaked overnight and cooked
1 tsp dry red chilli powder or pepper (optional)
Salt
2 tsp Oil
Chopped fresh parsley for garnish
Heat the oil and fry the onion, ginger-garlic and sugar over a low heat until onions begin to caramelise.
Add harissa powder and spices and cook until fragrant.
Add the veggies, season with salt, Cover and simmer for 40 minutes or until the vegetables are tender.
Garnish with chopped fresh parsley.
Serve hot with couscous or rice.
Share this:

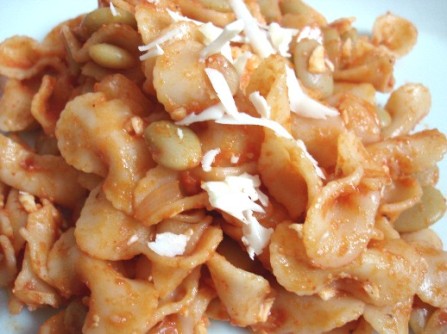
Farfalle with Lima Beans
I felt lost after posting recipes for all the blog events J What next? was the question.
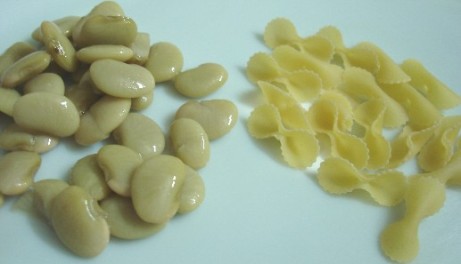
To utilise a can of Lima beans, (I bought when I was searching for Fava Beans) last night I fixed us a quick pasta dinner- Farfalle with Lima Beans. BTW, Lima Beans are also called Pavta in Marathi (which I very well know). This I learned after some research on them; though what we get locally looks a bit different than the canned ones.
The buttery nutty flavour of the Lima beans complimented the soft beautiful Farfalle bows in a tangy tomato-mushroom sauce. This bean-bow combination will be often repeated in my house!
I stumbled upon this blog just as I was to post the Farfalle with Lima beans recipe.
Regulars to my blog will already know I have become a slave to food blog events; how could I not send this recipe for the Presto Pasta Nights.Ruth this simple, quick Farfalle with Lima Beans is for your Pasta Night.
__________________________________________________________
Farfalle with Lima Beans recipe
_____________________________________________________
1 packet Farfalle (~ 3 cups uncooked farfalle)
1 Can Lima beans
3 tbsp Tomato-Mushroom Spaghetti sauce (storebought)
3 tbsp Tomato Ketchup
1 large onion chopped
3-4 garlic cloves peeled and crushed
2 tsp chili flakes/chili powder/pepper powder- whatever you like
1 tsp Mixed herbs
3-4 tsp Oil/butter
Salt as per taste
Grated Cheese (any cheese) as much as you like
Cook the Farfalle as per instructions till ‘Al dente’ or see ‘How to Cook Pasta’ here.
Heat Oil/butter in a pan.
Add the garlic and sauté for few seconds.
Add the onion and sauté till they turn translucent.
Drain the liquid from the canned beans and add them to the onions.
Mix in the cooked Farfalle.
Stir in the sauces and mix nicely, so that the sauce coats the Beans-Farfalle.
Add little water if required to make a thick sauce.
Season with chili flakes, salt and mixed herbs.
Add cheese and cook for 1-2 minutes more.
Serve hot with Garlic bread or any other bread or as it is.
Share this:

Dear Anita
Dear Anita,
You have no idea how your little provocation has unsettled my taste buds for the past week. I have been craving each day for those hot, oily floating balloons from the day you posted them at the Mad Tea party!
Clicking on any random blog on the Food Blog Desam made matters worse. I found myself drooling and ogling at all those sinful puris.
I decided to end my suffering, got up early (inspite of this being a weekend). I did not want anything to come between me and my puris (read my little one). I got up with this ‘Duniya ki koi takat muzhe puri banana se rok nahi sakti’ attitude. (too lengthy to translate in english)
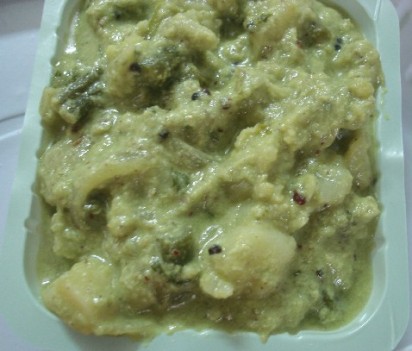
At once I knew, that the sagoo (my mother-in-law’s recipe) would be the right companion to my Puris.
When I inserted the first rolled out round disc into the hot oil my happiness knew no bounds! I felt like a child who was given a bunch of balloons-when the first reddish- brown oily balloon started floating on the oil- gleaming at me, urging me to be eaten!
Thanks to that one provocation, I have managed to over-oil (as in lubricating a vehicle) my mind, body and the camera. Why the camera? – Just to prove that these are actually puris and not Cluris.
Thank you Anita, I had almost forgotten how these soft, hot, homemade puris tasted.. pure bliss – I can’t even remember the last time I made them.
Thank you.
With lots of Puris and Sagoo
Madhuli
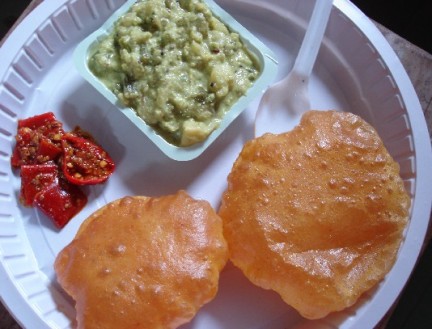
Puri, Sagoo and Punjabi,Red Chili Pickle for the Puri-Bhaji party
__________________________________________________________
Sagoo recipe
_____________________________________________________
For the gravy:
½ Coconut scrapped
6-7 green chillies chopped
½ bunch fresh coriander leaves
2 tsp poppy seeds (khus khus) soaked in warm water for 15 minutes
1” piece Cinnamon
½ “piece ginger chopped
1 onion sliced
For the Sagoo
1 Onion sliced
2 potatoes cubed
1 cup cauliflower florets
1 cup French beans chopped
For the tadka:
2 tsp oil
1 tsp mustard seeds
1 tsp cumene seeds
½ tsp turmeric powder
Blend all the ingredients for the gravy to a smooth creamy paste.
Heat oil in a pan. Add the mustard seeds.Then the cumene seeds and the turmeric powder.
Add the onion and sauté for 1-2 minutes.
Add the vegetables and cook covered till they become tender.
Add the gravy, salt and adjust the water to the required consistency.
Mix nicely, cook for a few minutes more and serve hot with Puris.
__________________________________________________________
Puri recipe
_____________________________________________________
Go to A Mad Tea Party on 20th August and you will get not one but many recipes for Puris.
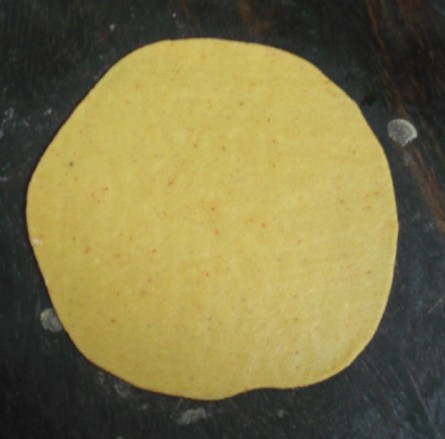
I made them like this:
In a bowl take 2 cups of Wheat Flour. Add salt as per taste. Add ½ tsp Turmeric powder. Add 1 tsp Red chilli powder. This type of puri is called Tikhat Mithachi Puri in Marathi. (Tikhat here refers to Red Chili powder and Mith is salt)
Add 1 tbsp hot oil to the Wheat Flour. Knead to a tight dough using water as required.
Make small balls from the dough. Roll out into small round discs.
Heat Oil in a Kadai/Wok. Deep fry the rolled out round disc till they puff up.
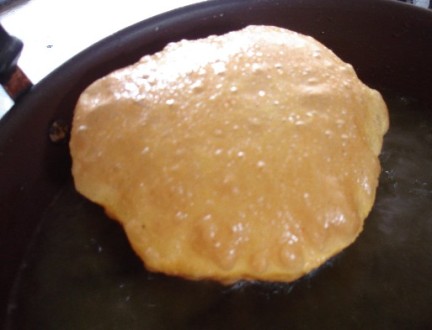
Turn and fry on the other side till it turns a reddish-brown colour.
Serve hot with Sagoo
Note: If you want to have Tikhat Mithachi Puri without any accompaniments- Add a tsp of cumene seeds and 1 tsp carom seeds to the Wheat flour before kneading the dough. Follow the rest of the procedure for puris. Roll and Insert these spicy Puris in hot Chai(tea) and eat it immediately..Hmmm..Yummy
Share this:

Oat Patties
This has been quite an ‘Oaty’ month in my house. I could lay my hands on some Quick cooking oats and Oat Bran and I have tried to utilize their goodness to the fullest. I have been adding Oats to many dishes including some Bhel!
I wish we would get some more varieties of Oats here- old fashioned, steel cut etc. The search is on….
In addition to their health benefits Oats have also introduced that ‘Feel Good’ factor in our daily lives. Just the thought that we are eating something so nutritious is making us feel nice.
Oat Patties, I can say, is one of my most successful experiments with this ‘wonder-grain’. If you are a person like me ,who cannot start her day with a sweet breakfast this is something you are gonna truly like.

Its spicy, its delicious, it masks the nutty flavour of Oats very well (if you don’t like it) and its quite simple to make.
I have thrown in the ingredients I had in my fridge to cook up this wholesome breakfast.
Nutritious Oat Patties for WBB#13 –Oats

__________________________________________________________
Oat Patties recipe
Makes~ 7-8 patties
_____________________________________________________
½ cup Quick cooking Oats
½ cup Oat Bran
½ cup button mushrooms chopped
½ cup grated/mashed tofu
½ cup French beans boiled and finely chopped (or veggie of your choice)
1 tsp ginger-garlic paste
1 small onion finely chopped (you can add spring onion with the greens)
4-5 sprigs fresh coriander leaves
3 tsp Red chilli flakes (or green chilli paste)
½ tsp cumene seeds
2 tsp Soy Sauce
Salt to taste
Olive Oil for shallow frying
Toast the Quick cooking Oats in a pan till they turn to a light brown colour. (You will get the smell similar to when you are roasting Rava or Poha) Keep them aside.
Heat 1 tsp olive oil in the same pan.
Add the cumene seeds and the ginger garlic paste. Fry for a second and then add the chopped onions and fry till they turn translucent.
Add the chopped mushrooms and fry for 1-2 minutes. The mushrooms will ooze out some water. Cook till the water evaporates. Remove from heat and cool in a bowl in which you can mix the other ingredients.
Mix together the toasted Quick cooking Oats, sautéed mushroom, grated tofu, beans, chopped coriander leaves, Red chili flakes, Soy sauce and salt.
Knead the mixture to mix all the ingredients nicely.
The moisture from the veggies and tofu is enough to hold together the mixture. If you feel it is a a bit dry and difficult to hold together dip your hand in water and knead the mixture with the same hand.
Make lemon sized balls of this mixture and press to make them into round discs.
Brush a non stick pan with little olive oil and fry the patties on both sides till brown and crisp. Alternatively grill the patties.
Serve immediately with some ketchup or chutney of your choice. (They tend to get a little soggy/ sticky if kept for a very long time)
To serve: For a wholesome filling breakfast- slice a whole wheat Bun or burger bun. Add a slice of cucumber, tomato. Spread some tomato ketchup and keep an Oat Patty and grill in the oven for 2-3 minutes.Serve immediately.


