Posts filed under ‘Roti/Parathas’
Dulche de leche & Apple Satori
A can of Homemade Dulche de leche lurking in the fridge got me thinking about this Satori.
Satori is a Maharashtrian sweet flat bread, usually stuffed with Rava and Khoya/Mawa .The stuffed bread is then cooked on a griddle ,drizzled with homemade ghee.
I decided to swap the Dulche de leche for khoya. It’s the season of Apples and Apple pies, so some grated apples and spices were added to the filling. I love the McCormick Apple pie spice mix I bought a few years ago. The warm spices mingled well with the Apple and Dulche De leche stuffing. I made a small test batch of about 7-8 Satoris and they were gone in minutes. I think grated pumpkin should also work in place of Apples.
The Dulche de leche I used was very firm since it was sitting in my refrigerator for quite some time. A filling made with a runny or a sauce like consistency of Dulche de Leche may not be a good idea, since it will be difficult to stuff and roll out the Satori.Take care that it is firm enough.

If you would like to try something different this Diwali, here’s my fusion recipe for
Dulche de Leche & Apple Satori
Ingredients
For the cover
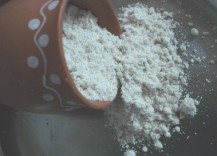
¾ cup Maida
¾ cup fine Rava (Semolina)
Small pinch salt
½ tbsp oil
~1/2 cup water (or more if required)
For the filling
2-3 tbsp Ghee
4 tbsp fine Rava/Semolina
2 Apples,peeled cored and grated (I used 1 Granny Smith and 1 Red Shimla apple)
3-4 tbsp Homemade Dulche de leche
½ tsp Apple pie spice mix (or you can use Cinnamon, Nutmeg, All Spice powder)
Ghee to cook the Satori
Method
For the dough
Boil water with the oil. Cool .
Mix the Maida, Rava and salt in a bowl.
Gradually add the water till it all just comes together.
Knead into a soft pliable dough.
Cover with a kitchen towel and keep aside for half an hour.
To make the filling
Heat the ghee in a pan.
Add the Rava and roast for 2-3 minutes .
Add the grated apples and mix nicely. Add 1-2 tbsp water and cook covered for 3-4 minutes or till the apples are cooked and water evaporates.
Cool slightly. Add in the Dulche de Leche, mix well.
Refrigerate for half an hour.
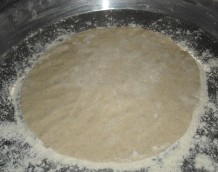
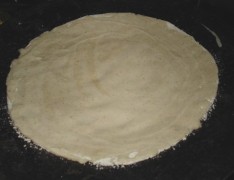
Pinch off 7-8 balls from the dough. Flatten the ball into a disc.
Roll out the ball a little. Add a tablespoon and half of the stuffing in the centre.
Bring together the edge and Seal it, like you would for a stuffed paratha.
Dust the work surface with a little flour.
Gently Roll out into a ~4 ½ inch disc, taking care that the filling does not come out. Don’t make them very thin.
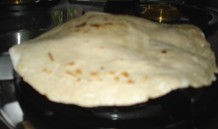
Cook on medium heat on a hot griddle on both sides, till light brown spots appear.
Repeat this process to make the rest of the Satoris.
These can be cooled and kept in an airtight container at this stage.
When ready to serve, heat them on the griddle, drizzle homemade ghee liberally on both sides and serve.
Share this:

A wholesome weekend Brunch- Veg Fajitas with Guacamole
The lad is a foodie- much to my happiness! He tastes the food and gives an instant ‘thumbs up’ to well made dishes. Some of my trials are met with an honest ‘I didn’t like this much’ feedback along with a suggestion to ‘repair’ the dish. On some Friday nights ‘Would you like to have Pizza for dinner?’ is answered by ‘Do we have fresh Basil and Mozzarella?’ On one occasion when I asked him what he would like to have for dinner (please note: this question gets asked only on weekends) , he picked up one of my cookbooks (the one mentioned below) and wrote down, on a piece of paper -A starter ,soup, a main course and a dessert he wanted me to make for his dinner!

Most of the days it’s a pleasure to feed this child who happily eats his veggies and fruits without any fuss. On the flip side, he needs a lot of variety. He is the ‘forever hungry monster’ specially when I am home. The veggies get grilled, marinated, wrapped, sandwiched or they get topped on whole wheat ‘pizza’ to make them more interesting than the regular Roti-Sabji.

The Veg Fajita (recipe below) is adapted from a book called ‘330 vegetarian recipes for health’. This book which I picked up from the local Crossword store has been one of my ‘super finds’. All the recipes are vegetarian (no-meat, no-fish). The first section in the book includes a whole food guide for fruits and vegetables to grains and from dairy foods to herbs and spices. This vegetarian ‘mini encyclopedia’ includes essential facts about key health benefits as well as information on buying, storing and preparing whole food. The photographs are absolutely drool-worthy. The book showcases hundreds of step by step recipes from around the world. Most of the recipes are not only healthy but are also easy to follow.The book occupies is always kept handy on my book shelf since more than often I find myself referring to it for ideas to keep the foodie lad satiated. The Light meals and side dishes section in the book are our favourites. I would recommend this fascinating book to anyone interested in finding out more about whole food.

For these colorful Veg Fajitas, Mushrooms and coloured Peppers (capsicums) are marinated in a little chilli powder/olive oil ,lightly sautéed and wrapped in flour Tortillas. Fresh Mushrooms and coloured capsicums are usually found in our crisper since they are a hit whichever way they get served. I used our regular whole wheat Rotis (Phulkas) to substitute the Tortillas.

Guacamole is a family favourite. We love Guacamole. Whenever I have access to good quality Avocados, the creamy dip gets slathered on breads or Rotis or is paired up with corn chips, khakras, Tacos anything that can be dipped or wrapped!. One of the very few veggie vendors who stocks ‘exotic’ fruits here in Nashik sometimes sells Avocados. Finding good quality Avocados is a challenge since they travel here all the way from Goa (that’s what the vendor tells me). I was happy to find some lush green Avocados on my trip to Nature’s basket, Bangalore.
A freshly made Guacamole served with the medley of colorful vegetables wrapped in a whole wheat Tortilla made for a wholesome weekend brunch. The foodie lad was ecstatic and lost count of the number of ‘Tortillas’ that vanished into his little tummy 🙂

Here’s the Recipe for the Veg Fajitas
Ingredients:
1 onion sliced
1 Red Pepper
1 Yellow Pepper
1 Green Pepper ( I skipped this )
1 garlic clove crushed
1 packet Button mushrooms (about 15-16 mushrooms)
6 tbsp vegetable oil ( I used the herb infused Olive oil )
2-3 tsp Red chilli powder (the original recipe asks for 2 tbsp but I reduced the quantity since our Red chilli powder is quite hot, adjut this to taste)
Salt to taste
Freshly ground pepper for garnishing
To serve:
~ 6 small Flour Tortillas/ Rotis warmed.
Sprigs of fresh coriander
Wedges of 1 lime.
Method:
Slice the onion.
Cut the Peppers into strips.
Mix the onion slices and peppers in a bowl.
Add the crushed garlic.
Wash and dry the Mushrooms on a kitchen towel.
Remove the stems from the Mushrooms (Use them to make stock)
Slice the Mushrooms and add to the pepper mixture.
Mix the oil and Red chilli powder in a small cup and mix.
Add this to the veggie mixture and Keep aside for 20 minutes (or till you make the Guacamole recipe below)
Heat a pan or wok till hot.
Add the marinated vegetables and stir fry over high heat for 5-6 minutes, till the veggies are just tender.
Season with salt and crushed black pepper.
Spoon the filling on to each Tortilla and roll up.
Garnish with fresh chopped coriander.
Serve with Fresh Guacamole and lime wedges.
I did not follow the recipe for Guacamole from the book.This is how I make it:
Recipe for Guacamole
Ingredients:
1 Ripe Avocado
1 small Onion finely chopped
1 small Tomato seeds removed and chopped
1 Green chilli chopped
Juice of 1 lime
Crushed black pepper to taste
Fresh coriander leaves chopped
Salt to taste
Method:
Cut the Avocado in half.
Remove the pit, scoop out the pulp from the peel and put in mixing bowl.
Mash the Avocado with a fork. I like to keep a few small pieces.
Add the onion, tomato, green chilli, lime juice, coriander leaves, salt and crushed black pepper.
Mix nicely and serve immediately with corn chips, Tacos, Khakras or Veg Fajitas.
Note: This is not one of the make ahead kind of dip since the Avocado oxidises very fast. If you haveto keep it for some time before serving cover with a plastic wrap and refrigerate.

Share this:

Quick Roti Quesadilla
A very simple way to use leftover Rotis and curries: This is a hit with my little one and he doesn’t even know he is eating beans, cauliflower, carrots!
Left over Rotis are stuffed with vegetable mixed with soya sauce, tomato ketchup, sprinkled with cheese, drizzled with oil, toasted and cut into triangle like Quesadillas.
The Idea for sealing the Roti edges comes from Nupur’s Aayis samosa. Thanks Nupur and your Aai for this brilliant idea.

 Roti Quesadilla Recipe:
Leftover Chapatis (you need them in pairs)
Butter as required
Grated Cheese
Chickpea Flour paste in water (for sealing the edges)
Oil
For the Filling:
Cooked mixed Vegetables of your choice (I have added carrots, cabbage, capsicum, Green beans, onion and tomatoes)
Tomato Ketchup 2 tbsp
Soya Sauce 2 tsp
Ginger Garlic paste-1tsp

- Heat 1 tsp oil/butter in a pan.
-
Add ginger garlic paste.
-
Add the cooked mixed vegetables. Fry for 1-2 minutes.
-
Add salt if not already added, tomato ketchup , soya sauce and mix well. Keep Aside.
-
Spread butter on one side of the Roti.
-
Add the vegetable filling and spread, leaving ½ inch space from the sides.
-
Sprinkle cheese.
-
Apply the Chickpea flour paste on the edge of the Roti.
-
Cover with another Roti (you can apply the Chickpea paste to the edges of the 2nd Roti too)
-
Press edges using a spoon or fork.
-
Heat a flat pan and drizzle some oil.
-
Cook the Rotis on both sides till golden brown.
-
Cut quarters of the Roti-Quesadilla using a pizza cutter.
-
Serve Hot.
Thank you for visiting My FoodCourt ..Cheers
Share this:

Power Parathas- Veggie stuffed Spinach Parathas.
We had some guests last night for dinner; one of our family friend’s daughter is getting married. We celebrated her engagement earlier with Chaats.Now for the pre-wedding dinner (this is called ‘Kelvan’ in Marathi) I wanted to make something substantial yet different. Also there were two grandmothers coming, so I had to plan something accordingly.
This was the time I felt the need for a ‘Menu Planner’ website! You feed what you need;
Prewedding dinner+substantial+Something different+2 grandmothers and press Search!
And then automatically you get the planned Menu:
Veggie stuffed spinach parathas
Boondi Raita
Tricolored Penne pasta
Mushroom fried rice
Fruit Salad with Raspberyy Jelly and Custard
(Anytakers for such a website??)
Yes that’s the spread that I cooked finally. It’s really a spread since it spans cuisines from many countries! Indian to Italian to Chinese. As you can see I did not follow any theme! But they loved it!J
I will post the recipes one–by-one as and when I can. __________________________________________________________
Veggie stuffed Spinach parathas recipe
_____________________________________________________

(You have to excuse the poor photos. I had to click them before the guests arrived and after slogging in the kitchen for the whole evening I was too tired to take extra efforts!)
For the cover:
1 bunch Spinach/Palak
~ 2 ½ cups Wheat Flour
1 tsp green chilly paste
1 tsp cumene powder
1 tsp coriander powder
Salt to taste
For the stuffing:
3/4th cup cauliflower florets
3/4th cup finely grated Carrots
3/4th cup French beand finely chopped
3 Potatoes boiled, peeled and mashed
½ cup Paneer (cottage cheese) grated
Handful of fresh green coriander leaves finely chopped
2 tsp ginger-green chilly paste
Salt to taste
Oil/butter for frying the parathas
For the cover:
Clean and Wash the Spinach leaves thoroughly. Keep the stems as much as possible. Blanch the Spinach leaves; Bring about 2 cups of water to a boil. Add a pinch of sugar and little salt. Add the spinach leaves and cook uncovered for ~5-8 minutes. Strain the water (don’t discard the water) and immediately add the cooked spinach to cold water. This helps to retain the green color of the spinach. Alternatively you can blanch the spinach in the Microwave.Puree the blanched spinach.
In a wide bowl add the wheat flour, spinach puree and all the ingredients for the cover.
Knead into a soft lovely green dough ball. Add water if necessary.
Divide the dough into lemon sized balls. Keep aside covered for ½ an hour.
For the stuffing:
I used Nupur’s tip for cooking potatoes in the microwave with excellent results! Specially if you want no moisture in the potatoes for parathas follow this simple method: Wash the potatoes and prick them all over with a fork.Microwave on the turn table for 3 minutes. Turn them and microwave for another 2-3 minutes.(The time required may vary) That’s it. Peel and mash the cooked potatoes.
Cut the cauliflower florets finely or as I did spin them in the Food processor once to have really fine florets!
I did the same with the French beans.
In a non stick pan dry cook the cauliflower and beans. Try and remove moisture as far as possible.
Add the carrots and cook for a few more minutes.
Cook till the veggies become a little tender.
Mix all the ingredients for the stuffing.
Flatten the dough ball into small thin circle.Stuff with as much stuffing as you can.
Bring together the cover from all the sides to the center, seal tightly and roll out into thin round discs, using wheat flour for dusting.
Cook on a hot griddle/tava, using a little oil/butter, until both sides are golden brown.
Repeat with the remaining dough and stuffing.
Serve hot with Raita, Pickle or Chutney.
Share this:

Dear Anita
Dear Anita,
You have no idea how your little provocation has unsettled my taste buds for the past week. I have been craving each day for those hot, oily floating balloons from the day you posted them at the Mad Tea party!
Clicking on any random blog on the Food Blog Desam made matters worse. I found myself drooling and ogling at all those sinful puris.
I decided to end my suffering, got up early (inspite of this being a weekend). I did not want anything to come between me and my puris (read my little one). I got up with this ‘Duniya ki koi takat muzhe puri banana se rok nahi sakti’ attitude. (too lengthy to translate in english)
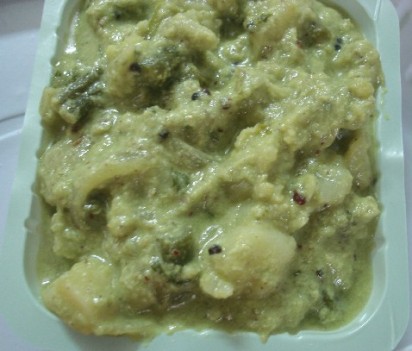
At once I knew, that the sagoo (my mother-in-law’s recipe) would be the right companion to my Puris.
When I inserted the first rolled out round disc into the hot oil my happiness knew no bounds! I felt like a child who was given a bunch of balloons-when the first reddish- brown oily balloon started floating on the oil- gleaming at me, urging me to be eaten!
Thanks to that one provocation, I have managed to over-oil (as in lubricating a vehicle) my mind, body and the camera. Why the camera? – Just to prove that these are actually puris and not Cluris.
Thank you Anita, I had almost forgotten how these soft, hot, homemade puris tasted.. pure bliss – I can’t even remember the last time I made them.
Thank you.
With lots of Puris and Sagoo
Madhuli
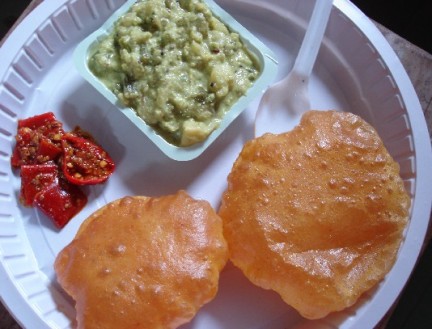
Puri, Sagoo and Punjabi,Red Chili Pickle for the Puri-Bhaji party
__________________________________________________________
Sagoo recipe
_____________________________________________________
For the gravy:
½ Coconut scrapped
6-7 green chillies chopped
½ bunch fresh coriander leaves
2 tsp poppy seeds (khus khus) soaked in warm water for 15 minutes
1” piece Cinnamon
½ “piece ginger chopped
1 onion sliced
For the Sagoo
1 Onion sliced
2 potatoes cubed
1 cup cauliflower florets
1 cup French beans chopped
For the tadka:
2 tsp oil
1 tsp mustard seeds
1 tsp cumene seeds
½ tsp turmeric powder
Blend all the ingredients for the gravy to a smooth creamy paste.
Heat oil in a pan. Add the mustard seeds.Then the cumene seeds and the turmeric powder.
Add the onion and sauté for 1-2 minutes.
Add the vegetables and cook covered till they become tender.
Add the gravy, salt and adjust the water to the required consistency.
Mix nicely, cook for a few minutes more and serve hot with Puris.
__________________________________________________________
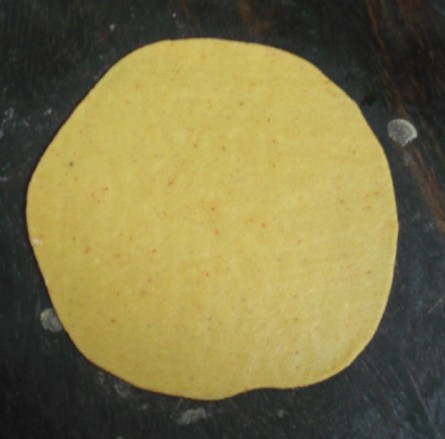
Puri recipe
_____________________________________________________
Go to A Mad Tea Party on 20th August and you will get not one but many recipes for Puris.
I made them like this:
In a bowl take 2 cups of Wheat Flour. Add salt as per taste. Add ½ tsp Turmeric powder. Add 1 tsp Red chilli powder. This type of puri is called Tikhat Mithachi Puri in Marathi. (Tikhat here refers to Red Chili powder and Mith is salt)
Add 1 tbsp hot oil to the Wheat Flour. Knead to a tight dough using water as required.
Make small balls from the dough. Roll out into small round discs.
Heat Oil in a Kadai/Wok. Deep fry the rolled out round disc till they puff up.
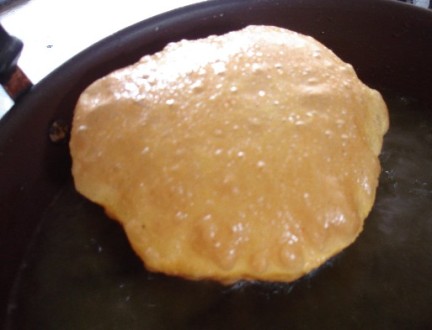
Turn and fry on the other side till it turns a reddish-brown colour.
Serve hot with Sagoo
Note: If you want to have Tikhat Mithachi Puri without any accompaniments- Add a tsp of cumene seeds and 1 tsp carom seeds to the Wheat flour before kneading the dough. Follow the rest of the procedure for puris. Roll and Insert these spicy Puris in hot Chai(tea) and eat it immediately..Hmmm..Yummy
Share this:

All things Beet
Previously I would buy only the Beet-root without the greens. After seeing Asha’s Dal saag recipe, I was inspired to buy Beet greens along with the Beetroot. Thanks Asha for the inspiration.
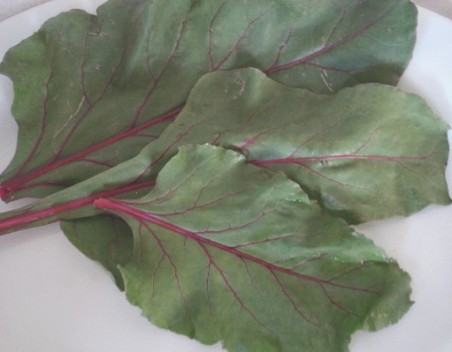
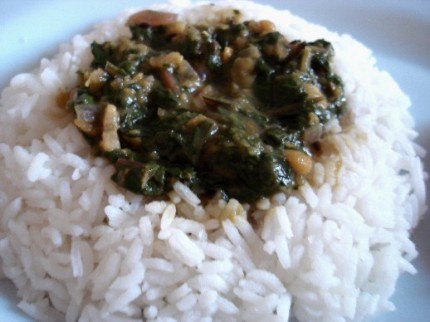
I have made my own version of the dal.I have used the Beet greens along with three types of dals; Chana Dal, Mung Dal and Toovar dal to make this very healthy and delicious Beet greens dal.
I used some of the leaves to make paratha for my little one J
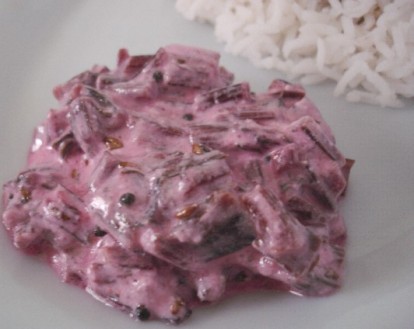
The pink-red stems of the Beet greens were looking so fresh and lovely that I didn’t have a heart to throw them away, which I later realized was a very wise decision! I made a delicious and refreshing Raita with them, which complimented the Dal-Rice combination.
I made Beetroot Kanji with the Root.
After making the Dal and Raita, I had a sense of satisfaction –that of utilizing most of the parts of the Beet, not wasting much (except the beetroot peels). J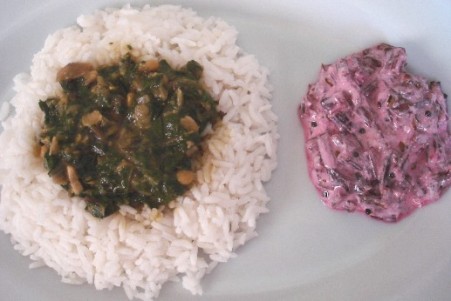
__________________________________________________________
Beet greens Dal recipe
Servings :4-5 _____________________________________________________
Ingredients:
1 ½ cup chopped Beet greens
½ cup Chana Dal
½ cup Moong da
l½ cup Toovar Dal
1 onion chopped
4-5 green chillies chopped
5-6 garlic cloves peeled and finely chopped
½ tsp cumene seeds ½ tsp mustard seeds¼ tsp turmeric powder
2 tsp oil
Wash the dals , add water, a pinch of turmeric powder and few drops of oil. This helps to cook the dals faster. Pressure cook till well done. Boil about 1 cup water in a vessel, add the beet greens and cook on a low flame till the greens are soft and well cooked.Add the cooked dals to these greens. Add salt and mix nicely.Heat oil in another pan. Add the cumene seeds, mustard seeds, garlic and chopped onion and fry nicely till the onion turns golden brown. Add the green chillies.To this add the Beet greens-dal mixture and cook for a few seconds more.
Serve hot with rice.
__________________________________________________________
Beet stem raita recipe
Servings :about 2-3 __________________________________________________________
Wash the Beet stems thoroughly (I had about7-8 young stems). Peel the thin skin from the stems. Steam the stems. (I put it in the pressure cooker along with the rice and the dals)Cool and chop the stems. Add about ½ cup Curd/yoghurt to this, salt as per taste and about ¼ tsp sugar and mix nicely.In a small pan heat 2 tsp oil, add ½ tsp cumene seeds, ½ tsp mustard seeds, 2-3 chopped green chillies. Add this tadka to the yoghurt raita. Mix nicely and chill.Serve with roti or dal-rice or have it as it is.
_____________________________________________________
And that’s my little one’s paratha made with Beet greens!

Share this:

Makki di Roti-Sarson da Saag
The festival of Lohri was celebrated on 13th Jan. The traditional Lohri food Sarson da Saag and Makki di Roti is specially cooked for the main course on this day along with sweets and other delicacies. I learnt this mouthwatering duo -the Punjabi way from my Punjabi colleague. Whenever she brings this for lunch I swap my lunch box with her! Now I make it often specially for dinner coz it tastes better if the Roti and Saag are both piping hot. So here’s a typical Punjabi recipe (my friend’s) for Sarson da Saag and Makki di roti.

For the Sarson Saag
1 big bunch Sarson leaves (mustard leaves)
1 bunch Spinach leaves
½ bunch Bathua leaves (Chenopodium album) (optional)
2 onions chopped
2 tomatoes chopped
4-5 garlic pods finely chopped
½ inch ginger piece crushed
½ tsp cumene seeds
2 tsp Makki flour (Cornmeal)
Salt to taste
1tsp butter for cooking and as much as you can have for topping
1 tsp oil
Roughly chop the cleaned, washed leaves of Sarson, Spinach (don’t remove spinach stalks) and Bathua. Pressure cook for ½ hour. Cool and coarsely puree in a food processor. In a pan heat 1 tsp butter and oil. Add cumene seeds,chopped garlic, crushed ginger and onion .Sauté till onions become translucent. Add chopped tomatoes and cook till they become tender. Add the Sarson puree and cook for almost 15 minutes .Add water if required. Add salt. Make a slurry of the Makki Flour in water and add to the saag.Cook for a few minutes. Serve piping hot with Makki Roti.
For the Makki Roti
2 cups Makki Flour (cornmeal)
Lukewarm water
Salt to taste
Oil for cooking
Butter for topping
Add salt to the Makki flour. Knead into a dough by adding warm water. Divide into small balls. Pat each ball into a small round Roti between your palms, or make rotis by patting on a flat surface like you do for Bhakri, or on a plastic sheet taking care that the Roti is not too thin.Cook on a hot griddle brushing oil on both sides.Top with a spoonful of butter and serve hot with Sarson da Saag.
For variation try adding fresh green Methi(fenugreek) leaves and chopped green chillies to the Makki dough.It tastes even better.This can be eaten like a paratha without the saag with lotso butter!
Share this:

Pumpkin Parathas
Pumpkin-truly Pumps up your Kins! J
With loads of Vitamins ,Minerals, Carotenes this orange fleshy vegetable (I am calling this as a vegetable – that’s what it is regarded as in India) is rich in fibre and low in calories and Cholesterol. So many benefits and yet I am surprised this vegetable doesn’t enjoy the popularity it should. I know many people who will say ‘Pumpkin..yuck!’. Bhopla (in Marathi) or Kaddu (in Hindi) is looked down upon by many people. In fact Pumpkins are quite versatile and can be added to many recipes like soups, curries, Sambar,Puris,cakes,pies -the list is endless.
Each and every part of this plump vegetable is edible, tasty and nutritious- The flesh , the seeds and the skin too!(We make a delicious chutney from the skin)
I am really glad Meeta has chosen this all rounder vegetable for this month’s FMR.
So here’s Pumpkins Parathas for Meetas FMR

Ingredients
3 Cups Whole wheat flour
1 cup grated Pumpkin (we call it Lal Bhopla here, the flat round variety)
2 tsp chopped fresh green coriander leaves
2 tsp sesame seeds
1 tsp ajowain seeds
2 tsp green chilli paste
1 tsp turmeric powder
2 tsp lime juice (optional)
Salt as per taste
Combine all the ingredients in a bowl.Pumpkin contains lots of water, so knead the dough in it. Use more water if required and knead into a soft pliable dough.Don’t keep the dough for long.
Immediately make small lime size balls of the dough.Roll out each ball on a flat surface with a rolling pin into a circle. Dust some wheat flour if required.On a hot griddle/tava, cook each paratha on both sides applying little oil on both sides.
Serve hot with curds(yoghurt) or some achaar,Chutney.

Share this:

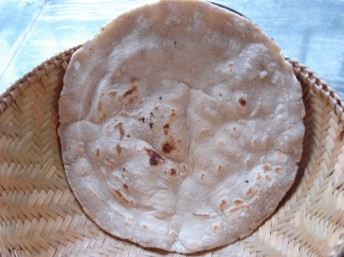
Bhakri (Flat bread made from Sorghum/White Millet flour).
I might sound like a grandmother when I say that the art of making Bhakri is disappearing with the new generation.
I learnt making Bhakri from my mom when I was still in college. I was made to learn! My Mom would ask me to make atleast 1 Bhakri whenever we had Bhakri -mostly for dinner. That time I was not quite happy about it. Now I realise that it was part of my culinary training. Thank God for that!
Jowar Bhakri is nutritious and high in protein content. It is also very easy to digest. Doctors and nutritionists now-a-days recommend Bhakri to be included in your diet. All the more reason for you to learn to make them!!!
To make 3-4 Jowar Bhakris you need
3 cups Fresh Jowar Flour. (The flour has to be very fresh or else the Bhakri will crack and won’t be soft. Also the flour if stored for a long time, turns bitter)
Salt as per taste(Optional)
Water to knead.
Make your first Bhakri like this:
Make dough for one Bhakri at a time.Don’t knead the entire dough.So for your first Bhakri take about a cup of Jowar flour and add salt to it. (Salt is optional).
Gradually add water and knead it into a soft pliable dough. This process of kneading the dough is quite important. Bhakris will be soft if the dough is well knead.So using your hand and knuckles knead it nicely for 8-10 minutes.
Take a golf sized round ball from the dough and flatten it with both your hands.

On a flat surface sprinkle some dry jowar flour, keep the flat ball on it, apply some Jowar flour to your hand and with the palm of your hand spread the dough into a thin circle. Take care that the dough does not stick at the bottom and should move freely with your hands.
Carefully lift this dough with both your hands and place it on a hot iron griddle (tava).
Spread a little water with your hands on the surface of the Bhakri and then turn the Bhakri to the other side. Cook on high flame till some brown spots appear on the lower surface of the Bhakri.
Remove it from the tava , turn it upside down and gently put it directly on the flame.It should blow like a balloon.
Remove from flame and serve hot.
Add more dry jowar flour to the remaining kneaded dough and knead well. Repeat the above procedure to make another Bhakri.Once you have mastered the art of making Bhakri,you can save time by kneading the dough for the next Bhari while still roasting the first !
Serve hot – Hot Bhakri topped with some homemade butter …..mmmmmm : )
For variation Bajra or even Rice flour can be used to make Bhakri.
Bhakri is usually served with Pithla (Curry made from gram flour), Thecha (spicy green and garlic chilly chutney) or any leafy green vegetable.
Share this:

Quick n Easy Methi (Fenugreek)Parathas
Fresh leafy veggies are my weakness and I can’t resist the temptation of buying them whenever I am in the Bhaji Bazaar (Vegetable Market). I couldn’t resist buying a bunch of Methi (Fenugreek) leaves this time I visited the bazaar.

The best thing one can make with a bunch of Methi leaves is quick and easy Parathas (…says me). So here’s what I carried for lunch today…
Ingredients:
1 bunch Methi leaves cleaned, washed and chopped
3 cups whole wheat flour (atta)
1 tbsp split gram flour (besan)
1 tbsp soy flour (Optional)
1 tsp turmeric powder
Red Chilli powder- as per taste
Salt – as required
½ tsp sugar
2 tsps lime juice
Oil/Butter/Ghee for cooking
Method:
Combine all the ingredients in a bowl.
Knead the dough using water as required. The dough should not be too hard or too soft. Keep it aside, covered for about 10 mins.
Make small lime size balls of the dough.
Roll out each ball on a flat surface with a rolling pin into a circle. Dust some wheat flour if required.
On a hot griddle/tava, cook each paratha on both sides.Apply little oil/butter/ghee on both sides. (For the diet conscious parathas can be cooked without the oil or butter. It tastes equally good.)
Serve with Achaar or Chutney.

Methi parathas are a favourite with my toddler too, though he prefers it less spicy!
Share this:


