Posts filed under ‘veggies’
Onion Magic
“It’s probably illegal to make soups, stews and casseroles without plenty of onions.” -Maggie Waldron
It’s hard to imagine my food without Onion and Garlic. The flavor of Onions and Garlic being sautéed in the ‘tadka’ is simply irresistible. Especially in the evenings nearing dinnertime, you go for a walk and you are sure to get this irresistible aroma from someone’s kitchen window. Both onions and Garlic add the required ‘zing’ to my food.

Here’s a simple starter from Tarla Dalal. Very quick and easy to make; yummy to taste-family opinion. Baby onions (I used Madras onions) and mushrooms sautéed in butter and seasoned with Tabasco sauce and Oregano (I used the oregano seasoning you get with Dominos pizzas). This can be served as a starter or as a side dish. I served it as a side dish with Tomato- Basil Pasta.

 Onion Mushroom with Oregano recipe as adapted from Tarla Dalal
|
Ingredients
Heat the butter in a saucepan and sauté the onions till they turn light brown. Add the button mushrooms and cook for some time (till the excess water evaporates). Finally add the Tobasco sauce, oregano and salt and mix well. Serve hot with toothpicks pierced in each mushroom and onion. The original recipe recommends spring onions for garnishing. I did not have any on hand so I have not added. |
Here’s some more Allium magic for Click: August 2009 (Allium).

Allium Magic
Thanks Jai and Bee for hosting Click.
Share this:

Quick Roti Quesadilla
A very simple way to use leftover Rotis and curries: This is a hit with my little one and he doesn’t even know he is eating beans, cauliflower, carrots!
Left over Rotis are stuffed with vegetable mixed with soya sauce, tomato ketchup, sprinkled with cheese, drizzled with oil, toasted and cut into triangle like Quesadillas.
The Idea for sealing the Roti edges comes from Nupur’s Aayis samosa. Thanks Nupur and your Aai for this brilliant idea.

Roti Quesadilla Recipe:
Leftover Chapatis (you need them in pairs)
Butter as required
Grated Cheese
Chickpea Flour paste in water (for sealing the edges)
Oil
For the Filling:
Cooked mixed Vegetables of your choice (I have added carrots, cabbage, capsicum, Green beans, onion and tomatoes)
Tomato Ketchup 2 tbsp
Soya Sauce 2 tsp
Ginger Garlic paste-1tsp

- Heat 1 tsp oil/butter in a pan.
-
Add ginger garlic paste.
-
Add the cooked mixed vegetables. Fry for 1-2 minutes.
-
Add salt if not already added, tomato ketchup , soya sauce and mix well. Keep Aside.
-
Spread butter on one side of the Roti.
-
Add the vegetable filling and spread, leaving ½ inch space from the sides.
-
Sprinkle cheese.
-
Apply the Chickpea flour paste on the edge of the Roti.
-
Cover with another Roti (you can apply the Chickpea paste to the edges of the 2nd Roti too)
-
Press edges using a spoon or fork.
-
Heat a flat pan and drizzle some oil.
-
Cook the Rotis on both sides till golden brown.
-
Cut quarters of the Roti-Quesadilla using a pizza cutter.
-
Serve Hot.
Thank you for visiting My FoodCourt ..Cheers
Share this:

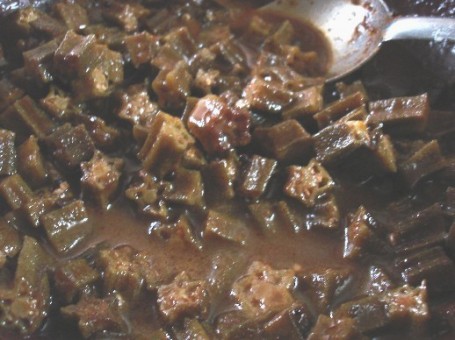
Bendekay (Bhindi/Okra) Gojju
Thank you all of you for your wishes, I am feeling much better now.
South Indian food was restricted to Idli-Sambar-Dosa- chutney- Rasam that was till I got married.
After marriage I learnt so many wonderful recipes from my mother-in-law, not just idli-dosa etc.. but some really nice curries, rice and Rotis.
Ajay’s family hails from Bangalore ;Iyengars settled in Karnataka for generations together (and now he is settled in Maharashtra). It’s a fine blend of Tamilian + Kannadiga cuisine, and now my addition- +Maharashtrian cuisine. So we have some very hybrid recipes cooked in our kitchen!
This is a nice recipe for Bendekay(Bhindi/Okra) Gojju; of course my mother-in-law’s recipe.
Bhindi/ okra is cooked in tamarind pulp along with jaggery and some rasam powder (Malkapudi). It thus has all three tastes; sweet, sour and spicy. This recipe is especially good when you have less amount of Bhindi and more amount of people eating it or when the Bhindi is not very fresh and you need to dress it up! J
Bendekay(Bhindi/Okra) Gojju my second entry to Asha’s RCI Karnataka.
![]()
__________________________________________________________
Bendekay (Bhindi/Okra) Gojju recipe _____________________________________________________ ½ kg Bhindi/okra/ Ladies finger – washed, towel dried, ends removed and chopped into small round discs.~ 1 tbsp tamarind pulp
2 tbsp crushed jaggery
2 tsp Rasam powder (Malkapudi)
¼ tsp asafoetida (hing) crushed
7-8 fresh curry leaves
½ tsp cumene seeds
½ tsp mustard seeds
¼ tsp turmeric powder
2 tsp oil
Salt to taste
Heat oil in a pan.
Do the tadka mustard seeds- cumene seeds- turmeric powder and then the curry leaves and asafoetida.
Add the Bhindi and fry nicely.
Cook for a few minutes and then add the tamarind pulp, jaggery, salt and the Rasam (Malkapudi) powder.
Mix nicely and add little water if the pulp is too thick.
Cook uncovered till the Bhindi is cooked nicely.
Serve hot with Rice of Roti.
Share this:

Ridge Gourd with Jowar-Wheat flour dumplings
I always wonder what keeps My Foodcourt going?
I am not someone who is very good with words , and so the writeup on posts are usually quite small and only occasionally elaborate. My food-photos are ok but not exceptional;I get on an average 5-7 minutes to photograph any of my recipes, before my little one decides it is high time he took charge of the camera!
Then what is it?
Of course I love your feedback and encouragement, the most important thing that keeps me going.
And then there are recipes like these which I love to share with you all! And that’s what I love the most about food-blogging; Posting recipes which you will usually not find documented on the internet or maybe even cookbooks, passed on from one generation to the other, which are very close to my heart and my palate, of course. Usually these are my mom’s or Mom-in-law’s recipes and hence can be called authentic.
This Ridge Gourd with Jowar-wheat flour dumplings is one such recipe- very authentic (since my mom makes it J ) and which you would usually not find on any Hotel menu card or maybe even in any cookbooks.
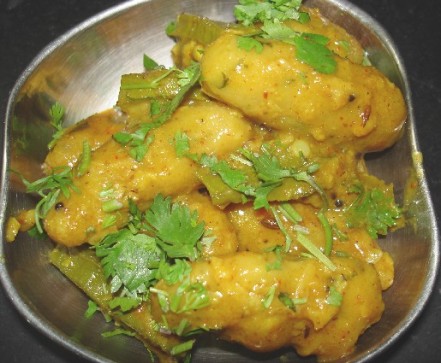
Dumplings of Jowar flour (sorghum/white millet)-wheat flour spiced with some chillies and ajwain (carom seeds) are cooked along with Ridge gourd. These dumplings just transform the simple, humble Ridge Gourd curry into something very exotic and utterly delicious, not to mention very very healthy. You can substitute Ridge Gourd with Silk Squash (Dodka) or Cluster beans (Gavar) or any such vegetable.
__________________________________________________________
Ridge Gourd with Jowar-Wheat Flour dumplings recipe
_____________________________________________________
2-3 Ridge gourds lightly peeled and cut into 1 inch pieces
2-3 garlic cloves (optional)
2 tsp Red chilli powder
1 tsp mustard seeds
1 tsp cumene seeds
½ tsp turmeric powder
3 tsp oil
Salt as per taste
Fresh coriander leaves for garnishing
For the Jowar-Wheat flour dumplings
1 cup Jowar flour
1 cup Wheat flour
2 tsp green chili paste
1 tsp ajwain (carom seeds)
¼ tsp turmeric powder
Salt to taste
For the Jowar-Wheat flour dumplings
Mix all the ingredients and knead into a firm dough. It maybe a little sticky but its ok. Shape small lemon sized balls of the dough into cylindrical croquette shaped dumplings. Keep them aside.
Heat oil in a pan.
Do the tadka (tempering); Mustard seeds-cumene seeds-garlic- turmeric powder.
Fry for a few seconds and add the Ridge gourd pieces.
Add salt and Red chili powder, mix nicely and cook covered till the Ridge gourd is almost half done. Add about ½ cup water.
Place and spread the Jowar-Wheat flour dumplings one by one on top of the Ridge gourd. Do not stir or mix. Cover and cook on low flame till the dumplings are nicely steamed.
Only after the dumplings are properly cooked, stir the curry nicely so that the dumplings and Ridge gourd mix nicely.
Cook for a few more minutes.
Garnish with fresh coriander leaves.

Serve hot with Bhakri or Roti. I had it just like that!
Share this:

Dear Anita
Dear Anita,
You have no idea how your little provocation has unsettled my taste buds for the past week. I have been craving each day for those hot, oily floating balloons from the day you posted them at the Mad Tea party!
Clicking on any random blog on the Food Blog Desam made matters worse. I found myself drooling and ogling at all those sinful puris.
I decided to end my suffering, got up early (inspite of this being a weekend). I did not want anything to come between me and my puris (read my little one). I got up with this ‘Duniya ki koi takat muzhe puri banana se rok nahi sakti’ attitude. (too lengthy to translate in english)
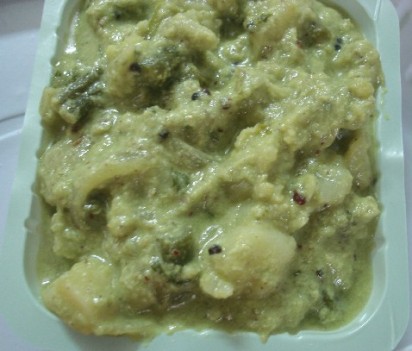
At once I knew, that the sagoo (my mother-in-law’s recipe) would be the right companion to my Puris.
When I inserted the first rolled out round disc into the hot oil my happiness knew no bounds! I felt like a child who was given a bunch of balloons-when the first reddish- brown oily balloon started floating on the oil- gleaming at me, urging me to be eaten!
Thanks to that one provocation, I have managed to over-oil (as in lubricating a vehicle) my mind, body and the camera. Why the camera? – Just to prove that these are actually puris and not Cluris.
Thank you Anita, I had almost forgotten how these soft, hot, homemade puris tasted.. pure bliss – I can’t even remember the last time I made them.
Thank you.
With lots of Puris and Sagoo
Madhuli
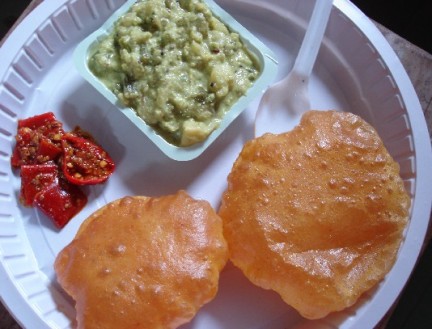
Puri, Sagoo and Punjabi,Red Chili Pickle for the Puri-Bhaji party
__________________________________________________________
Sagoo recipe
_____________________________________________________
For the gravy:
½ Coconut scrapped
6-7 green chillies chopped
½ bunch fresh coriander leaves
2 tsp poppy seeds (khus khus) soaked in warm water for 15 minutes
1” piece Cinnamon
½ “piece ginger chopped
1 onion sliced
For the Sagoo
1 Onion sliced
2 potatoes cubed
1 cup cauliflower florets
1 cup French beans chopped
For the tadka:
2 tsp oil
1 tsp mustard seeds
1 tsp cumene seeds
½ tsp turmeric powder
Blend all the ingredients for the gravy to a smooth creamy paste.
Heat oil in a pan. Add the mustard seeds.Then the cumene seeds and the turmeric powder.
Add the onion and sauté for 1-2 minutes.
Add the vegetables and cook covered till they become tender.
Add the gravy, salt and adjust the water to the required consistency.
Mix nicely, cook for a few minutes more and serve hot with Puris.
__________________________________________________________
Puri recipe
_____________________________________________________
Go to A Mad Tea Party on 20th August and you will get not one but many recipes for Puris.
I made them like this:
In a bowl take 2 cups of Wheat Flour. Add salt as per taste. Add ½ tsp Turmeric powder. Add 1 tsp Red chilli powder. This type of puri is called Tikhat Mithachi Puri in Marathi. (Tikhat here refers to Red Chili powder and Mith is salt)
Add 1 tbsp hot oil to the Wheat Flour. Knead to a tight dough using water as required.
Make small balls from the dough. Roll out into small round discs.
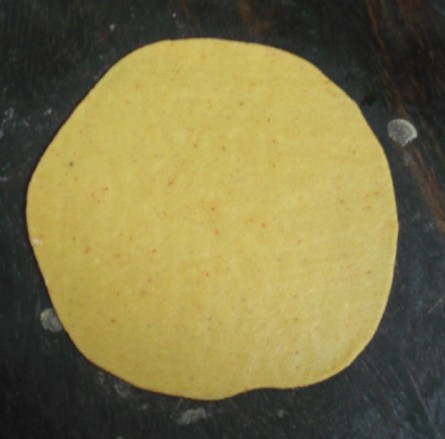
Heat Oil in a Kadai/Wok. Deep fry the rolled out round disc till they puff up.
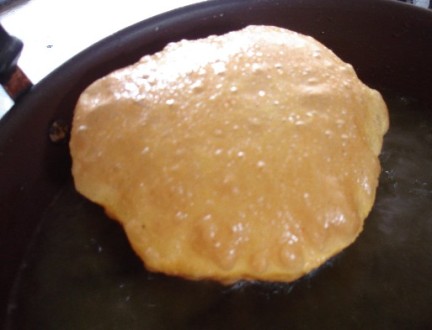
Turn and fry on the other side till it turns a reddish-brown colour.
Serve hot with Sagoo
Note: If you want to have Tikhat Mithachi Puri without any accompaniments- Add a tsp of cumene seeds and 1 tsp carom seeds to the Wheat flour before kneading the dough. Follow the rest of the procedure for puris. Roll and Insert these spicy Puris in hot Chai(tea) and eat it immediately..Hmmm..Yummy
Share this:

Spinach-Carrot soup and Stuffed Dinner Rolls
I love having different types of soups for dinner. Many times we have some soup teamed up with sandwiches or a pizza or a burger for dinner- a welcome change from our regular Daal-Chawal .
I am tempted to buy Fresh green spinach leaves (Palak) and fresh orange-red carrots every time I visit the market.
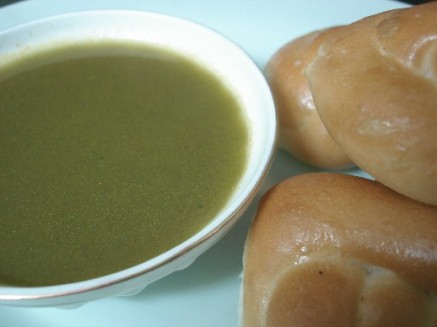
This time I cooked the two together to make this scrumptious Spinach- Carrot soup– a treat for all the Popeye’s in the world
We also had some very soft and fresh dinner rolls from our local bakery. I stuffed them with some potato-beetroot-mushroom filling (usually my choice of filling depends on the vegetables available in my fridge) to make these lovely looking appetizing stuffed rolls.
__________________________________________________________
Spinach Carrot soup recipe
For about 3-4 servings
_____________________________________________________
1 bunch Spinach (Palak) –keep the stems as far as possible
2-3 carrots peeled and grated
1 onion skin removed and cut into half
1 large potato boiled (optional)
1 tsp butter/ margarine
½ tsp sugar
White/green pepper powder
Salt to taste
Blanch spinach and onion together. Cool and blend in a food processor along with the boiled potato.(I add the boiled potato to give thickness to the soup.You can avoid adding the potato if you like and use cornflour to thicken the soup)
Heat butter/margarine in a pan.
Add grated carrots, sauté for a few seconds.
Pour the spinach puree over it.
Add water(used for blanching) to adjust the soup to the desired consistency. Boil for few minutes.
Add salt, sugar, pepper powder and boil one last time.
Serve hot with breadsticks or toasts or bread rolls.
You can garnish with some grated cheese when serving this soup to kids.
Note: To preserve the green colour of the spinach, don’t cover the pan while blanching. Boil for 10 minutes and immediately immerse the blanched leaves in cold water. (Don’t discard the water used to blanch the spinach.Use it for diluting the soup or for making dal or Roti dough)_________________________________________________________
Stuffed Dinner Rolls recipe
For 8-10 rolls
_____________________________________________________

8-10 Dinner Rolls
2 large potatoes boiled, peeled and grated
1 beetroot boiled, peeled and grated
7-8 button mushrooms cleaned and chopped
1 tomato chopped
1 onion finely chopped
2 tsp green Jalapeno sauce (readily available, you can use green chili sauce also)
3-4 greenchillies finely chopped
2 cheese cubes grated (optional)
~ 2 tbsp tomato ketchup
1 tsp butter
Heat butter in a pan.
Add the chopped onion,green cillies and fry till translucent.
Add the mushroom and sauté till the water from the mushroom evaporates.
Add chopped tomatoes and cook till they become mushy.
Now add the grated potato and beetroot.
Add salt, mix nicely and remove from fire.
Mix in the tomato ketchup and grated cheese.
Cut the dinner rolls horizontally without cutting through.
Spread as much filling as you can evenly and grill for few minutes.
Serve hot.

Share this:

Sai Bhaji
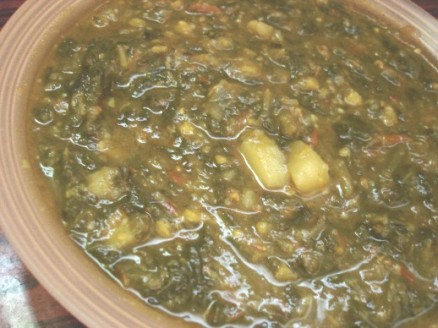
Sai Bhaji– This is a very popular Sindhi signature dish. It is also known as ‘Sindhi Palak’ since Palak is used in generous proportions for this recipe. I recently learnt this recipe from my Sindhi colleague and it was an instant hit in our home.Hey Nupur this time it’s the traditional SSSSSS….Sindhi , SSSSSS……Sai Bhaji for A-Z of Indian vegetables.
_________________________________________________________ Sai Bhaji recipe
Servings :5-6
_____________________________________________________
Ingredients:
1 bunch Palak/spinach leaves cleaned, washed and chopped
½ bunch Ambat Chuka (Green sorrel) leaves cleaned, washed and chopped. (If you don’t have Ambat Chuka, use more number of tomatoes to maintain the slightly sour taste of this dish. I have tried that version too and it tastes as good as this)
1 medium sized Brinjal/Baingan (the purple variety) cubed
1 medium sized potato washed, peeled, cubed
1-2 medium sized tomatoes, washed and finely chopped
1 onion peeled and finely chopped
½ cup Chana dal (split Bengal gram) soaked in water for ½ hour
6-7 green chillies chopped
½ tsp red chilli powder (optional)
½ tsp coriander powder
½ tsp cumene seeds
¼ tsp turmeric powder
2 tsp oil
Salt as per taste
In a pressure cooker heat oil. Add the cumene seeds, turmeric powder and then the chopped green chillies. Add the onions and sauté till the onions turn golden brown in colour. Add the tomatoes and cook till the tomatoes become mushy. Add the coriander powder and the red chilli powder. Add the other veggies-potato cubes, brinjal cubes, chopped palak leaves, chopped chuka leaves and mix nicely. Add the chana dal. Add one cup of water and salt. Mix nicely and pressure cook on high heat for one whistle. Reduce the heat and cook for another6-7 minutes. Once the steam goes off remove the lid. Remove the potatoes cubes and mash the remaining bhaji with the back of a round spoon or a masher. This helps to mash the chana dal and palak leaves and the bhaji becomes homogenous. Put back the potato pieces.
If you want to serve Sai Bhaji with Roti ,evaporate some water to thicken it. With rice it can be serve a little liquidish.
Share this:

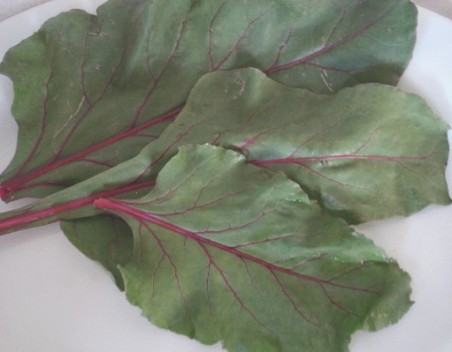
All things Beet
Previously I would buy only the Beet-root without the greens. After seeing Asha’s Dal saag recipe, I was inspired to buy Beet greens along with the Beetroot. Thanks Asha for the inspiration.
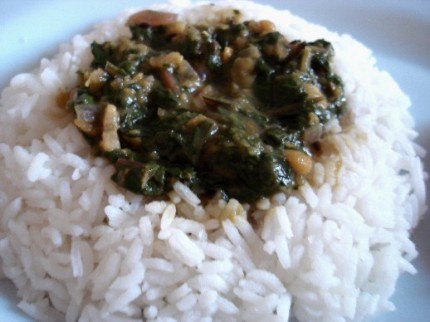
I have made my own version of the dal.I have used the Beet greens along with three types of dals; Chana Dal, Mung Dal and Toovar dal to make this very healthy and delicious Beet greens dal.
I used some of the leaves to make paratha for my little one J
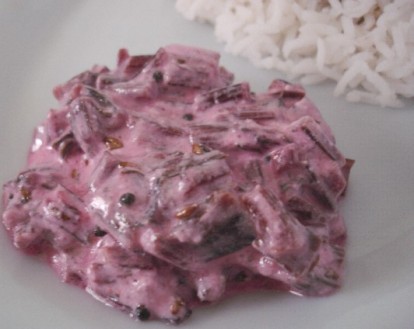
The pink-red stems of the Beet greens were looking so fresh and lovely that I didn’t have a heart to throw them away, which I later realized was a very wise decision! I made a delicious and refreshing Raita with them, which complimented the Dal-Rice combination.
I made Beetroot Kanji with the Root.
After making the Dal and Raita, I had a sense of satisfaction –that of utilizing most of the parts of the Beet, not wasting much (except the beetroot peels). J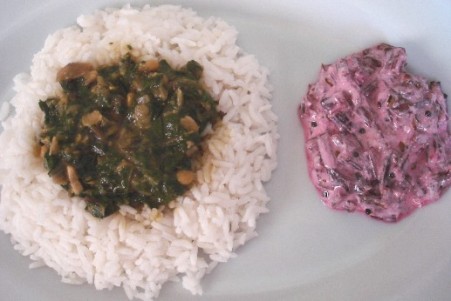
__________________________________________________________
Beet greens Dal recipe
Servings :4-5 _____________________________________________________
Ingredients:
1 ½ cup chopped Beet greens
½ cup Chana Dal
½ cup Moong da
l½ cup Toovar Dal
1 onion chopped
4-5 green chillies chopped
5-6 garlic cloves peeled and finely chopped
½ tsp cumene seeds ½ tsp mustard seeds¼ tsp turmeric powder
2 tsp oil
Wash the dals , add water, a pinch of turmeric powder and few drops of oil. This helps to cook the dals faster. Pressure cook till well done. Boil about 1 cup water in a vessel, add the beet greens and cook on a low flame till the greens are soft and well cooked.Add the cooked dals to these greens. Add salt and mix nicely.Heat oil in another pan. Add the cumene seeds, mustard seeds, garlic and chopped onion and fry nicely till the onion turns golden brown. Add the green chillies.To this add the Beet greens-dal mixture and cook for a few seconds more.
Serve hot with rice.
__________________________________________________________
Beet stem raita recipe
Servings :about 2-3 __________________________________________________________
Wash the Beet stems thoroughly (I had about7-8 young stems). Peel the thin skin from the stems. Steam the stems. (I put it in the pressure cooker along with the rice and the dals)Cool and chop the stems. Add about ½ cup Curd/yoghurt to this, salt as per taste and about ¼ tsp sugar and mix nicely.In a small pan heat 2 tsp oil, add ½ tsp cumene seeds, ½ tsp mustard seeds, 2-3 chopped green chillies. Add this tadka to the yoghurt raita. Mix nicely and chill.Serve with roti or dal-rice or have it as it is.
_____________________________________________________
And that’s my little one’s paratha made with Beet greens!

Share this:

Ambadichi Bhaji (Sour greens curry)
Ambadichi Bhaji (Sour greens curry)
Type Comfort in MS word, select it, right click and see the synonyms: Soothe , console, reassure, calm, relieve ..This Ambadichi Bhaji (Sour greens/Gongura curry) makes every synonym for comfort sound true:
½ Soothes your palette
½ Consoles you when you are feeling low
½ Reassures you when you dearly miss your mom’s cooking
½ Calms you down when you are upset
½ Relieves your stress
Yes this is one of the recipes I rely on when I am in need of some ‘Comfort food’ (of course provided the greens are available).

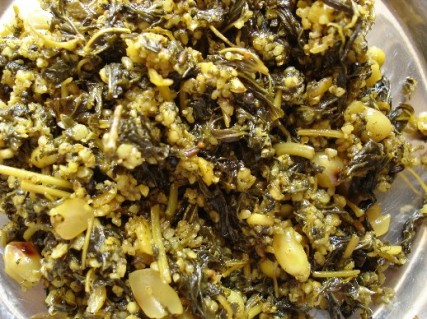
Ambadi/sour greens/Gongura leaves
Ambadi leaves are sour -almost vinegary to taste. But this tartness is what makes them so tasty and special. I read here that these greens come in two varieties- Red stemmed and Green stemmed. Here we usually get the green stemmed variety, so I have used that. What makes this a quintessentially Maharashtrian recipe is the use of Jowar Kani (broken Jowar grains). The Ambadi leaves are stemed together with the Jowar Kani to make this very special Ambadichi bhaji -which makes me nostalgic and reminds of my mom’s or my granny’s cooking each and everytime I make it.
__________________________________________________________
Ambadichi Bhaji
Servings :about 3-4
____________________________________________________
Ingredients:
1 big bunch Ambadi leaves (cleaned,washed and chopped)
1 cup Jowar (Sorghum/White millet) grains
2tbsp Toovar dal (arhar dal/yellow lentils), soaked in water for ½ hour
2tbsp Peanuts soaked in water for ½ hour
Salt as per taste
For the tadka:
8-10 garlic cloves peeled and crushed
2-3 tsp oil
½ tsp cumene seeds
½ tsp mustard seeds
1-2 tsp Red chilli powder (adjust to your taste)
To make the Jowar Kani:

Jowar Kani/Broken Jowar Grains
Coarsely grind the Jowar grains in the mixer for few seconds. Tranfer to a sieve (used to sieve atta or Maida). Remove the powder which falls at the bottom (this flour can be added to the usual jowar flour for making Bhakris, or add this to the usual Roti atta)Use the broken jowar kani which remains in the sieve to make Ambadichi Bhaji. If any unbroken jowar grains are left in the sieve, run them once again in the mixer and repeat the above procedure. Soak the Jowar Kani in water for ½ hour along with the Toovar dal and peanuts.
To make the Bhaji:
Steam the chopped Ambadi leaves and the soaked Toovar dal, Peanuts and Jowar Kani. For steaming I use a stainless steel sieve kept on a steamer-a deep vessel filled with 1/3 water. Alternatively you can use a pressure cooker without the whistle. Cover the sieve and steam till the leaves are well cooked (takes about half an hour)
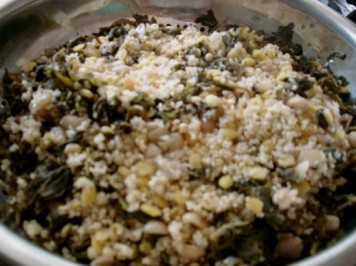
Ambadi leaves,soaked Jowar Kani,Toovar dal and peanuts in SS sieve for steaming
Remove the bhaji from steam,add salt and mix nicely. In a small pan heat oil ,add the mustard seeds, then the cumene seeds,then the crushed garlic. Fry nicely till your kitchen smells of the garlic, switch off the gas ,add the chilli powder and immediately pour this tadka on the bhaji so that the red chilli powder does not get charred.Mix nicely and serve with Bhakri or Roti!
Share this:

Pudina Tofu stir fry (Minty Tofu stir fry)
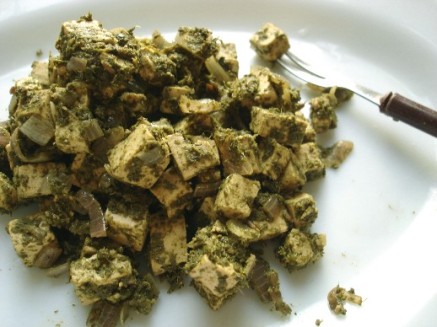
I happened to ‘accidentally’ discover this recipe. I happened to dip a piece of Tofu in green chutney (made for Bhel / Sev Puri) and it tasted quite good! And thus was born ‘Pudina Tofu stir fry’ :). Now it has become a common recipe in our house since it is quite easy to make. Proteinaceous tofu is marinated with herby Pudina-coriander chutney to make this nutritious, healthy, flavourful and tasty recipe. Another advantage from health point of view is that this recipe requires very little oil!
It is called ‘Pudina Tofu stir fry’ for the sole reason that I wanted to participate in Nupur’s A to Z of Indian vegetables and this week’s letter happens to be ‘P’. Nupur this recipe is for you and your wonderful effort with the A to Z of Indian vegetables.
_________________________________________________________
Pudina Tofu stir fry recipe
For about 2-3 servings ____________________________________________________
Ingredients:
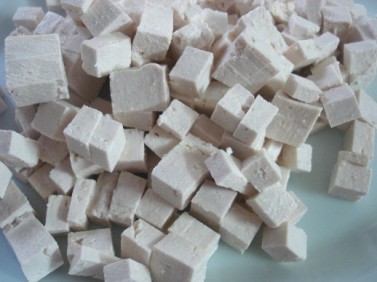
Firm Tofu about 250gm or about 3 cups finely cubed
1 onion finely chopped
½ tsp cumene seeds
½ tsp Chaat Masala (optional)
2 tsp lime juice
Salt to taste
To be ground to a fine paste:
1 small bunch Pudina (mint ) leaves washed
1 small bunch coriander leaves washed
4-5 green chillies chopped
pinch of salt
Procedure:
Grind the Pudina, coriander, green chillies along with a pinch of salt to a smooth paste. Add the tofu pieces to this Pudina paste in a bowl and mix well. Keep it aside for about ½ an hour for marination. In a wok heat oil, add the cumene seeds and then the chopped onion. Fry till the onion turns translucent and add the marinated tofu pieces and mix nicely. Adjust the salt if required and turn off the gas stove, don’t cook for more than a minute.Just before serving sprinkle some chaat Masala and lime juice. Serve with Roti or this stir fry can be eaten as it is as a light lunch!


